
The corrector type is recognized by visual inspection of the distributor. If only the vacuum hose is visible, going to the circular diaphragm located on the distributor, then the system uses a purely vacuum corrector. The presence of two hoses indicates the use of two methods of correction.
Uninstall and install
1. Using a marking tape, disconnect the wires going to the spark plugs from the distributor cap and remember the sequence of their connection, for subsequent connection in the same order. There is a label on the factory distributor caps indicating the wire going to the first cylinder.
2. Locate and disconnect the vacuum hose, primary wire and high voltage cable. On some early models, these wires are disconnected at the coil. Find and disconnect all external wires from the distributor.
3. Unscrew the fixing bolts and remove the distributor from the shaft head.
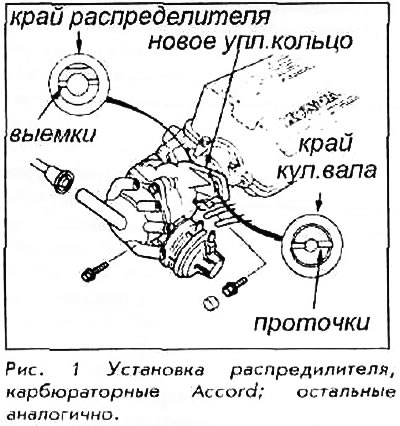
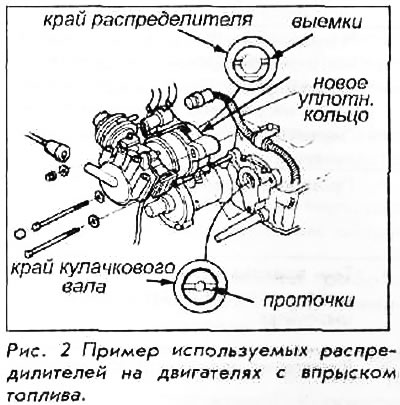
4. Remove from the camshaft and remove the O-ring.
Distributor installation:
5. Using a new O-ring, install it on the distributor shaft and cover with a thin film of clean oil.
6. The drive teeth at the end of the distributors are slightly offset to match the offset at the end of the camshaft. Assess the approximate alignment of the distributor axis, and then place it in place.
The distributor will only engage the cam in the correct position. This design allows the valve to mount correctly regardless of the position of the engine, even if the engine has been offset from the valve.
7. Check that the drive teeth are properly engaged and that the O-ring is in place. Install the retaining bolts in the center of the fasteners and it will be enough to turn them slightly to secure the distributor.
8. Connect the distributor external wiring and spark plug wires. Double check the connection is correct.
9. Start engine and advance. Tighten the distributor mounting bolts to failure.