
Replacement is made on the starter removed from the car.
Type Nippon Denso
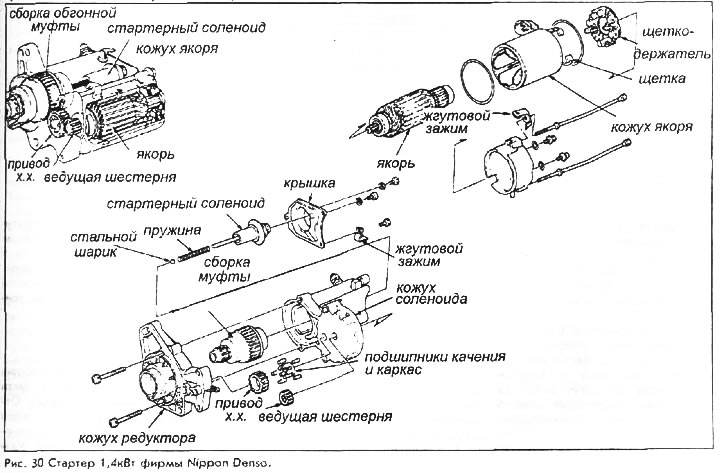
This starter has a duplicate reduction gear set, which occupies a solid volume, and the solenoid is often placed inside the starter.
1. Remove the back cover of the solenoid. Remove the solenoid. There is a spring on its axis, and a steel ball at the end of the axis.
2. Remove the bolts securing the end frame to the motor and solenoid housing.
3. Remove the end frame. The freewheel assembly can now be removed along with the drive gear. Idler pulley and drive gear can be removed separately. The idler gear has five ball bearings.
4. The coupling assembly is held in place by a ring clamp. Push down on the gear against the internal spring and remove the expander o-ring. Remove thrust ring, gear, spring and washer from clutch assembly. For installation:
5. Assemble the clutch components and install the ring clamp.
6. Install gears and clutch assembly. Make sure the five ball bearings are correctly positioned.
7. Install the end frame.
8. Install middle bolts.
9. Install the solenoid. Pay attention to the correct installation of the steel ball at the end of the axle and spring. All sliding surfaces of the solenoid should be lightly covered with a thin layer of grease before installation.
Mifsuba type
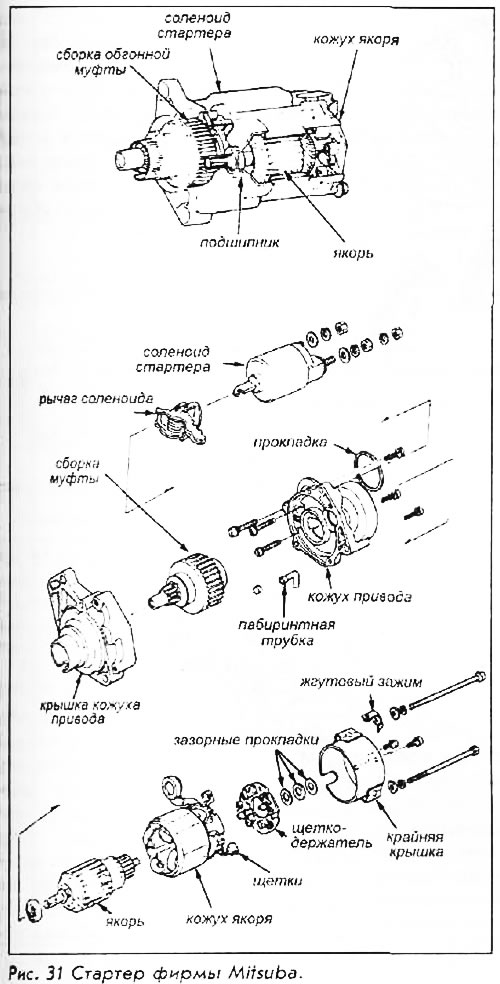
1. Remove the three solenoid retaining screws from the front of the mechanism (from the casing cover). Separate the solenoid from the armature plane to disengage from the solenoid arm; remove it and the gasket. Remove any remaining screws holding the mechanism case.
2. Loosen the bolts securing the end frame and armature housing to the drive housing, then remove the transmission housing cover and housing itself, leaving the armature, brushes and bearings assembled.
3. At the back, remove the three screws holding the cover to the shroud. Remove the casing cover. Now completely remove the freewheel assembly with drive gear and solenoid arm. Be careful not to knock or lose the labyrinth tube and its rubber seal.
4. Check the coupling assembly by moving it along the shaft. If the movement is not free and smooth, or if the clutch does not adequately prevent counterclockwise rotation (viewed from the side of the main drive gear), replace it.
Starter installation:
5. Assemble the freewheel assembly and solenoid arm.
6. Install the cover and secure it with screws.
Assemble the assembly at the end frame and secure it with bolts.
Install the solenoid by properly positioning and engaging the solenoid arm.
Install external mounting screws.