HondaBook.ru
Auto companies Volkswagen Auto companies Ford Auto companies Lada Auto companies Skoda Auto companies BMW Auto companies Mazda Auto companies Peugeot
English Русский
Български
Беларускі
Український
Српски
Hrvatski
Română
Polski
Slovenský
Magyar
Bookmark Contacts Sitemap   


Accord Civic Fit / Jazz CR-V HR-V Others Articles
Avancier 1 (1999-2003, petrol)

Seals — assembly (Honda Avancier 1)

  • Main
  • Honda
  • Avancier 1 (1999-2003, petrol)
  • Transmission
  • Drive shafts and differential
  • Seals — assembly
0
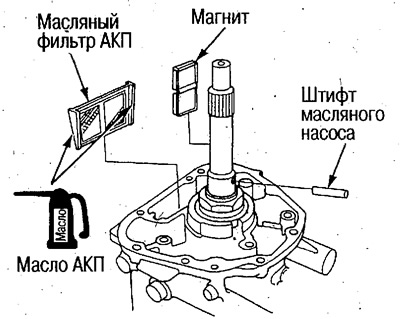
1. Install the oil pump pin, magnet and automatic transmission oil filter to the differential housing assembly.

1. Install the oil pump pin, magnet and automatic…


Caution: Before installing the oil filter, apply automatic transmission oil to its rubber surfaces.


2. Install the oil pump housing assembly.
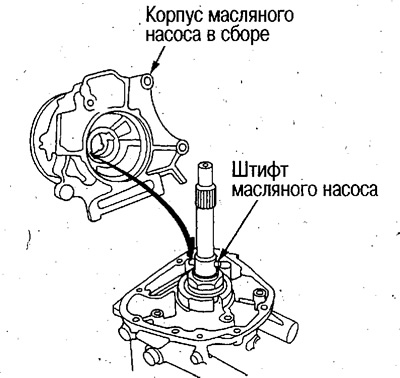
2. Install the oil pump housing assembly.


Caution: Align the groove in the oil pump housing with the pin.


3. Tighten the oil pump mounting bolts, and then install the oil pump drive shaft and thrust needle bearing.
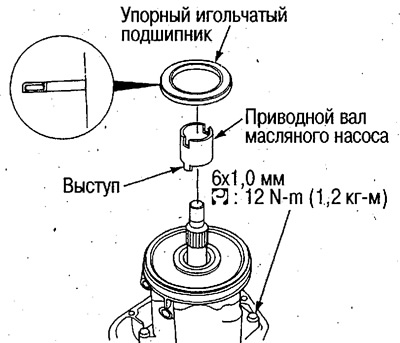
3. Tighten the oil pump mounting bolts, and then…


Caution: Align the tabs on the drive shaft with the grooves in the oil pump.


4. Install the pressure plate.
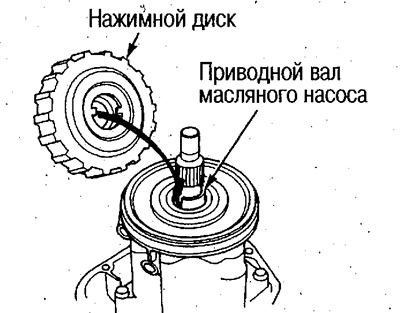
4. Install the pressure plate.


Caution: Align the tabs on the pressure plate with the grooves on the oil pump drive shaft.


5. Install the clutch hub/plates/discs, then install the clutch guide and 30mm adjusting washer.
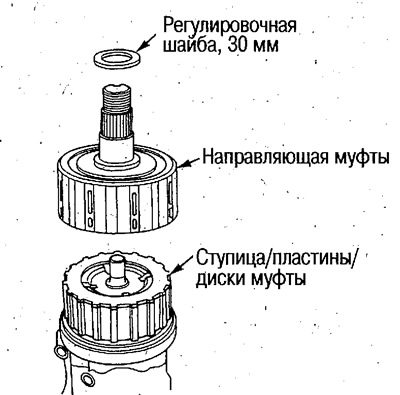
5. Install the clutch hub/plates/discs, then…


Place the hub/plate/clutch disc projections in one row.

6. Apply sealant to the sealing surfaces of the differential-torque distributor housing.
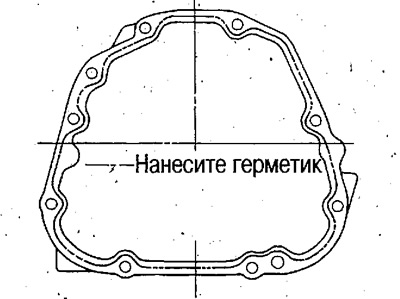
6. Apply sealant to the sealing surfaces of the…


Attention:
  • Use Honda 1216 sealant.
  • Remove old sealant, dirt and oil from sealing surfaces.
  • If more than 20 minutes have passed since applying the sealant, do not perform assembly. Reapply the sealant.
  • Add oil 30 minutes or more after assembly.


7. Install the pins and then install the torque distributor differential housing 1.


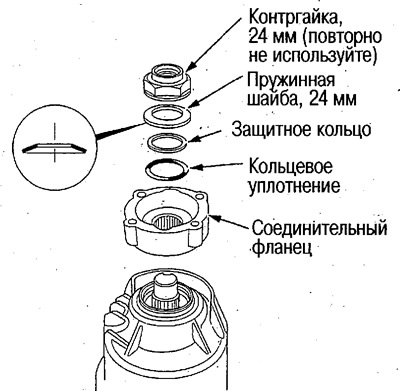
8. Install the connecting flange, spring washer (24 mm) and tighten the lock nut (24 mm).
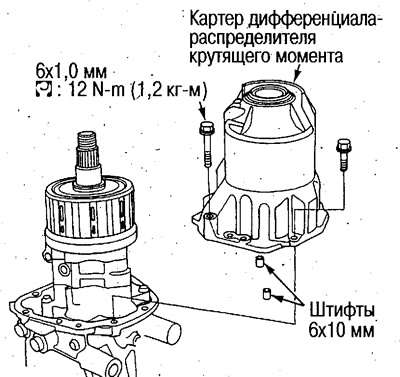
8. Install the connecting flange, spring washer…

Caution: Pay attention to the installation direction of the spring washer.


9. Using the special tool, tighten the lock nut to the required torque.
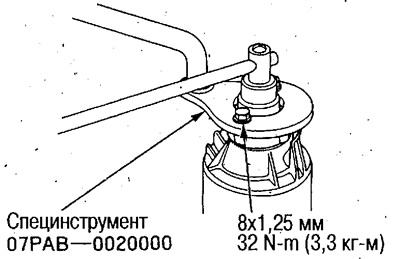
9. Using the special tool, tighten the lock nut…


147 N·m (15 kg·m)

10. Coal the locknut.


11. Connect the breather hose.
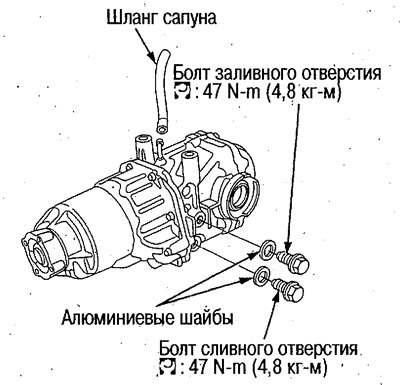
11. Connect the breather hose.


12. Tighten the filler and drain hole bolts.
This article is available at: russian, bulgarian, belarusian, ukrainian, serbian, croatian, romanian, polish, slovak, hungarian
This information has been verified: Emil Safonov
Share with friends:
◀ Previous
Avancier 1: Drive shafts and differential
Next ▶

Seals — disassembly
Seals — replacement
Differential housing
Rear Differential Component Locations
Removal and installation the rear differential
 
See also other articles from Honda manuals:
Valve springs and valve stem seals Honda Accord 3 (1985-1989)
Valve springs, plates and seals — replacement Honda Civic 3 and 4 (1983-1991)
Removal valves, springs and seals Honda CR-V 2 (2002-2006, petrol)
Valves, springs and seals — removal Honda HR-V 1 (1998-2006, petrol)
Link in different formats to this article
Comments and feedback from visitors
No comments yet


How much will 50 + 25 ?


Avancier 1 (1999-2003, petrol) 
  • General information
  • Controls and instruments
  • User manual
  • Power unit
  • Engine maintenance
  • Engine repair
  • Cooling system
  • Engine management
  • Power and exhaust system
  • Transmission
  • Automatic gearbox
  • Drive shafts and differential
  • Chassis and running gear
  • Steering
  • Car suspension
  • Brake system
  • Body and interior
  • Doors, locks and windows
  • Interior (internal elements)
  • Exterior (external elements)
  • Air conditioner
  • Electrical equipment
  • Power devices
  • Equipment and devices
  • Headlights and lighting
  • Electrical circuits
HondaBook.ru © 2018–2026 • Mobile version • Sitemap: EN BG BY UA RS HR RO PL SK HU • Feedback • Driver Information • Search system • Bookmark
Accord 3 (1985-1989) • Accord 6 (1997-2002) • Civic 3 and 4 (1983-1991) • Civic 5 and 6 (1991-2000) • Civic 6 (1995-2000) • Civic 7 (2000-2005) • Civic 8 (2005-2011) • Fit 1 (2001-2008) • CR-V 1 (1995-2001) • CR-V 2 (2002-2006) • HR-V 1 (1998-2006) • Avancier 1 (1999-2003) •
 
This website uses cookies to ensure proper functioning. By clicking "OK," you agree.