HondaBook.ru
Auto companies Volkswagen Auto companies Ford Auto companies Lada Auto companies Skoda Auto companies BMW Auto companies Mazda Auto companies Peugeot
English Русский
Български
Беларускі
Український
Српски
Hrvatski
Română
Polski
Slovenský
Magyar
Bookmark Contacts Sitemap   


Accord Civic Fit / Jazz CR-V HR-V Others Articles
Avancier 1 (1999-2003, petrol)

Front Drive Shafts — Assembly (Honda Avancier 1)

  • Main
  • Honda
  • Avancier 1 (1999-2003, petrol)
  • Transmission
  • Drive shafts and differential
  • Front Drive Shafts — Assembly
0
Contents: From the inner hinge side ⇊ From the splines of the left hinge ⇊ From the outer hinge side ⇊
Attention.
  • Wash all components except rubber with flushing oil and blow with an air gun.
  • Install Omega type clamps on the outer hinge covers.
  • Lubricate the hinges and boots with the recommended grease.
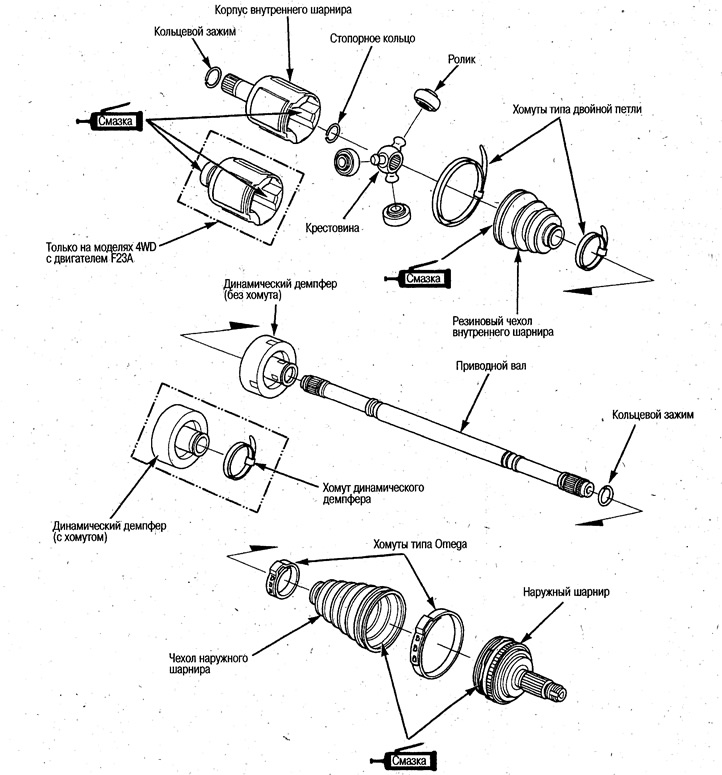

Lubricate the hinges and boots with the…


From the inner hinge side


1. To avoid damaging the cover, wrap the splines of the drive shaft with vinyl tape.

2. Install the inner hinge cover.

3. Remove the vinyl tape.
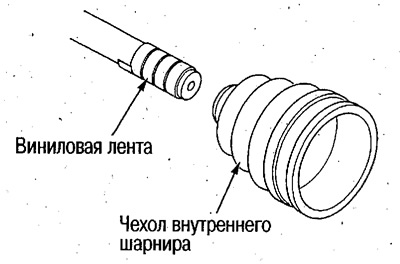
3. Remove the vinyl tape.


4. Install the crosspiece on the drive shaft according to the marks and install the ring clamp.
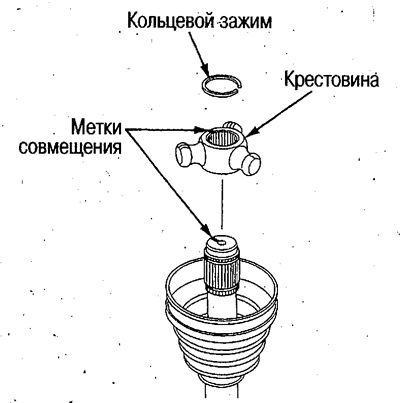
4. Install the crosspiece on the drive shaft…


5. Install the rollers on the crosspiece according to the marks. Watch the directions of the rollers.
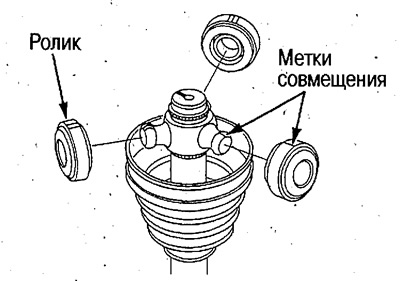


5. Install the rollers on the crosspiece…


6. Apply grease to the hinge and boot.
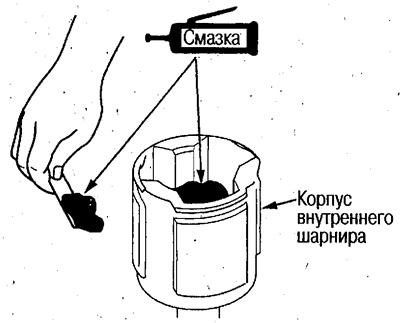
6. Apply grease to the hinge and boot.


Recommended lubricant:

NIPPON OIL CO., LTD. US131-15BS №1

Quantity:
  • 2WD models: 130-140 g
  • 4WD models: 150-160 g

From the splines of the left hinge


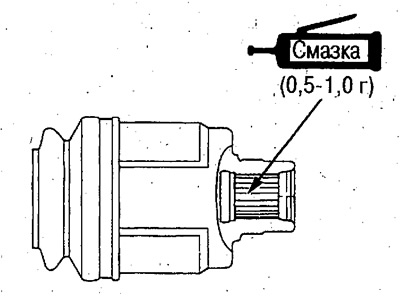
Recommended lubricant:
  • JOINT OILCS №1
  • Quantity: 0.5-1.0 g

Quantity: 0.5-1.0 g


7. Align the marks and install the crosspiece with the rollers into the hinge housing. Make sure that they do not fall out. Put the cover on the hinge.
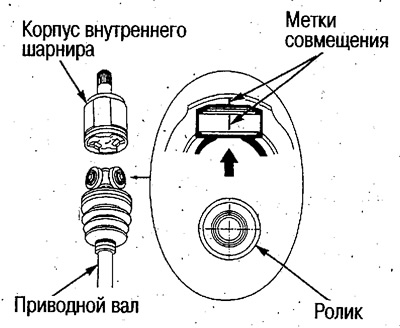


7. Align the marks and install the crosspiece…


Caution: If the drive shaft is turned with the hinge facing down after assembly, the hinge may fall out.


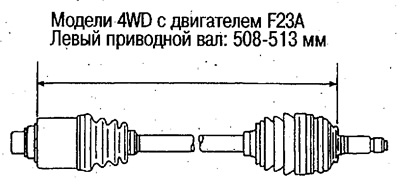
8. Select the position of the inner hinge so that the distance between the hinges corresponds to the dimensions shown in the figures.
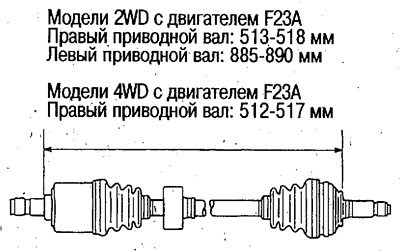
8. Select the position of the inner hinge so that…

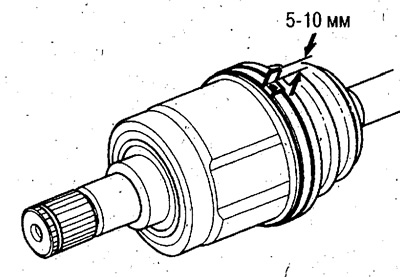
9. Put on the cover as shown in the picture.
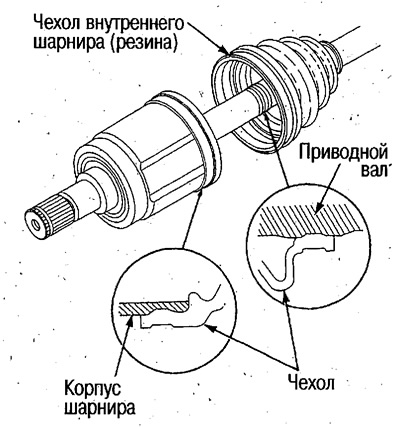
9. Put on the cover as shown in the picture.


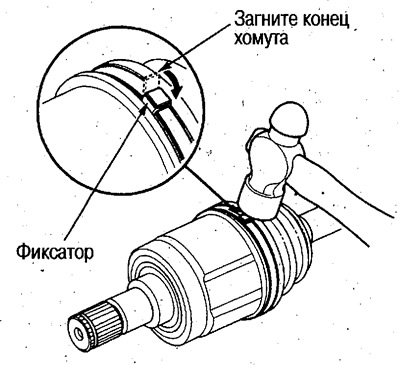
10. Pass the end of the clamp strap through the retainer twice, winding it in the direction of rotation of the drive shaft while moving the vehicle forward.
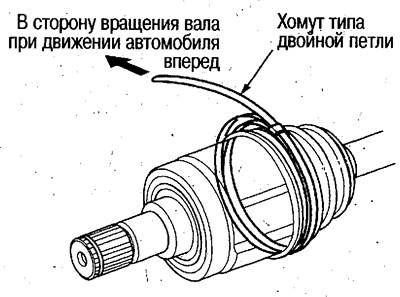


10. Pass the end of the clamp strap through the…


11. Pull the tape so that it fits snugly against the cover.

12. Place a mark on the tape at a distance of 10-14 mm from the end of the retainer.
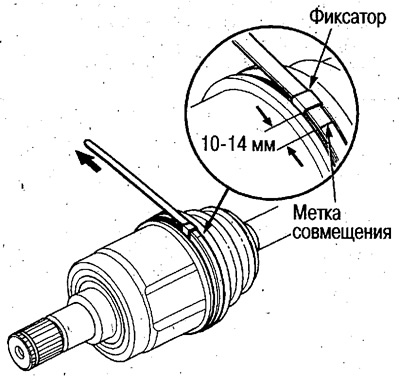
12. Place a mark on the tape at a distance of…


13. Pass the free end of the strap through the front end of the clamp tightening tool and into the slot in the axle.

14. Rotate the axle so that the mark aligns with the end of the retainer.
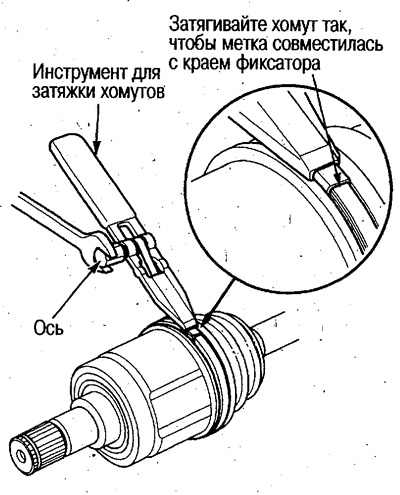
14. Rotate the axle so that the mark aligns with…


15. Bend the end of the tape approximately 90° towards the retainer by lifting the tool.


16. Using a punch, mark the center of the retainer.

17. Loosen the axis rotation tape and remove the tool from the clamp.

18. Trim the excess tape, leaving a 5-10 mm long end protruding from the retainer.

19. Bend the end of the tape and hit it with a hammer.
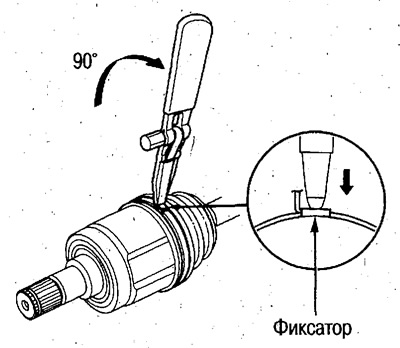
19. Bend the end of the tape and hit it with a…

19. Bend the end of the tape and hit it with a…


20. Install a new ring clamp onto the inner joint.
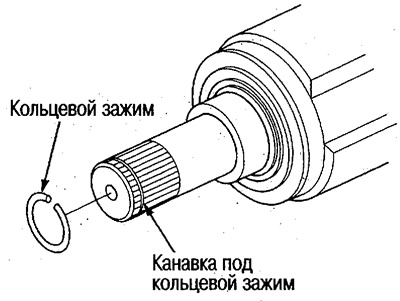


20. Install a new ring clamp onto the inner joint.


21. Make sure the clamp is not loose and remove grease from the outer surfaces of the boot and drive shaft.

From the outer hinge side


1. To avoid damaging the boot, wrap the drive shaft splines with vinyl tape.

2. Install the outer joint boot onto the drive shaft and install the Omega type clamps.
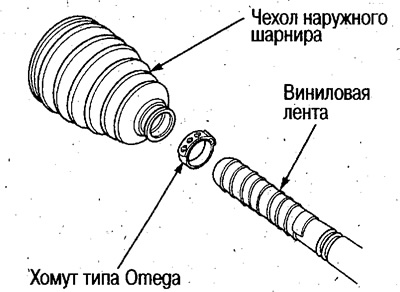
2. Install the outer joint boot onto the drive…


If you install the clamps after assembling the outer hinge, they may become deformed, so install the clamps into the grooves of the boot in advance.

3. Remove the vinyl tape.

4. Install the snap ring into the groove of the drive shaft.
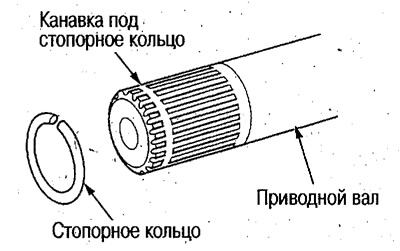
4. Install the snap ring into the groove of the…


5. Insert the drive shaft into the outer joint until it stops.
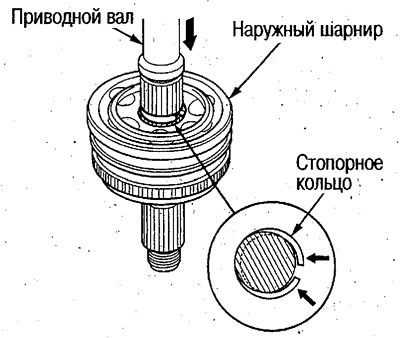
5. Insert the drive shaft into the outer joint…


6. Hold the drive shaft and joint and tap them on a hard surface from a height of about 10 cm under their own weight.
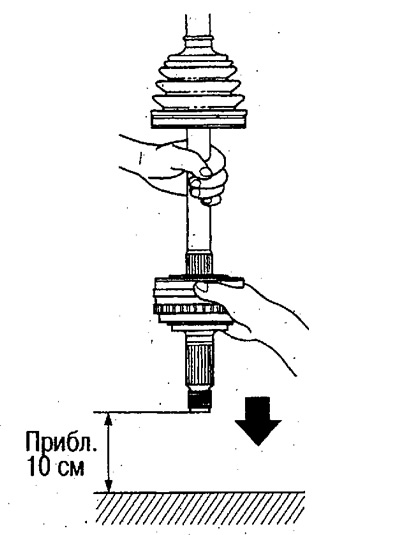
6. Hold the drive shaft and joint and tap them on…


Attention:
  • To avoid damaging the drive shaft, place a cloth on a hard surface.
  • Do not use a hammer.


7. Place a ruler and make sure that the mark on the drive shaft is aligned with the end of the outer joint.
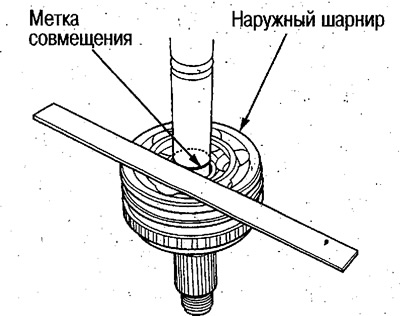
7. Place a ruler and make sure that the mark on…


8. Apply grease to the hinge and boot.
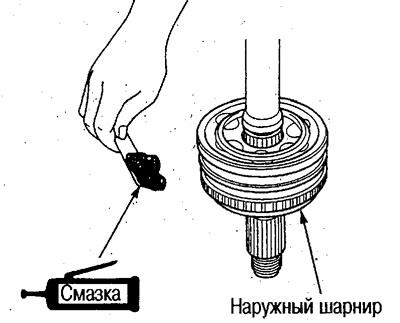
8. Apply grease to the hinge and boot.


Recommended lubricant:
  • NIPPON OIL CO.,LTD. U1651-62
  • Quantity (2WD): 135-145 g

9. Place the boot on the drive shaft and joint as shown in the figure.
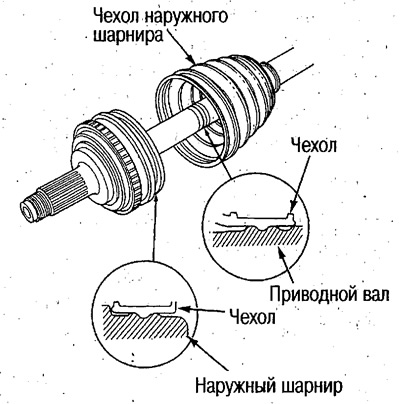
9. Place the boot on the drive shaft and joint as…


10. Install the Omega clamps and hook the clips into the holes.
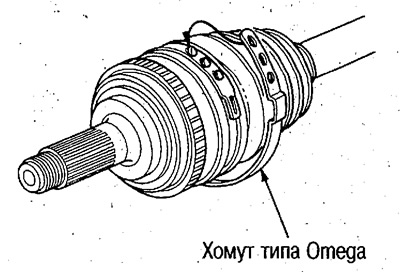
10. Install the Omega clamps and hook the clips…


11. Using pliers, tighten the Omega type clamps.
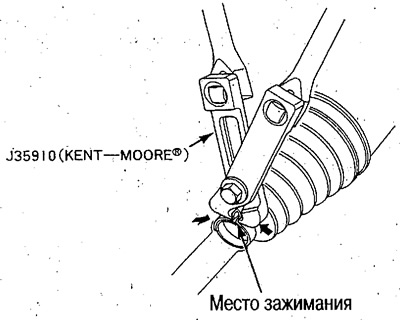
11. Using pliers, tighten the Omega type clamps.


12. Make sure the "Omega" section of the clamp has the dimensions shown in the figure.
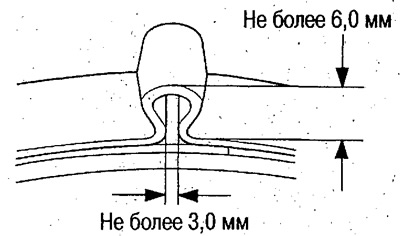
12. Make sure the «Omega» section of the clamp…


13. Remove grease from the outer surfaces of the boot and drive shaft.
This article is available at: russian, bulgarian, belarusian, ukrainian, serbian, croatian, romanian, polish, slovak, hungarian
This information has been verified: Emil Safonov
Share with friends:
◀ Previous
Avancier 1: Drive shafts and differential
Next ▶

Front Drive Shafts — Dynamic Damper Replacement
Front Drive Shafts — Disassembly
Front Drive Shafts — Removal
Drive shafts — check
Front Drive Shafts — Installation
Intermediate Shaft (4WD Models) — Removal
Intermediate Shaft (4WD Models) — Disassembly
Intermediate Shaft (4WD Models) — Assembly
Intermediate Shaft (4WD Models) — Installation
See also other articles from Honda manuals:
Removal and installation drive shafts Honda Accord 6 (1997-2002)
Front Drive Shafts — Removal Honda Civic 7 (2000-2005)
Front Drive Shafts — Removal Honda Fit 1 (2001-2008)
Removal the front drive shafts Honda CR-V 2 (2002-2006, petrol)
Checking drive shafts Honda HR-V 1 (1998-2006, petrol)
Link in different formats to this article
Comments and feedback from visitors
No comments yet


How much will 31 + 15 ?


Avancier 1 (1999-2003, petrol) 
  • General information
  • Controls and instruments
  • User manual
  • Power unit
  • Engine maintenance
  • Engine repair
  • Cooling system
  • Engine management
  • Power and exhaust system
  • Transmission
  • Automatic gearbox
  • Drive shafts and differential
  • Chassis and running gear
  • Steering
  • Car suspension
  • Brake system
  • Body and interior
  • Doors, locks and windows
  • Interior (internal elements)
  • Exterior (external elements)
  • Air conditioner
  • Electrical equipment
  • Power devices
  • Equipment and devices
  • Headlights and lighting
  • Electrical circuits
HondaBook.ru © 2018–2026 • Mobile version • Sitemap: EN BG BY UA RS HR RO PL SK HU • Feedback • Driver Information • Search system • Bookmark
Accord 3 (1985-1989) • Accord 6 (1997-2002) • Civic 3 and 4 (1983-1991) • Civic 5 and 6 (1991-2000) • Civic 6 (1995-2000) • Civic 7 (2000-2005) • Civic 8 (2005-2011) • Fit 1 (2001-2008) • CR-V 1 (1995-2001) • CR-V 2 (2002-2006) • HR-V 1 (1998-2006) • Avancier 1 (1999-2003) •
 
This website uses cookies to ensure proper functioning. By clicking "OK," you agree.