
Withdrawal
1. Disconnect both wires from the battery (first negative). Remove the battery and its support tray (see chapter Engine electrical equipment).
Attention! If the stereo system installed in the car is equipped with a security code, before disconnecting the battery, make sure that you have the correct combination to activate the audio system!
2. Remove the air intake sleeve and air cleaner cover (see chapter Power and exhaust systems).
3. Disconnect the starter wiring and remove the last (see chapter Engine electrical equipment).
4. Disconnect the transmission ground bus and the electrical wiring of the sensor-switch of the reversing lights (see Section Check and replacement of the gauge-switch of reversing lights). Disconnect the wiring harness clamp from the transmission case.
5. Engage reverse gear.
6. Disconnect from a box driving cables of a choice and a gear change (see Section Removal and installation of a drive and the gear lever).
Note. There is no need to release the cables from the support brackets.
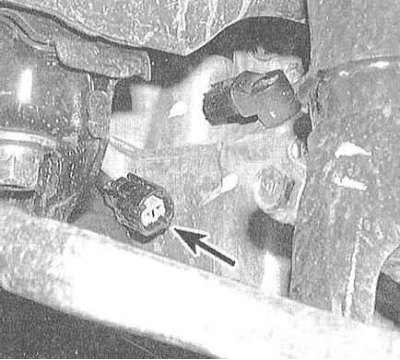
7. Disconnect wiring from speed sensor (VSS).
8. Remove the nipple assembly connecting the hydraulic hose of the clutch drive to the pressure hydraulic line. Remove pressure line and clutch slave cylinder with push rod (see chapter Clutch and drive shafts).
Attention! Take care not to bend or twist the pressure line (after disconnecting, immediately tie it up with wire). Do not depress the clutch pedal with the slave cylinder removed.
9. Turn out bolts of fastening of an arm of a forward support of the power unit to the block of the engine, remove a mounting bracket of a back support (see chapter Engine).
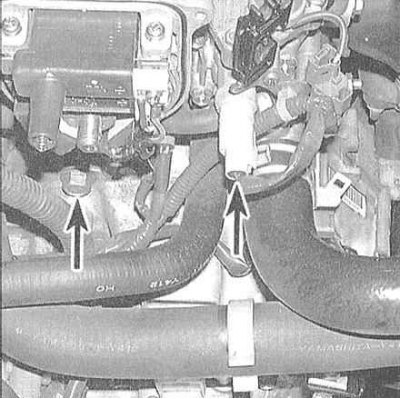
10. Release the wiring harness from the clamps and unscrew the two upper gearbox mounting bolts.
11. Loosen the front wheel nuts, jack up the car and place it on jack stands. Hang the power unit from above with a winch, or a beam laid over the edges of the hood.
12. Remove the front wheels.
13. Remove the crankcase protection.
14. Drain gear oil (see chapter Settings and ongoing maintenance).
15. Disconnect the lower suspension arms from the steering knuckle assemblies, then release the damper forks from the lower arms (see chapter Suspension and steering).
16. Release the left drive shaft from the intermediate shaft, and the right drive shaft from the transmission (see chapter Clutch and drive shafts). Tie the drive shafts with wire to the suspension elements, being careful not to let them hang on the outer CV joints. Wrap the hinge assemblies in plastic bags to keep dirt out.
17. Loosen the bearing support and release the intermediate shaft from the left side of the gearbox (see chapter Clutch and drive shafts).
18. Remove the right damper fork pinch bolt and separate the latter from your shock absorber (see chapter Suspension and steering).
19. Remove the mounting bolts from both push rods (see chapter Suspension and steering).
20. Release the power steering hydraulic line from the holders on the subframe.
21. Remove the subframe assembly, having previously marked the position of the latter relative to the chassis.
22. Remove the clutch access cover or powertrain amplifier assembly.
23. Remove the intake manifold mounting bracket.
24. Expand the inner CV joint of the right drive shaft so that it does not interfere with the dismantling of the box.
25. Jack up the transmission (as special as possible), fixing it on the head of the latter with a safety chain.
Note. Special transmission attachments are available for the head of the floor jack. Raise the gearbox, finally unloading its supports.
26. Remove the transmission support with its bracket (see chapter Engine). Unscrew the threaded stud from the gearbox housing.
27. Turn out bolts of fastening of transmission over an intermediate shaft and near to a location of the executive cylinder of a drive of coupling. Turn out two bolts of arms of support of the power unit.
28. Finally make sure to disconnect all reinforcing lines and wiring harnesses, then, moving the jack, carefully separate the transmission from the engine. Having completely released the input shaft of the manual transmission from the clutch assembly, remove the box from under the car.
29. After removing the box, access to the clutch components opens up, the condition of which, taking this opportunity, should be checked immediately. Usually, when removing a manual transmission, it is customary to replace the clutch (see chapter Clutch and drive shafts).
Installation
1. If removed, reinstall clutch components (see chapter Clutch and drive shafts).
2. Jack up the transmission as you did during removal, and carefully slide it under the vehicle, lifting it to its original position behind the engine. Gently engage the input shaft with the splines of the hub of the clutch disc, make sure that the guide pins fall into the mating holes in the mating surface of the engine. Never use force - if the input shaft does not enter the clutch disc hub, adjust the angle of the gearbox and slightly rotate the shaft, achieving the correct alignment of the splines.
3. Screw in the lower bolts of the manual transmission to the engine, as well as the bolts of the rear support bracket. Tighten fasteners to the required torque.
4. Screw in the threaded rod and install the transmission support with bracket. Tighten the mount-to-body bolts, loosely tightening the through bolt, then tighten the three bracket-to-transmission housing nuts. Finally, tighten the through-bolt of the support with the required force (see Specifications to Chapter Engine).
5. Reinstall the subframe, making sure that the landing marks applied during the dismantling process are aligned correctly. Tighten fasteners to the required torque. Secure the power steering hydraulic line in the clamps on the subframe.
6. Reinstall the powertrain booster assembly and intake manifold mounting bracket.
7. Reinstall the intermediate and drive shafts. Don't forget to replace the halt fasteners (see chapter Clutch and drive shafts).
8. Connect the suspension push rods to the lower arms, install the damper forks, then connect the lower arms to the steering knuckles (see chapter Suspension and steering).
9. Reinstall the crankcase guard and front wheels, then lower the vehicle to the ground.
10. Further installation is carried out in the reverse order to the dismantling of the relevant components.
11. Fill the gearbox with the required amount of gear oil of the required grade (see chapter Settings and ongoing maintenance).
12. Bleed the clutch hydraulic system (see chapter Clutch and drive shafts) and make sure that the assembly of the latter is working properly.
13. Carry out road tests of the car, checking the correct operation of the manual transmission. Inspect the power unit for signs of fluid leaks.
14. If vibration occurs, loosen and re-tighten the fasteners of the power unit supports (see chapter Engine).
15. Adjust the front wheel alignment.