
HondaBook.ru
Auto companies Volkswagen Auto companies Ford Auto companies Lada Auto companies Skoda Auto companies BMW Auto companies Mazda Auto companies Peugeot
English Русский
Български
Беларускі
Український
Српски
Hrvatski
Română
Polski
Slovenský
Magyar
Bookmark Contacts Sitemap   


Accord Civic Fit / Jazz CR-V HR-V Others Articles
Accord 3 (1985-1989) Accord 6 (1997-2002)

Removal and installation rack and pinion gear (Honda Accord 6)

  • Main
  • Honda Accord
  • 6 (1997-2002)
  • Chassis and running gear
  • Steering
  • Removal and installation rack and pinion gear
0
Contents: Removal ⇊ Installation ⇊
Warning! The models of vehicles covered in this manual are equipped with a supplemental restraint system (SRS). Before performing any work near the air bag unit, steering column or instrument panel, turn off the SRS to avoid injury from accidental deployment (see Chapter On-board electrical equipment). The SRS circuit wiring is easily identified by its yellow insulation. To avoid damaging the SRS system, Make sure that the steering shaft does not turn after removing the steering wheel. Lock the column with the ignition key with the front wheels straight ahead.


Removal
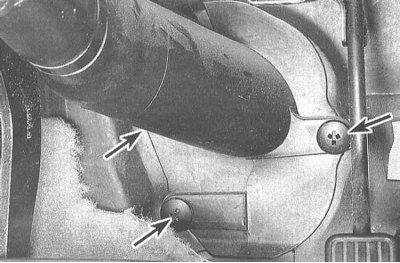


Removal


1. Park the car with the front wheels turned straight ahead. Disconnect the negative cable from the battery first, then the positive cable.

Warning! If the car stereo system is equipped with a security code, make sure you have the correct combination to activate the audio system before disconnecting the battery! Remove the steering column joint cover under the instrument panel.
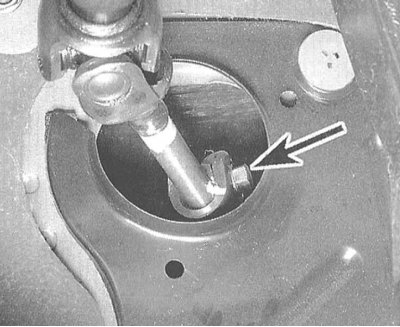

Warning! If the car stereo system is equipped…


2. Mark the position of the steering column intermediate shaft in relation to the rack and pinion input shaft, then loosen the clamping screw.


3. Set the parking brake. Loosen the wheel nuts. Jack up the front of the car and place it on supports. Remove the wheels.
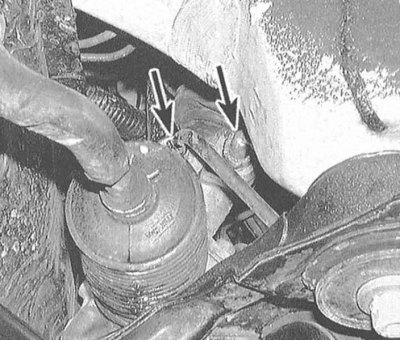
3. Set the parking brake. Loosen the wheel nuts.…


4. Drain the PAS hydraulic fluid into a prepared container: disconnect the supply and return hydraulic lines from the rack and pinion housing.

Note: Do not loosen the union nut connections on the lines going to the steering gear pressure cylinder.


5. To minimize fluid loss, plug open ends of lines.

6. Release the steering rod ends from the steering knuckle arms (see Section Removal and installation tie rod ends).

7. Disconnect the λ-probe wiring connector (see Chapter Engine management) and remove the catalytic converter.

8. Disconnect the gear shift cable(s) (see Chapter Gear shift box).
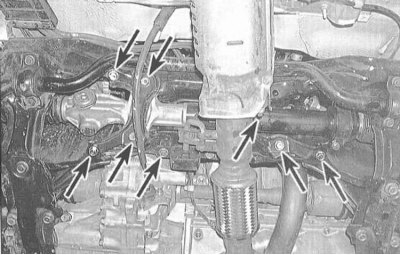
8. Disconnect the gear shift cable(s) (see…


9. Remove the reinforcement plates from the chassis and rack and pinion housing.
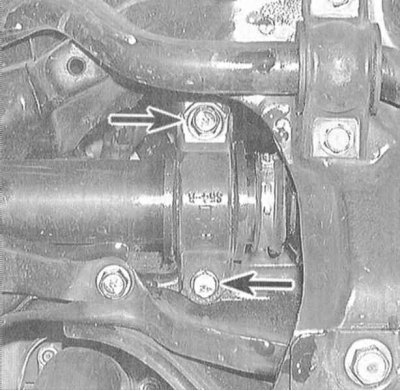


9. Remove the reinforcement plates from the…


10. Support the steering gear from below and loosen its mounting bolts. Lower the rack and pinion assembly, carefully disengaging the intermediate shaft of the steering column from engagement with the input shaft of the mechanism. To avoid catching the rear beam, tilt the steering gear assembly slightly and remove it from under the car.

Installation


1. Place the steering gear assembly in its regular place and engage its input shaft with the intermediate shaft of the steering column (make sure that the alignment marks applied during dismantling are correctly aligned).

2. Screw in the rack and pinion assembly mounting bolts (remember to place washers under the bolt heads) and tighten them to the required torque.

3. Install the reinforcing plates and tighten the bolts securing them to the required torque.

4. Connect the tie rod ends to the steering knuckle (see Section Removal and installation the steering wheel).

5. Screw in the intermediate shaft clamp bolt and tighten it to the required torque.

6. Replace the hinge access cover, making sure both tabs engage with the corresponding holes in the floor panel.


7. Connect the PAS hydraulic lines to the steering gear housing. Fill the PAS reservoir with the required amount of fresh hydraulic fluid of the required grade (see Chapter Settings and ongoing maintenance).

8. Install the wheels. Lower the vehicle to the ground and tighten the wheel nuts to the specified torque (see Specifications in Chapter Settings and ongoing maintenance).

9. Bleed the power steering system (see Section Bleeding air from the hydraulic circuit of the power steering system).

(Original material on the website: «HONDABOOK»)
This article is available at: russian, bulgarian, belarusian, ukrainian, serbian, croatian, romanian, polish, slovak, hungarian
This information has been verified: Timofey Goryachev
Share with friends:
◀ Previous
Accord 6: Steering
Next ▶

Replacing the steering gear protective covers
Removal and installation tie rod ends
Removal and installation the steering wheel
Removal and installation the steering pump
Bleeding air from the hydraulic circuit of the power steering system
See also other articles from Honda manuals:
Main gear pinion seal — replacement Honda Civic 3 and 4 (1983-1991)
Gear Selection and Shifting Mechanism — Removal and Installation Honda Fit 1 (2001-2008)
Rack — removal and installation Honda CR-V 1 (1995-2001, petrol)
Gear shift lever (models with manual transmission) Honda HR-V 1 (1998-2006, petrol)
Electric valves B and C of gear shifting — replacement Honda Avancier 1 (1999-2003, petrol)
Link in different formats to this article
Comments and feedback from visitors
No comments yet


How much will 46 + 38 ?


Accord 6 (1997-2002) 
  • General information
  • Introduction to the guide
  • User manual
  • Maintenance
  • Power unit
  • Four-cylinder engines
  • Six-cylinder engines
  • Engine overhaul
  • Cooling system
  • Heater and air conditioner
  • Power and exhaust systems
  • Engine electrical equipment
  • Engine management
  • Transmission
  • Mechanical gearbox
  • Automatic gearbox
  • Clutch and drive shafts
  • Chassis and running gear
  • Brake system
  • Car suspension
  • Steering
  • Body and interior
  • Exterior (external elements)
  • Interior (internal elements)
  • Electrical equipment
  • Equipment and devices
  • Electrical circuits
Accord 3 (1985-1989) 
  • General information
  • Maintenance
  • Power unit
  • Engine adjustment
  • Engine repair
  • Engine electrics
  • Emission management
  • Engine management (carburetor)
  • Electronic injection
  • Programmable injection
  • Schematic of emission system
  • Fuel system
  • Feedback management
  • Transmission
  • Manual gearbox
  • Automatic gearbox
  • Clutch
  • Chassis and running gear
  • Front suspension
  • Rear suspension
  • Steering
  • Brake system
  • Electrical equipment
  • Ventilation and heating
  • Air conditioner
  • Cruise control system
  • Equipment and devices
HondaBook.ru © 2018–2026 • Mobile version • Sitemap: EN BG BY UA RS HR RO PL SK HU • Feedback • Driver Information • Search system • Bookmark
Accord 3 (1985-1989) • Accord 6 (1997-2002) • Civic 3 and 4 (1983-1991) • Civic 5 and 6 (1991-2000) • Civic 6 (1995-2000) • Civic 7 (2000-2005) • Civic 8 (2005-2011) • Fit 1 (2001-2008) • CR-V 1 (1995-2001) • CR-V 2 (2002-2006) • HR-V 1 (1998-2006) • Avancier 1 (1999-2003) •
 
This website uses cookies to ensure proper functioning. By clicking "OK," you agree.