HondaBook.ru
Auto companies Volkswagen Auto companies Ford Auto companies Lada Auto companies Skoda Auto companies BMW Auto companies Mazda Auto companies Peugeot
English Русский
Български
Беларускі
Український
Српски
Hrvatski
Română
Polski
Slovenský
Magyar
Bookmark Contacts Sitemap   


Accord Civic Fit / Jazz CR-V HR-V Others Articles
Accord 3 (1985-1989) Accord 6 (1997-2002)

Removal and installation the steering wheel (Honda Accord 6)

  • Main
  • Honda Accord
  • 6 (1997-2002)
  • Chassis and running gear
  • Steering
  • Removal and installation the steering wheel
0
Contents: Removal ⇊ Installation ⇊
Warning! The models of vehicles covered in this manual are equipped with a supplemental restraint system (SRS). Before performing any work near the air bag unit, steering column or instrument panel, turn off the SRS to avoid injury from accidental deployment (see Chapter On-board electrical equipment). The SRS circuit wiring is easily identified by its yellow insulation. To avoid damaging the SRS system, Make sure that the steering shaft does not turn after removing the steering wheel. Lock the column with the ignition key with the front wheels straight ahead.


Removal


1. Disconnect the negative cable from the battery first, then the positive cable.

Warning! If the car stereo system is equipped with a security code, make sure you have the correct combination to activate the audio system before disconnecting the battery!

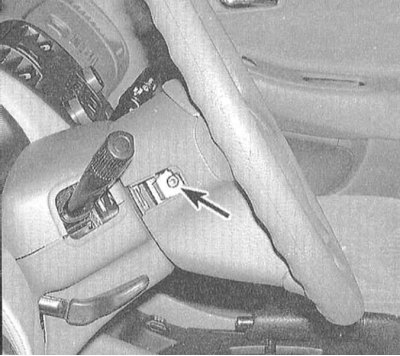
Warning! If the car stereo system is equipped…


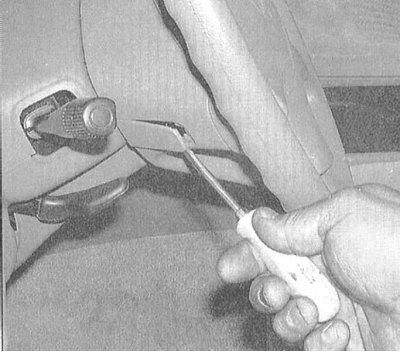
2. Remove the access cover from the steering wheel assembly.
2. Remove the access cover from the steering…


3. To immobilize the airbag, disconnect the 2-pin connector of the airbag module wiring.


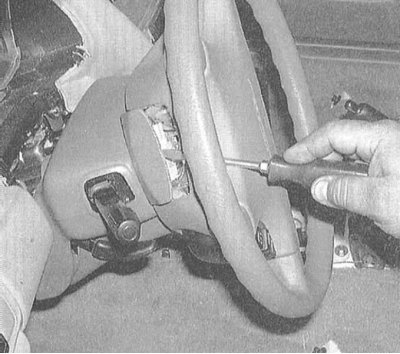
4. Remove the airbag module mounting bolt access covers on both sides of the lower steering wheel, remove the TORX head bolts that secure the module to the wheel assembly.
4. Remove the airbag module mounting bolt access…

5. Carefully remove the airbag module and move it to a safe location.

Attention! Try not to turn the module with the front side facing you. Do not under any circumstances place any foreign objects on top of the module.


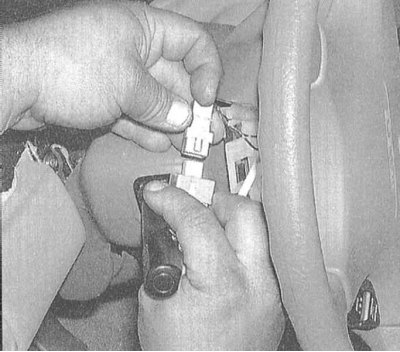
6. Disconnect the electrical connectors of the horn button and (if equipped) cruise control.
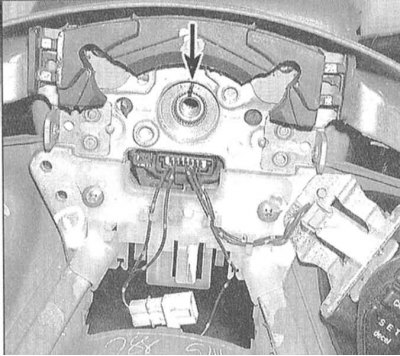
6. Disconnect the electrical connectors of the…


7. Remove the steering wheel mounting bolt and mark the position of the steering wheel hub relative to the column shaft.


8. Pull the wheel strictly parallel to its axis and remove it from the steering shaft. If the wheel does not give in, rock it a little.

Caution! Never turn the puller bolts into the steering wheel assembly more than five turns, as this may cause the SRS cable drum to fail. For the same reason, do not allow the column shaft to rotate when the steering wheel is removed!


Installation


1. Make sure the front wheels of the vehicle are turned straight ahead.
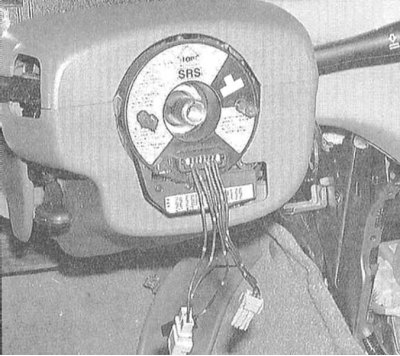
1. Make sure the front wheels of the vehicle are…


2. Make sure that the SRS cable drum is centered correctly - the arrow marked TOP should point straight up. If the column shaft did not rotate after removing the steering wheel, there should be no problem with this issue. If for some reason the shaft did rotate, center it as follows:
  • a) Turn the cable drum clockwise until it stops;
  • b) Turn the cable drum counterclockwise approximately two and a half turns so that the mark points straight up.

3. Bring the steering wheel into its normal position and align the mounting marks applied during dismantling. Make sure that the column guide pins fit into the corresponding holes on the back of the steering wheel and that the hub is correctly engaged with the turn signal switch return device. Place the wheel hub on the steering shaft journal, screw in the mounting bolt and tighten it to the required torque.
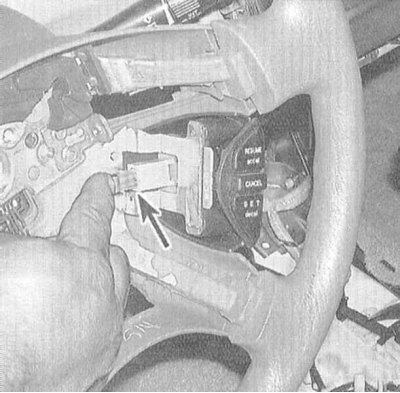


3. Bring the steering wheel into its normal…


4. Connect the horn and (if equipped) cruise control connectors.

5. Reinstall the SRS module using new TORX bolts. Make sure the bolts are tightened to the specified torque. Replace the screw access covers.

6. Connect the halves of the SRS cable drum connector together.

7. Install the access cover onto the steering wheel assembly.

The article was copied from the website HondaBook.ru
This article is available at: russian, bulgarian, belarusian, ukrainian, serbian, croatian, romanian, polish, slovak, hungarian
This information has been verified: Timofey Goryachev
Share with friends:
◀ Previous
Accord 6: Steering
Next ▶

 
Removal and installation tie rod ends
Replacing the steering gear protective covers
Removal and installation rack and pinion gear
Removal and installation the steering pump
Bleeding air from the hydraulic circuit of the power steering system
See also other articles from Honda manuals:
Checking the steering wheel play Honda Civic 8 (2005-2011)
Adjusting the position of the steering wheel Honda Fit 1 (2001-2008)
Control the audio system using the steering wheel remote control Honda CR-V 2 (2002-2006, petrol)
Steering wheel — disassembly and assembly Honda HR-V 1 (1998-2006, petrol)
Steering wheel audio controls Honda Avancier 1 (1999-2003, petrol)
Link in different formats to this article
Comments and feedback from visitors
No comments yet


How much will 19 + 41 ?


Accord 6 (1997-2002) 
  • General information
  • Introduction to the guide
  • User manual
  • Maintenance
  • Power unit
  • Four-cylinder engines
  • Six-cylinder engines
  • Engine overhaul
  • Cooling system
  • Heater and air conditioner
  • Power and exhaust systems
  • Engine electrical equipment
  • Engine management
  • Transmission
  • Mechanical gearbox
  • Automatic gearbox
  • Clutch and drive shafts
  • Chassis and running gear
  • Brake system
  • Car suspension
  • Steering
  • Body and interior
  • Exterior (external elements)
  • Interior (internal elements)
  • Electrical equipment
  • Equipment and devices
  • Electrical circuits
Accord 3 (1985-1989) 
  • General information
  • Maintenance
  • Power unit
  • Engine adjustment
  • Engine repair
  • Engine electrics
  • Emission management
  • Engine management (carburetor)
  • Electronic injection
  • Programmable injection
  • Schematic of emission system
  • Fuel system
  • Feedback management
  • Transmission
  • Manual gearbox
  • Automatic gearbox
  • Clutch
  • Chassis and running gear
  • Front suspension
  • Rear suspension
  • Steering
  • Brake system
  • Electrical equipment
  • Ventilation and heating
  • Air conditioner
  • Cruise control system
  • Equipment and devices
HondaBook.ru © 2018–2026 • Mobile version • Sitemap: EN BG BY UA RS HR RO PL SK HU • Feedback • Driver Information • Search system • Bookmark
Accord 3 (1985-1989) • Accord 6 (1997-2002) • Civic 3 and 4 (1983-1991) • Civic 5 and 6 (1991-2000) • Civic 6 (1995-2000) • Civic 7 (2000-2005) • Civic 8 (2005-2011) • Fit 1 (2001-2008) • CR-V 1 (1995-2001) • CR-V 2 (2002-2006) • HR-V 1 (1998-2006) • Avancier 1 (1999-2003) •
 
This website uses cookies to ensure proper functioning. By clicking "OK," you agree.