
CAUTION: If any repair operation requires the removal of an air conditioning system component (on equipped vehicles), do not disconnect lines with refrigerant. If it is not possible to move the component out of the way with the lines attached, have the system evacuated by a professional. The air conditioning system contains pressurized refrigerant. This gas can be very dangerous. Drain the refrigerant into a sealed container. The refrigerant can be reused if it is not contaminated or very old.
1984-85 Accord: 1.8 L engine; 1984-87 Prelude: 1.8 L or 2.0 L engines
All wires and hoses must be marked at the time of removal. This will save you time during subsequent assembly.
1. Apply the parking brake, and place chocks behind the rear wheels.
Raise and secure the front of the vehicle with jacks.
2. Disconnect the negative cable to connect the battery, then the positive one. Remove the battery and drain the battery from the engine compartment.
3. Double check that the jacks are secure under the vehicle.
4. Remove the mudguard under the engine.
Using a felt-tip pen, mark the hinged contour of the hood on the hood; remove the bolts and the hood itself.
5. Drain engine oil.
When replacing the drain plug, be sure to use a new washer.
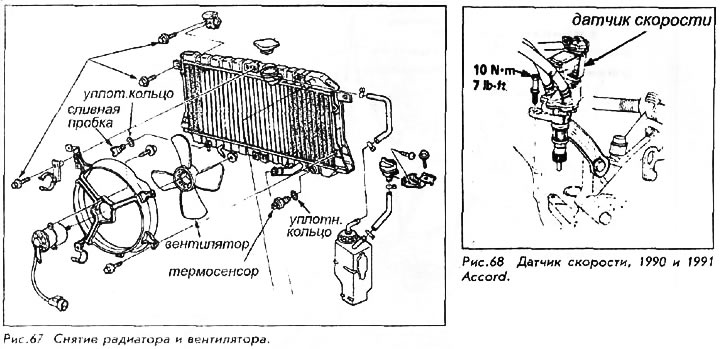
6. Remove the radiator cap. Open the radiator drain plug and drain the coolant from the radiator.
7. Remove the gearbox filler plug; remove the drain plug and drain the liquid from the box.
8. If the vehicle is equipped with a carburetor, perform the following procedures:
- A. Tag and remove ignition coil wires and motor secondary ground cable located on valve cover
- b. Remove the air filter cover and filter.
- c. Remove the air intake, air filter nuts/bolts, air control valve and air filter,
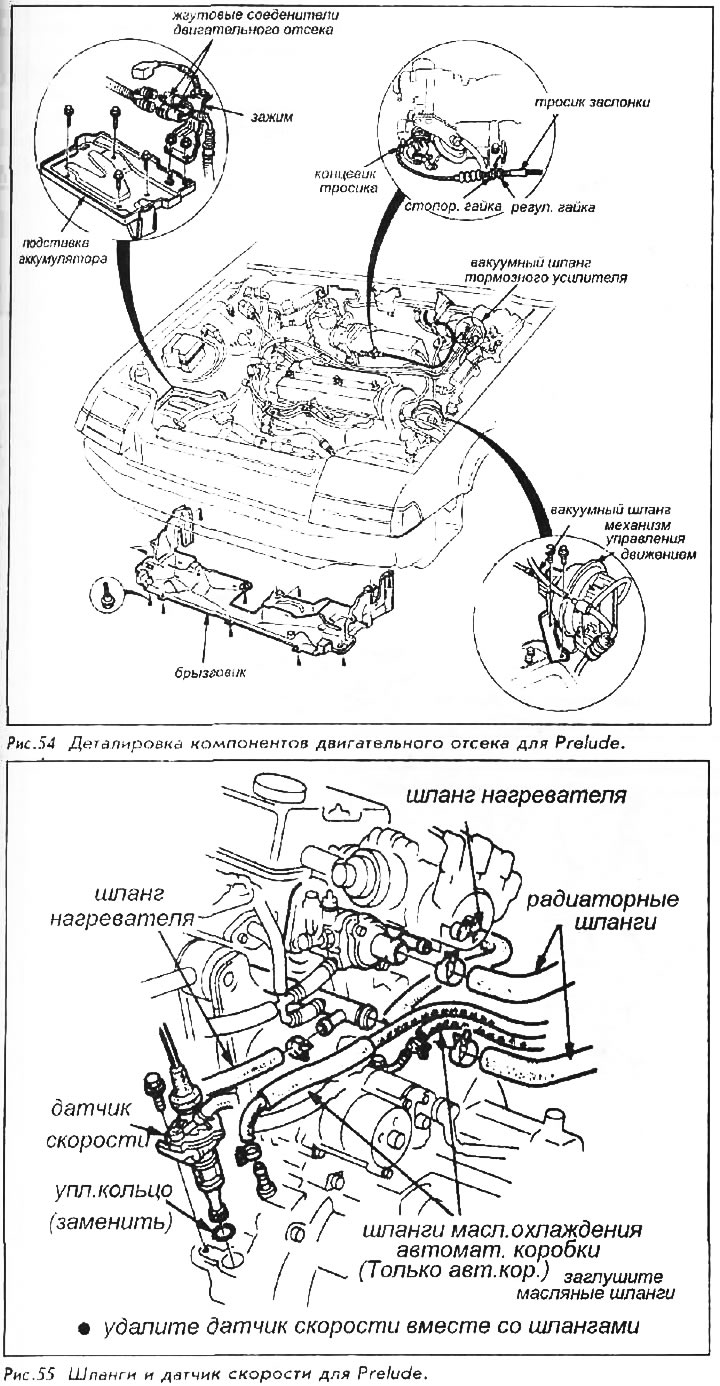
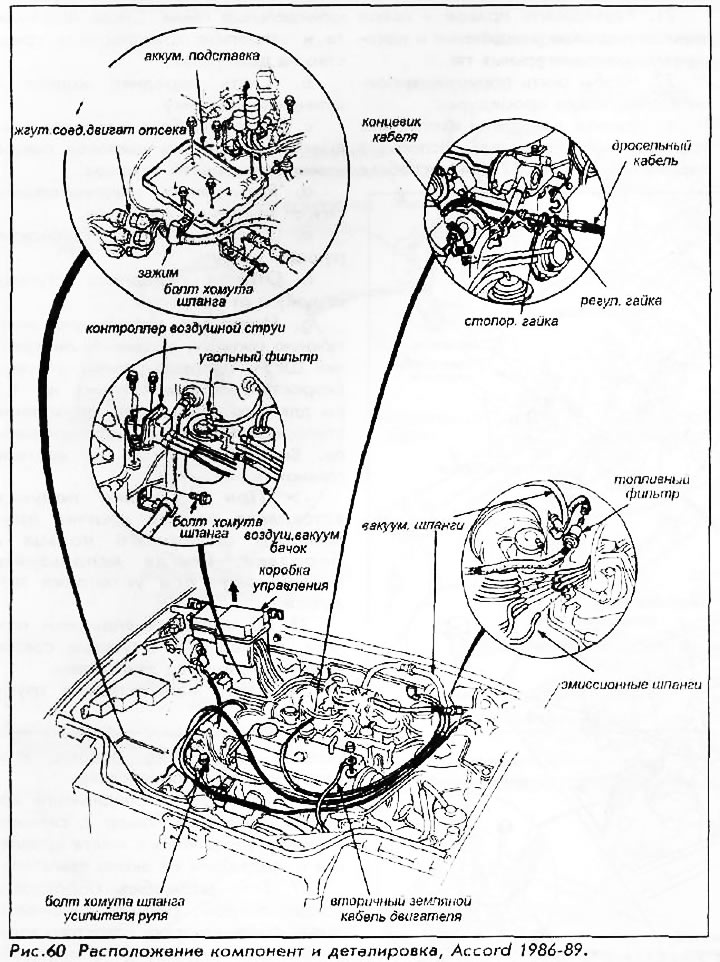
- d. Loosen the throttle cable lock nut and adjusting nut. Disconnect the end of the throttle control cable from the carburetor (pic. 48).
Be careful not to bend or tangle the throttle cable. Always replace a damaged cable.
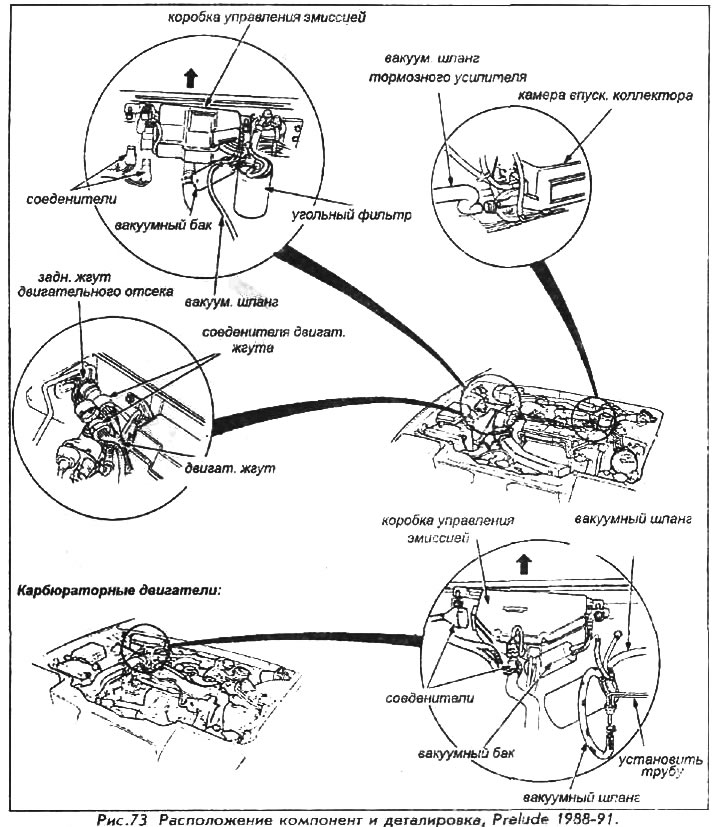
- e. Disconnect connector No. 1 of the control box. Remove the control box from the attachment point; support it with a hard wire, and hang it near the engine.
- f. Disconnect the fuel line from the fuel filter and the solenoid vacuum hose from the carbon filter.
- g. For high altitude models, remove the air jet regulator.

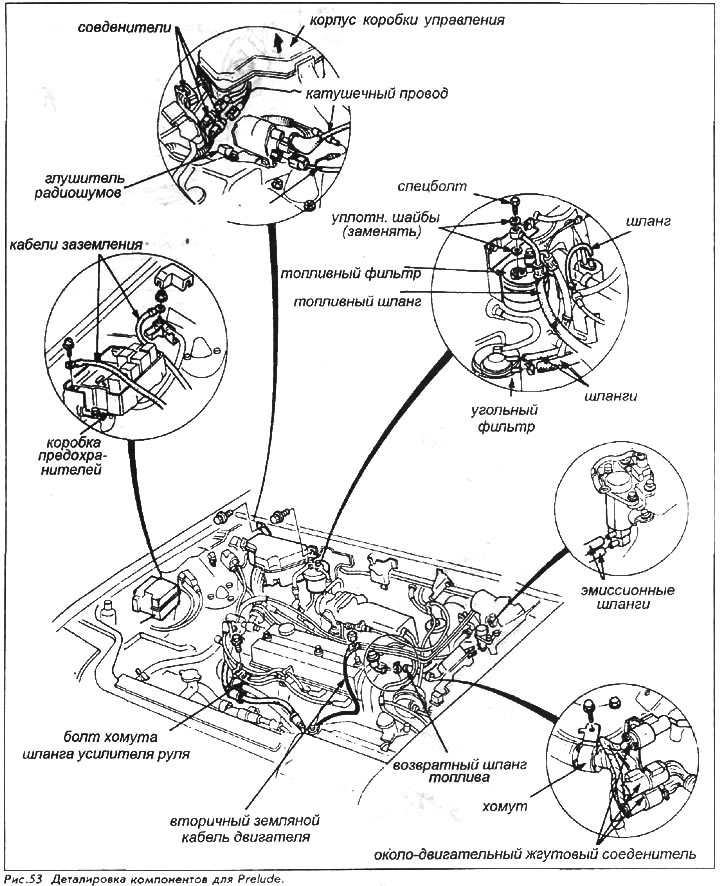
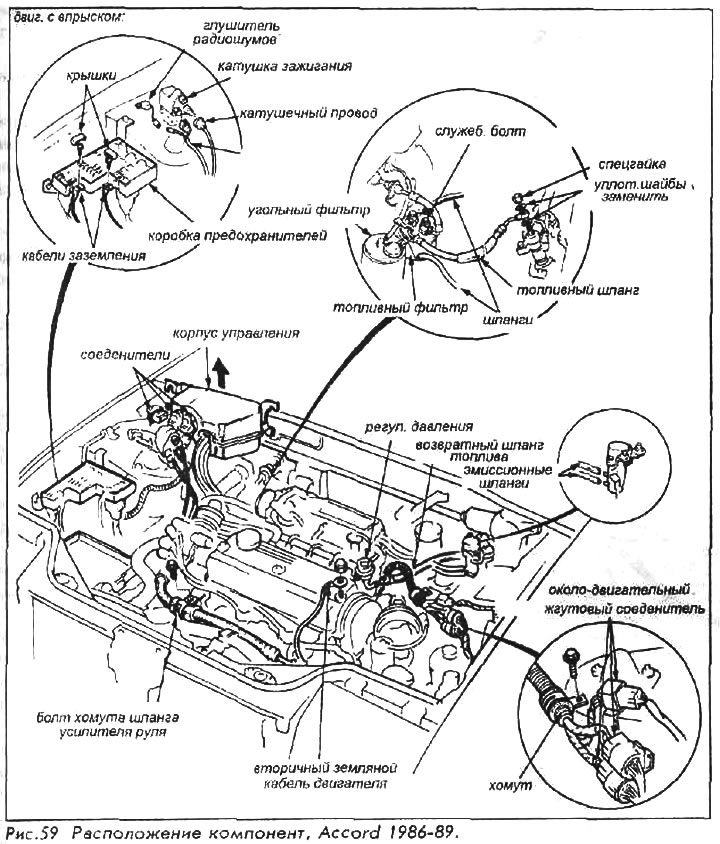
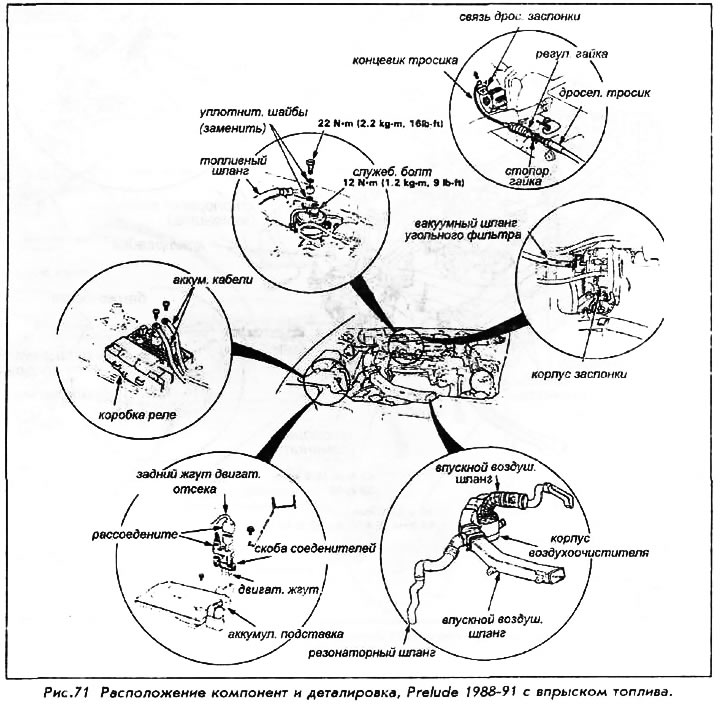
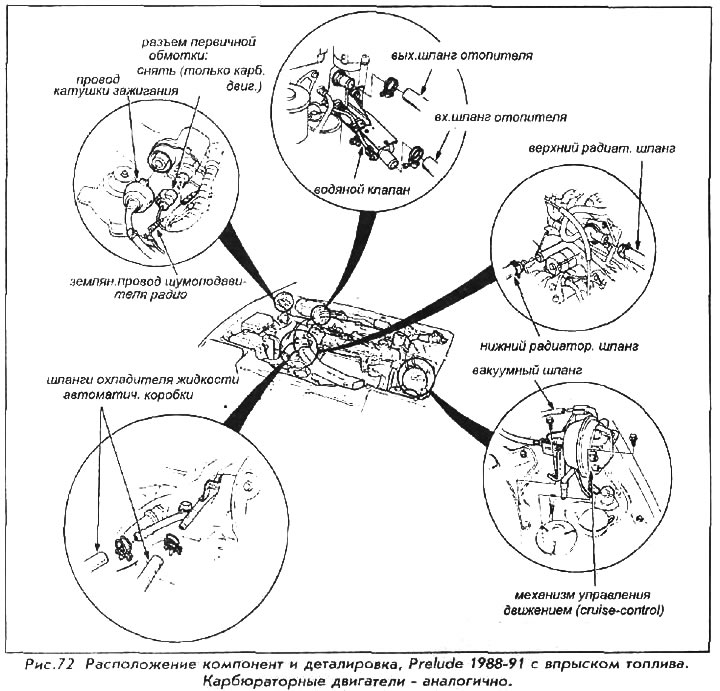
9. If the vehicle is equipped with a fuel injection system, perform the following procedures:
- a. Remove air intake. Disconnect the motion control vacuum hose (cruise control) from the air intake, and remove the jet exhaust muffler pipe.
- b. Remove the secondary earth cable from the top of the motor.
- c. Disconnect the air box connecting the pipe. Loosen the pipe clamp bolt and separate the emission pipes.
- d. Remove the air filter mounting nuts, and remove the air filter housing assembly.
- e. Loosen the throttle cable locknut and adjusting nut. Disconnect the end of the cable from the attachment and connection.
- f. Disconnect the following wires:
- Earth cable from the fuse block.
- Harness connector and clip in engine compartment.
- High voltage wire and wires from the primary winding of the ignition coil.
- The wire connecting the ignition coil and the radio noise silencer.
- g. To reduce fuel pressure, follow these procedures:
- Using a rag, place it over the fuel filter to absorb any gasoline that may be sprayed on the engine.
- Slowly loosen the service bolt approximately one full turn; this will reduce the pressure in the system.
- Using a new seal washer, retighten the service bolt.
- h. Disconnect the fuel return hose from the pressure regulator. Remove the banjo nut, then the fuel supply hose.
- i. Disconnect the vacuum hose from the brake booster.
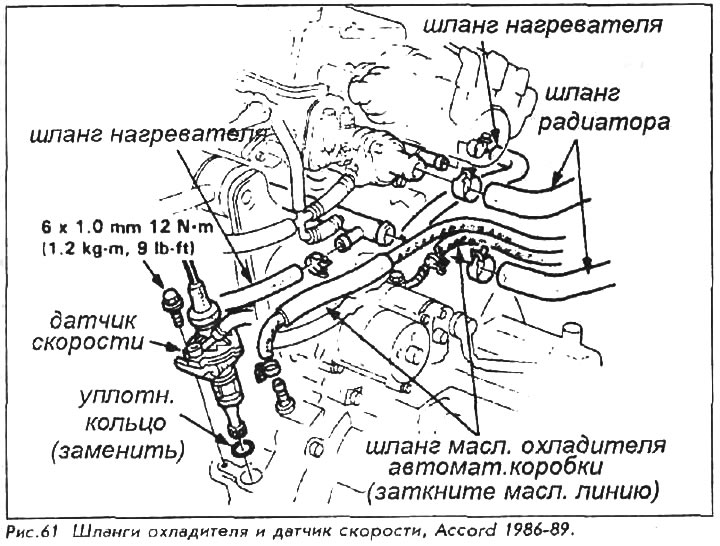
10. Tag and disconnect the radiator and heater hoses from the engine.

11. If the car is equipped with an automatic transmission, disconnect the oil cooler hoses from the box, and drain the fluid. Support the hoses near the radiator without twisting them.
12. If the vehicle is equipped with a manual transmission, loosen the clutch cable set nut, and remove the clutch cable from the release lever.
13. Disconnect the battery cable from the gearbox and the starter cable from the starter clamp.
14. Disconnect both electrical harness connectors from the engine.
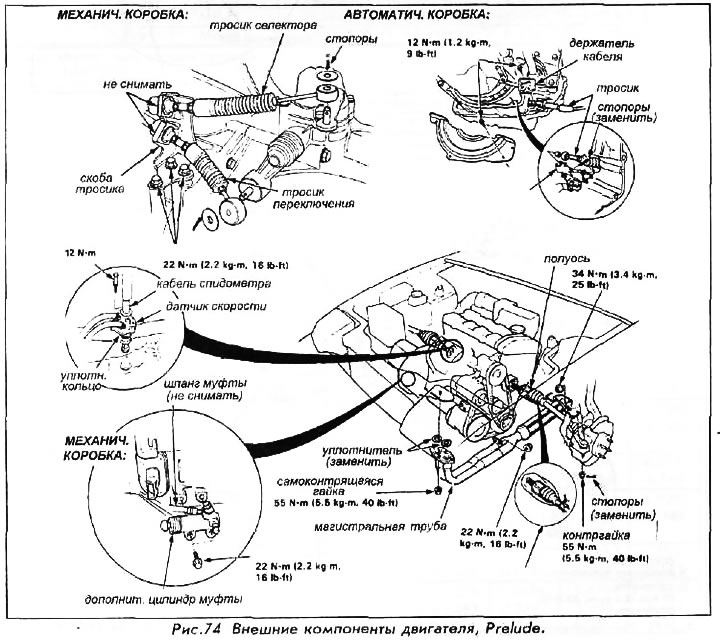
15. Remove the speedometer drive cable bracket. Pull the cable out of the holder.
DO NOT remove the holder as the speedometer drive mechanism may fall into the box.

16. If equipped with power steering, perform the following procedures:
- a. Remove the bolt securing the speed sensor to the gearbox and the sensor together with the hoses.
Do not disconnect the hoses from the speed sensor; simply move the sensor with the hoses attached.
- b. Remove the power steering pump adjusting bolt, mounting bolt and V-belt.
- c. Without disconnecting the hoses, take the pump away from its installation site. Secure it with a stiff wire - don't let it hang from the hoses.
- d. Disconnect the power steering hose from the cylinder head.
17. Remove the central beam at the bottom of the engine. Loosen the radial rod nuts to make it easier to remove the axle shafts later on.
18. If the vehicle is equipped with air conditioning, perform the following procedures:
- a. Remove the compressor clutch lead wire.
- b. Loosen the belt adjusting bolt and drive belt.
DO NOT loosen or disconnect the air conditioning hoses. The A/C compressor can move without discharging the system.
- With. Remove compressor mounting bolts and remove compressor from mounting location with hoses attached. Secure it to the front bulkhead with a piece of strong wire. Never hang the compressor by the hoses.
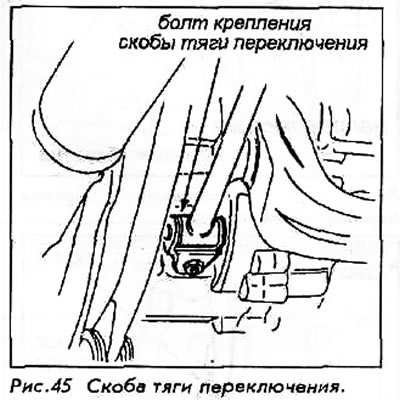
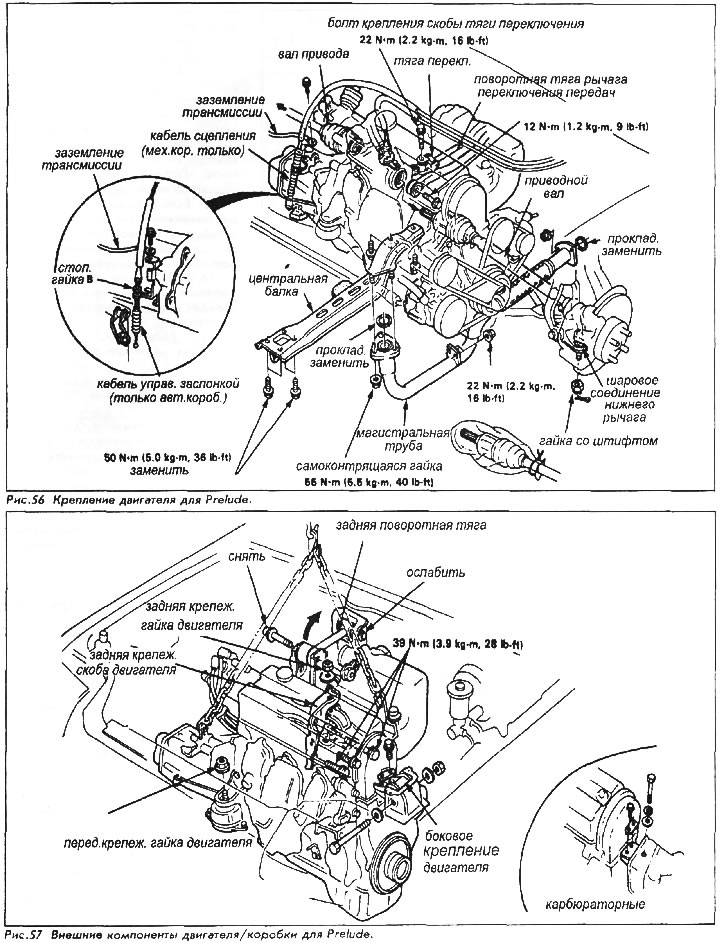
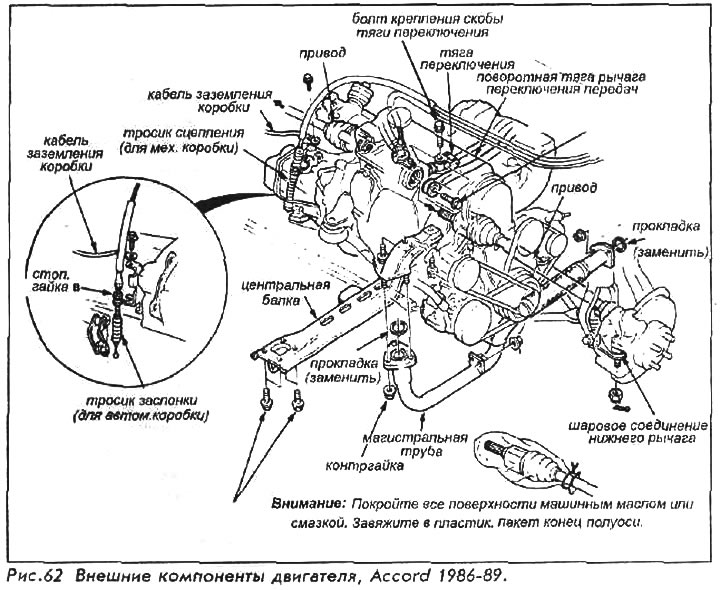
19. If the car is equipped with a manual transmission, remove a bolt of fastening of bracket of draft of switching and disconnect rotary draft of the lever of a gear change.
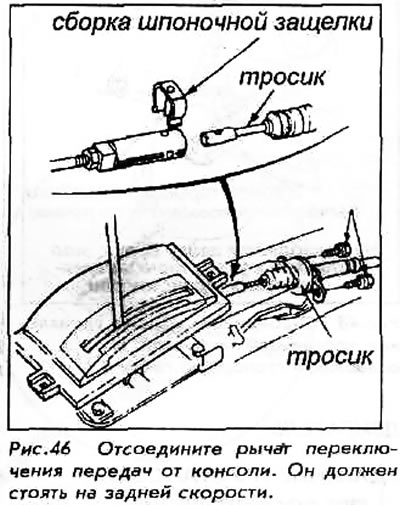
20. If the vehicle is equipped with an automatic transmission, perform the following procedures:
- a. Remove center console.
- b. Place the shift lever in Reverse. Remove the pin from the end of the cable.
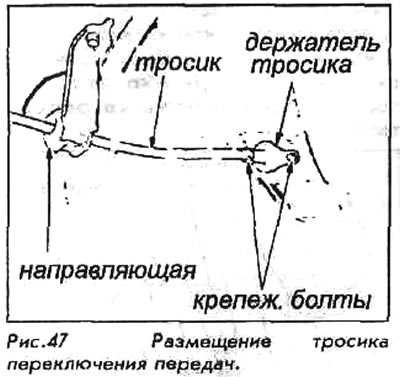
- c. Remove the cable mounting bolts and cable holder.
- d. Remove the throttle cable from the throttle lever. Loosen the lower locknut and disconnect the cable from the attachment point.
21. Disconnect the right and left lower ball joints and tie rod ends.
22. To remove the axle shafts, follow these procedures:
- A. Remove the jacks and lower the vehicle. Using a 32mm socket wrench, loosen the spindle nuts. Raise and jack up the vehicle again.
- b. Remove the front wheel and spindle nut.
- c. Loosen the ball joint bolt and separate the ball joint from the front hub.
- d. Disconnect connecting rods from steering knuckles.
- e. Loosen the stabilizer bar bolts.
- f. Pull the front hub out and away from the axle shafts.
- g. Using a small spudger, slide out the inner CV joint (constant-velocity joint) approximately 1.3 cm to remove the circlip from the differential. Pull the axle shaft out of the final drive housing.
When installing the axle shaft, insert the axle until the circlip snaps into place in the groove. Always use a new clamp when installing axle shafts.
23. On models with fuel injection, disconnect the harness connectors and the clamp above the engine.
24. Remove the main exhaust pipe.
25. Attach the winch to the engine, and raise it a little to eliminate the slack.
26. Disconnect the No. 2 control box connector, remove the control box from its mounting location and hang it near the engine.
27. If the vehicle is equipped with air conditioning, remove the idle air control solenoid valve.
28. If the car is equipped with an airbag (Altitude Models), remove it.
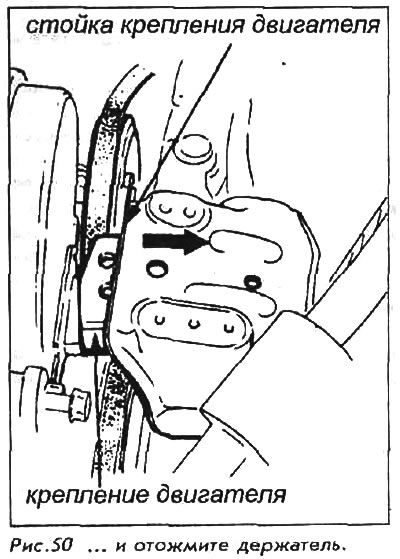
29. From under the airbox, remove the three mounting bolts. Press the engine out until the engine mount comes out of the engine mount.
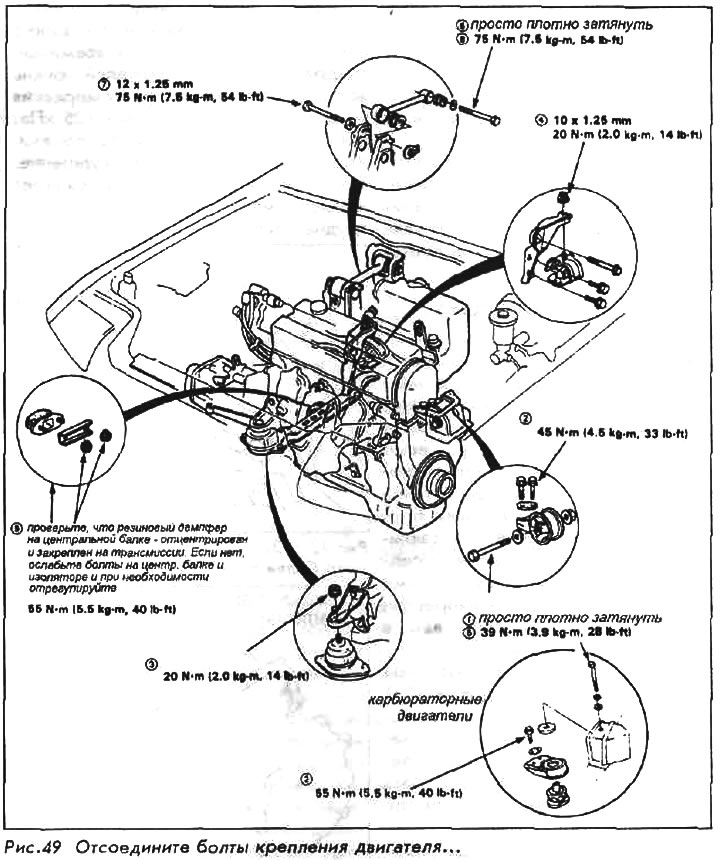
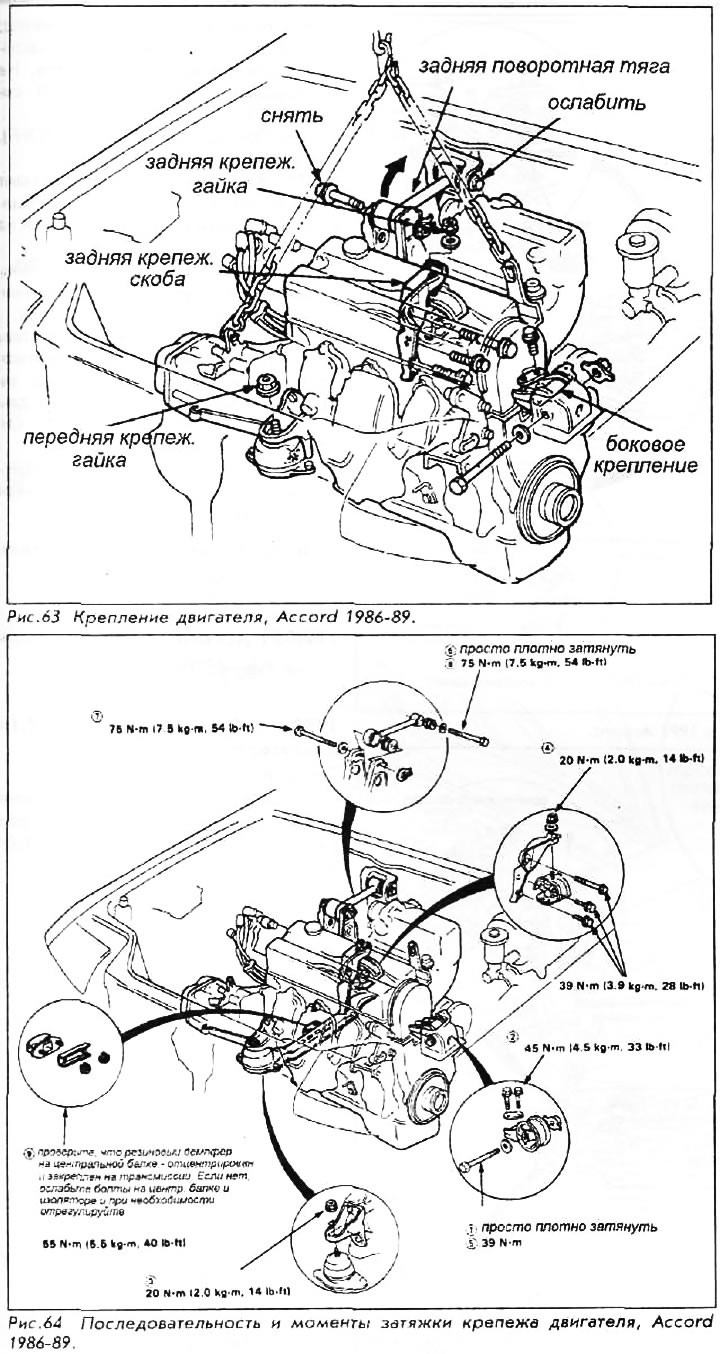
30. Remove the front and rear engine mounting nuts.
31. Loosen the alternator bolts and remove the drive belt. Disconnect the alternator wire harness and remove the alternator.
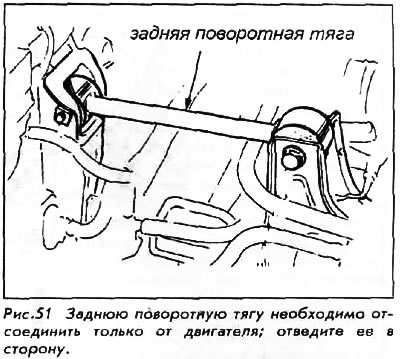
32. At the engine, remove the rear swivel link bolt; loosen the bolt in the frame mount, swing the bar and move it to the side.
33. Carefully lift the engine, making sure all wires and hoses have been removed from the engine/box. Remove it from the vehicle.
34. Remove the transmission.
35. If manual transmission, remove the clutch cover and clutch disc.
36. Install the engine on a stand.
For installation:
37. The gearbox assembly with the drive axle must be installed on the engine before it is installed on the vehicle. The engine must be completely assembled with oil sump, valve cover, etc., even if they must be removed later.
38. Lower the engine into the vehicle.
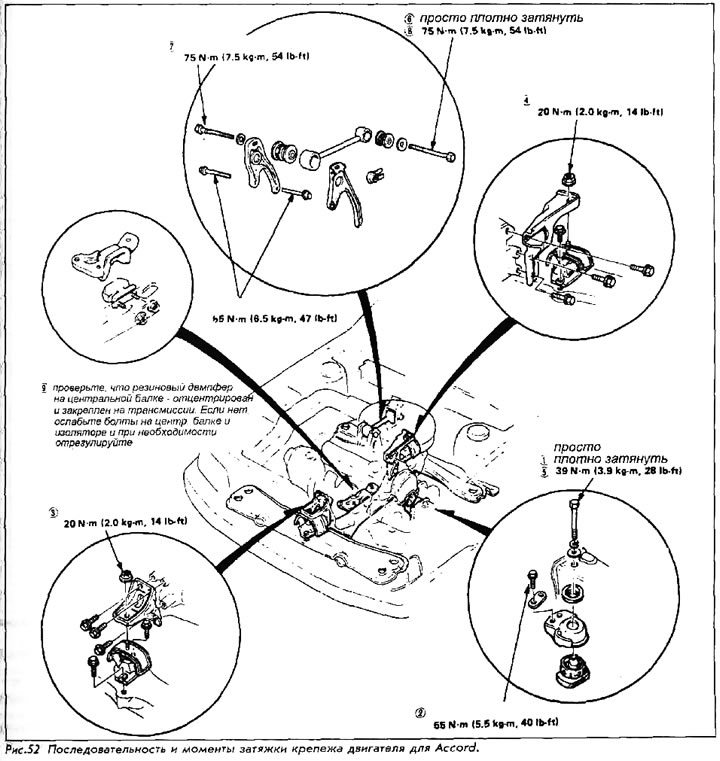
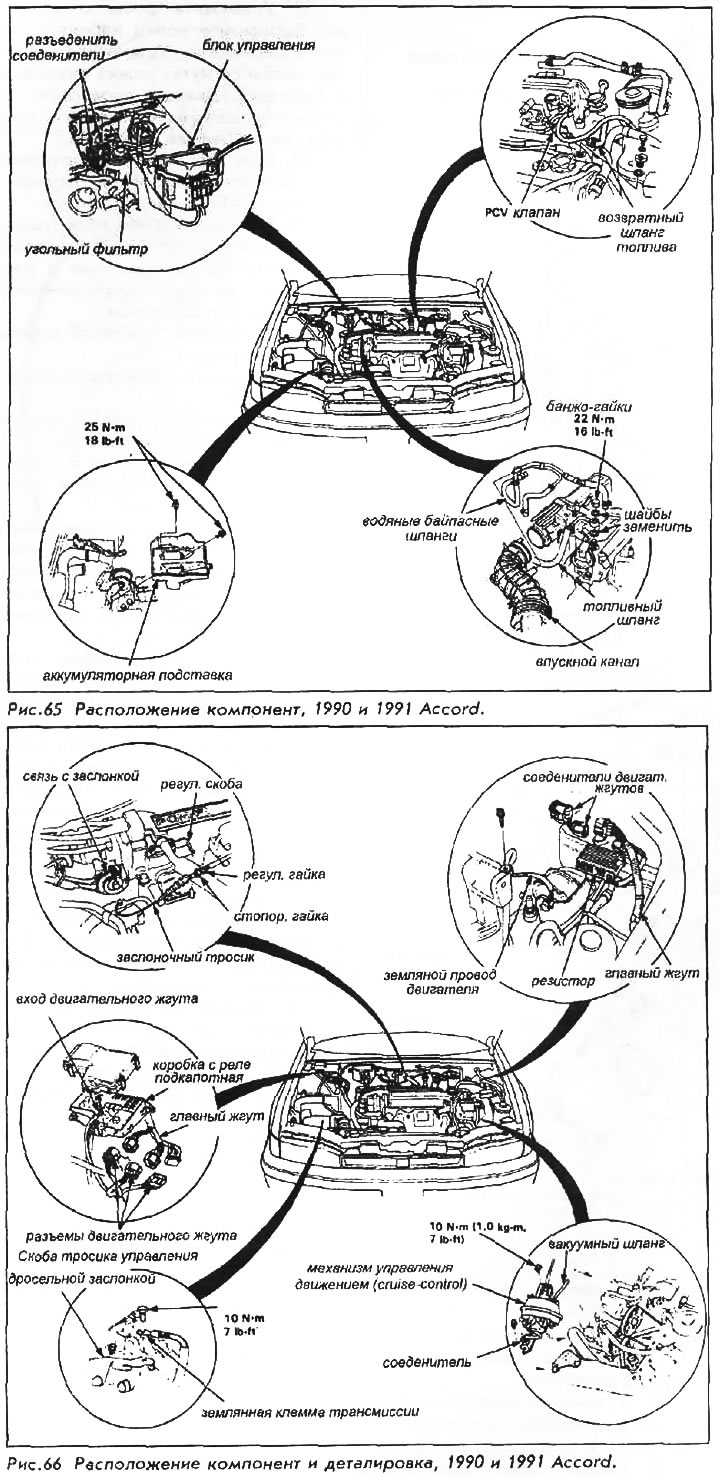
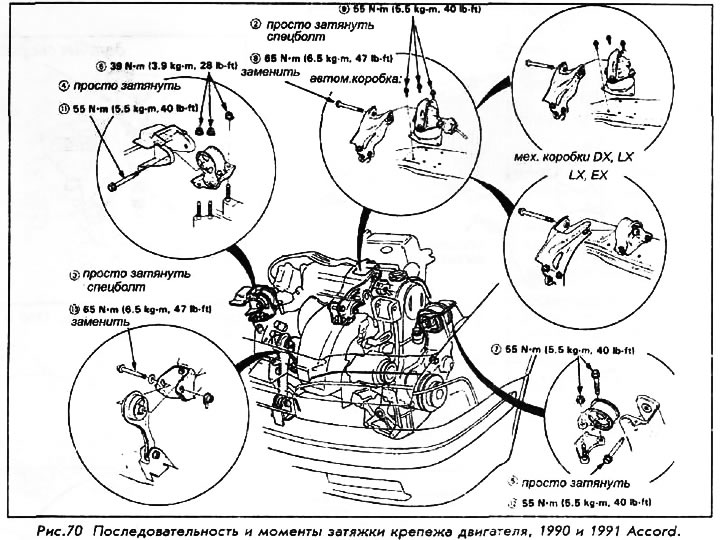
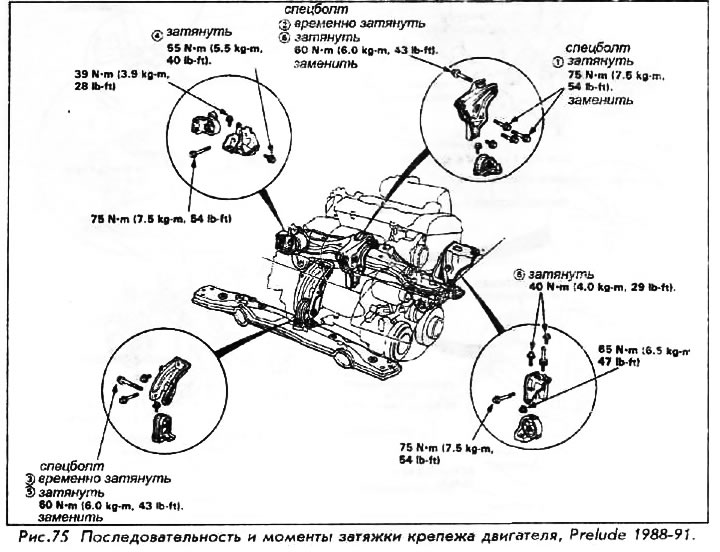
All engine mounting bolts should initially be hand-tight. After that, they must be tightened in a certain order with certain efforts in order for the special rubber gaskets to properly dampen engine vibrations.
39. Attach the rear swivel link to the engine.
40. Install the front and rear engine mounting nuts.
41. Attach the alternator bracket, alternator and belt.
42. Install the rear engine mount bracket.
43. Install the rear motor mounting nut, tightening it to 20 Nm.
44. Install the front engine mounting nut, tightening the bolt to 20 Nm.
45. Return the engine mount to the engine mount; install bolts and tighten one bolt (on top) up to 39 Nm. Tighten the adjacent pair of bolts to 55 Nm.
46. Loosen the chain in the machine winch. Continue fastening the engine by tightening each bolt to the correct torque.
47. Install motion control vacuum hoses (cruise control).
48. Install axle shafts. Use a new circlip and make sure the shaft is locked in the gearbox.
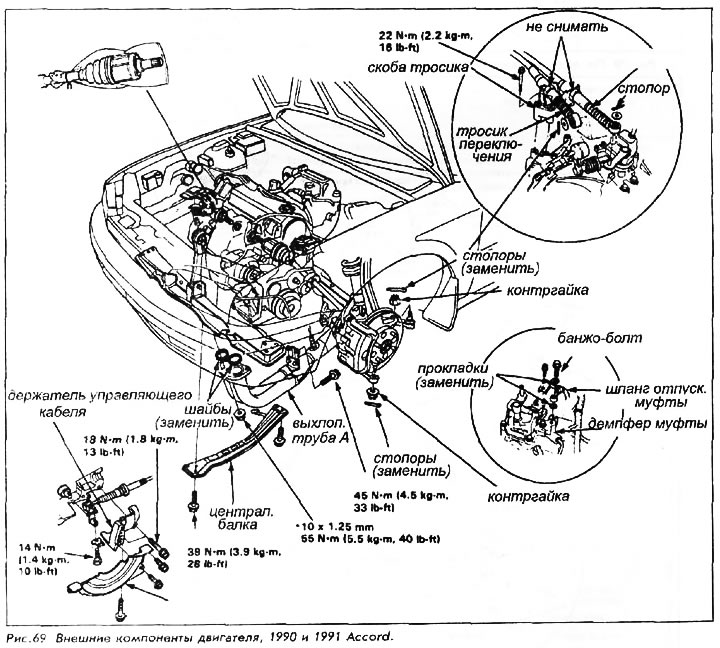
49. For vehicles with automatic transmission, connect the throttle control cable to the bracket, tighten the locknut, and connect the cable to the throttle lever on the box. Install the shift cable and cable clamp; tighten the cable mounting bolts at the gearbox only to 10 Nm. Reconnect the cable in the switch inside the vehicle and install the center console.
50. For vehicles with a manual transmission, install the shift rod bracket and bolt; tighten it to 22 Nm.
51. Attach the rotary rod of the gear lever; tighten the bolt to 10 Nm.
52. Install the A/C compressor and belt.
53. Using new gaskets and self-locking bolts, connect the exhaust system to the engine. Tighten the nuts to 55 Nm. Install and tighten the 2 support leg bolts.
54. Tighten the radial rod nuts to 44 Nm.
55. Install the center beam under the engine. Use new nuts and tighten them to 50 Nm.
56. Install the power steering pump and belt. Install the speed sensor, tightening the bolt to 10 Nm only.
57. Install the speedometer cable. Align the end of the cable with the groove in the holder. Install the clamp so that the bent leg is in the groove. Double check this setting by gently pulling on the cable; he must not weaken.
58. If the car is equipped with an automatic transmission, connect the ATF cooler lines.
59. If the vehicle is equipped with a manual transmission, install the clutch cable to the release lever. Adjust clutch free play.
60. Connect the transmission earth cable.
61. Connect the radiator and heater hoses.
62. Connect the hose (And) fuel supply at the fuel filter.
63. For high altitude vehicles, install an air jet regulator.
64. Connect the vacuum hoses of the cleaning solenoid valve of the carbon filter.
65. Install the control box.
66. Connect the throttle cable. Tighten locknut.
67. Reconnect electrical harnesses including coil, idle control solenoid valve, engine harness connectors, and secondary ground cable located between body and valve cover. Check all electrical wiring, ensuring that it lies inside the clamping brackets and is not in contact with hot or moving parts.
68. Install the air intake pipes and air filter. Make sure the vacuum hoses are properly installed.
69. Double check all parts of the installation, paying special attention to missing hoses or slack wires, loose nuts and tools left in the engine.
70. Fill in gear oil to the correct level.
71. Fill the cooling system.
72. Fill in engine oil.
73. Install the hood. On the Prelude, reinstall the grille and turn the headlights to the DOWN position.
74. Connect the cables to connect the battery (positive wire first).
75. Disconnect the coil wire from the distributor. Insulate or shield the end of the cable to prevent arcing between it and the motor or surrounding metal. Without touching the accelerator, turn the ignition key to the START position and start the engine for approximately 5-10 seconds; this will develop some oil pressure inside the engine, do not exceed starting for more than 10 seconds.
76. Turn off the ignition (OFF), and reconnect the coil.
77. Start the engine, leaving it at idle. Check hoses and lines carefully for any sign of leakage.
78. Bleed air from the cooling system; check timing and idle speed.
79. After the engine has warmed up completely and the fan (s), at least once started, recheck the engine for fluid leaks. Turn off the engine.
80. Adjust belts, clutch and throttle cable as needed.
1986-89 Accord: 2.0 L engine
1990-91 Accord: 2.2 L engine
1988-91 Prelude: 2.0 L and 2.1 L engines
The procedures are basically the same as those described in the section for "1984-85 Accord: 1.8 L engine".