
HondaBook.ru
Auto companies Volkswagen Auto companies Ford Auto companies Lada Auto companies Skoda Auto companies BMW Auto companies Mazda Auto companies Peugeot
English Русский
Български
Беларускі
Український
Српски
Hrvatski
Română
Polski
Slovenský
Magyar
Bookmark Contacts Sitemap   


Accord Civic Fit / Jazz CR-V HR-V Others Articles
HR-V 1 (1998-2006, petrol)

Rear Wheel Bearing — Replacement (Honda HR-V 1)

  • Main
  • Honda HR-V
  • 1 (1998-2006, petrol)
  • Chassis and running gear
  • Car suspension
  • Rear Wheel Bearing — Replacement
0
Perform the replacement taking into account the following:
  • Use only genuine Honda aluminum wheel weights. Non-genuine weights may cause corrosion and damage to aluminum wheels.
  • Before installing the brake drum, clean the contact surfaces of the rear wheel hub and brake drum.
  • Before installing the wheel, clean the contact surfaces on the brake drum and on the wheel.
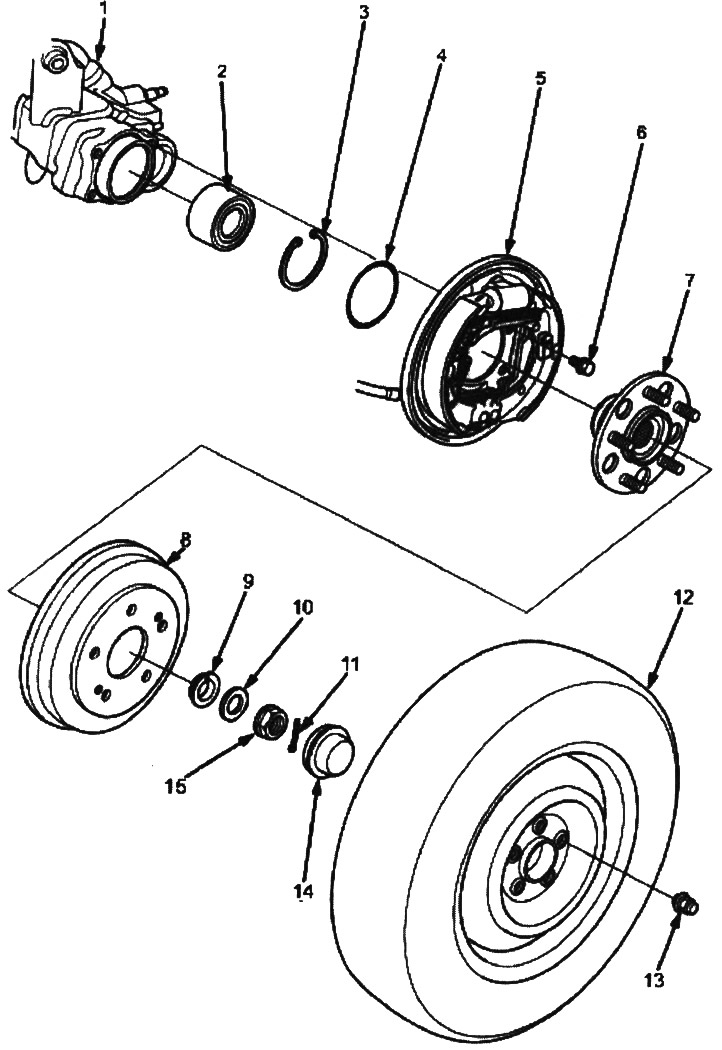
1. REAR AXLE BEAM

1. REAR AXLE BEAM
2. REAR WHEEL BEARING. Replace.
3. RING CLAMP
4. O-RING. Replace
5. REAR WHEEL BRAKE ASSEMBLY
6. 10x1.25 mm, 64 Nm (6.5 kgf/m)
7. REAR WHEEL HUB. Check for damage and cracks.
8. BRAKE DRUM. Check for wear and rust.
9. REAR WHEEL BRAKE DRUM WASHER
10. REAR WHEEL HUB WASHER
11. SPIN. Replace.
12. REAR WHEEL
13. WHEEL NUT, 12x1.5 mm, 108 Nm (11.0 kgf/m)
14. HUB CAP. Replace
15. AXLE NUT, 22x1.5 mm, 196 Nm (20 kgf/m)
Before tightening the axle nut, apply engine oil to the seating surface of the nut.


1. Loosen the wheel nuts slightly.

2. Raise the rear of the vehicle and support it properly on the safety stands at the designated points.

3. Loosen the wheel nuts and remove the rear wheel.
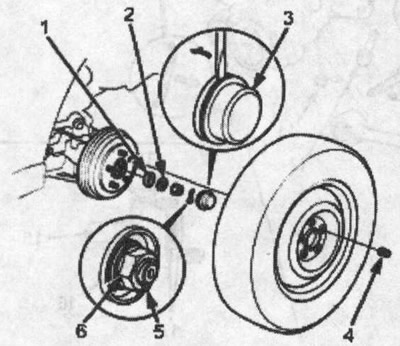
1. REAR WHEEL BRAKE DRUM WASHER

1. REAR WHEEL BRAKE DRUM WASHER
2. REAR WHEEL HUB WASHER
3. HUB CAP. Replace
Note: Be careful not to damage the hub assembly when disassembling.
4. WHEEL NUT, 108 Nm (11 kgf/m)
5. COTTAGE PIN. Replace. When assembling, bend the cotter pin as shown in the figure.
6. AXLE NUT, 22x1.5 mm, 196 Nm (20 kgf/m)
Note: Before tightening the axle nut, apply engine oil to the seating surface of the nut.


4. Release the parking brake lever.

5. Screw two 8x1.25mm bolts into the brake drum to separate it from the hub.

Note: To avoid excessive disc warping, tighten the bolts two turns at a time.


6. Remove the brake drum, hub and ring clamp.
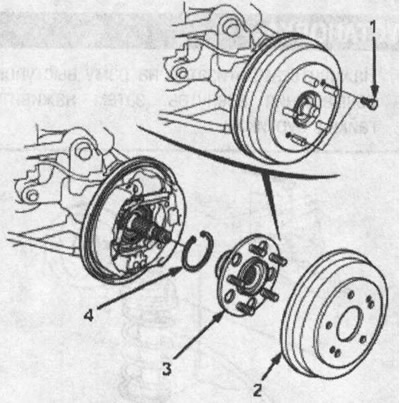
1. 8x1.25 mm

1. 8x1.25 mm
2. BRAKE DRUM
3. REAR WHEEL HUB
4. RING CLAMP


7. Remove the rear drive shaft from the rear axle beam.

8. Remove the rear wheel bearing from the axle beam.
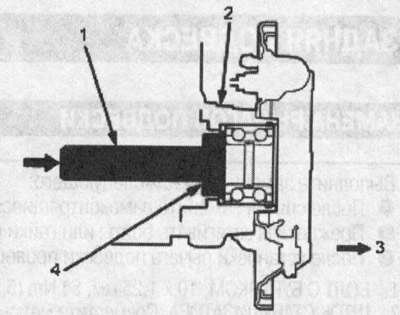
1. MANDREL HANDLE, 07749-0010000

1. MANDREL HANDLE, 07749-0010000
2. REAR AXLE BEAM
3. OUTSIDE
4. MARKET, 42x47 mm, 07746-0010300


9. Press the new rear wheel bearing into the rear axle beam using the old bearing and a metal disc.
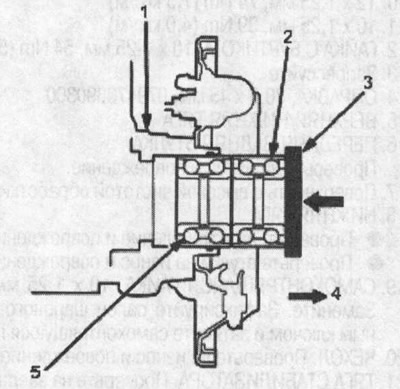
1. REAR AXLE BEAM

1. REAR AXLE BEAM
2. OLD BEARING
3. METAL DISC
4. OUTSIDE
5. NEW WHEEL BEARING


10. Installation is carried out in the reverse order of removal.

11. Check the rear wheel alignment angles (see above).
This article is available at: russian, bulgarian, belarusian, ukrainian, serbian, croatian, romanian, polish, slovak, hungarian
This information has been verified: Emil Safonov
Share with friends:
◀ Previous
HR-V 1: Car suspension
Next ▶

Replacing the rear suspension arms
Front shock absorber — installation
Front shock absorber — assembly
Front shock absorber — check
Front shock absorber — disassembly
Spring, rear shock absorber limiter
Rear shock absorber — removal, inspection and installation
Disposal of shock absorbers
Front and rear suspension specifications
See also other articles from Honda manuals:
Rear Wheel Bearing — 1984-85 Accord Honda Accord 3 (1985-1989)
Removal and installation the rear hub assembly with wheel bearing Honda Civic 6 (1995-2000)
Checking the axial clearance in the rear wheel hub bearing Honda Fit 1 (2001-2008)
Checking the rear wheel alignment Honda CR-V 2 (2002-2006, petrol)
Rear Suspension Knuckle and Hub (4WD Models) — Wheel Bearing… Honda Avancier 1 (1999-2003, petrol)
Link in different formats to this article
Comments and feedback from visitors
No comments yet


How much will 20 + 39 ?


HR-V 1 (1998-2006, petrol) 
  • General information
  • User manual
  • Maintenance
  • Power unit
  • Engine repair
  • Lubrication system
  • Cooling system
  • Fuel injection and control
  • Power and exhaust system
  • Engine electrical equipment
  • Transmission
  • Clutch
  • Mechanical gearbox
  • Automatic gearbox
  • Rear differential
  • Drive shafts and cardan
  • Chassis and running gear
  • Steering
  • Car suspension
  • Brake system
  • Body and interior
  • Exterior (external elements)
  • Interior (internal elements)
  • Doors, locks and windows
  • Electrical equipment
  • Equipment and devices
  • Lighting system
  • Electrical circuits
HondaBook.ru © 2018–2026 • Mobile version • Sitemap: EN BG BY UA RS HR RO PL SK HU • Feedback • Driver Information • Search system • Bookmark
Accord 3 (1985-1989) • Accord 6 (1997-2002) • Civic 3 and 4 (1983-1991) • Civic 5 and 6 (1991-2000) • Civic 6 (1995-2000) • Civic 7 (2000-2005) • Civic 8 (2005-2011) • Fit 1 (2001-2008) • CR-V 1 (1995-2001) • CR-V 2 (2002-2006) • HR-V 1 (1998-2006) • Avancier 1 (1999-2003) •
 
This website uses cookies to ensure proper functioning. By clicking "OK," you agree.