
Withdrawal
1. Disconnect the negative cable from the battery. Raise and secure the vehicle.
2. To remove a casing from the steering hinge and to disconnect a steering column.
3. Drain the fluid by disconnecting the crankcase return hose in the reservoir. Plug the cistern channel and place the end of the hose in a drain pan. Start the engine and turn the steering wheel from the steering wheel lock to the lock. When the fluid stops draining, stop the engine immediately. Remove plug and install hose.
4. Remove the screen from the crankcase.
5. Remove the front wheels.
6. Using a ball joint remover, disconnect the tie rods from the knuckles.
7. If the vehicle is equipped with a manual transmission, remove the switch extension from the transmission housing. Disconnect the shift rod from the gearbox housing by removing the 8mm bolt.
8. If the vehicle is equipped with an automatic transmission, remove the control cable clip.
9. Remove the central beam.
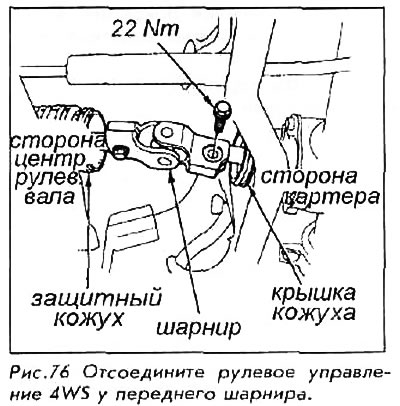
10. On a 4-wheel steering Prelude, separate the hinge guard cover and the guard itself. Remove the pivot bolt from the worm drive side. Remove the pivot bolt from the center side of the steering shaft, then slide the pivot back to disengage it from the drive worm.
11. Remove the head exhaust pipe.
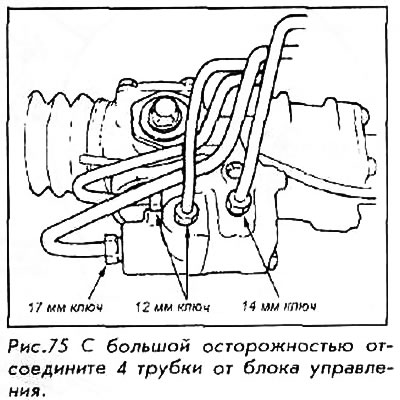
12. Tag and disconnect the hydraulic tubes from the steering control unit. 4 nuts have three different sizes: 12, 14 and 17mm; use box wrenches that fit the tubes exactly.
13. On the Prelude, remove the mounting bolts and lower the front anti-roll bar.
14. Move the tie rods all the way to the right, simulating a left turn.
15. Remove crankcase mounting bolts.
16. Move the crankcase to the right so that the left connecting rod releases the base from the rear beam. Remove the crankcase.
For installation:
17. Fit the crankcase to the vehicle and tighten the clamp bolts to 22 Nm on 1986-89 Accord and to 40 Nm on all other models.
18. Install the anti-roll bar on the Prelude.
19. Attach hydraulic pipes and exhaust pipe.
20. Attach the gearshift link mechanism.
21. Connect the ends of the connecting rod to the steering knuckles. Tighten the nuts to 44 Nm and install a new cotter pin, tightening more if necessary.
22. Attach the steering shaft coupling and tighten it to 30 Nm.
23. Fill reservoir with liquid. Do not fill the tank above the mark "FULL" (full).
Remember that your Honda uses only Honda Power Steering Fluid. Changing to another fluid may damage the system.
24. Bleed the air out of the system. After filling the tank, start the engine and let it run at fast idle by turning the steering wheel several times from one lock to another. Check fluid level and top up if necessary. Turn off the engine.