
HondaBook.ru
Auto companies Volkswagen Auto companies Ford Auto companies Lada Auto companies Skoda Auto companies BMW Auto companies Mazda Auto companies Peugeot
English Русский
Български
Беларускі
Український
Српски
Hrvatski
Română
Polski
Slovenský
Magyar
Bookmark Contacts Sitemap   


Accord Civic Fit / Jazz CR-V HR-V Others Articles
Avancier 1 (1999-2003, petrol)

Checking and adjusting the parking brake pedal (Honda Avancier 1)

  • Main
  • Honda
  • Avancier 1 (1999-2003, petrol)
  • Chassis and running gear
  • Brake system
  • Checking and adjusting the parking brake pedal
0
Contents: Examination ⇊ Fine adjustment ⇊ Basic adjustment ⇊

Examination


Press the parking brake pedal with a force of 294 N (30 kg) and check the pedal travel (count the number of clicks).
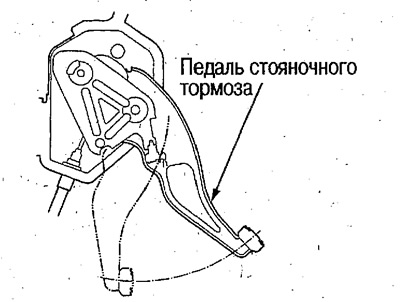
Press the parking brake pedal with a force of 294…


Pedal travel: 5-7 clicks (when pressing the pedal with a force of 294 N (30 kg))
  • If the number of clicks is not within the norm, check the thickness of the parking brake shoe friction linings (see below).
  • If the friction lining thickness is normal, adjust the pedal travel.
  • If minor adjustments are required (1-2 clicks), make adjustments using the pedal adjustment nut, and if major adjustments are required, make adjustments using the adjusters installed in the rear brake drums.

Attention.
  • After replacing the parking brake shoes, perform a basic adjustment and then bed the shoes (see below).
  • If the parking brake shoes were removed for any reason, press the pedal hard several times after installation, and then make the adjustment.


Fine adjustment


1. Raise the rear of the vehicle with a jack and install supports.

2. Rotate the rear wheel with your hands and tighten the pedal adjustment nut until the wheel begins to slow down slightly.


3. Loosen the adjusting nut half a turn and make sure that the wheels do not brake.
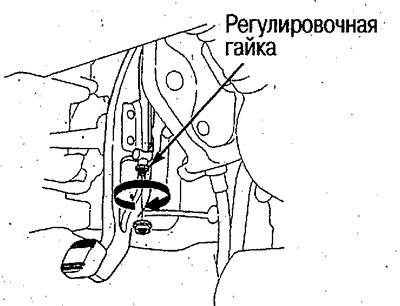
3. Loosen the adjusting nut half a turn and make…


4. Check the travel of the parking brake pedal.

Basic adjustment


1. Raise the rear of the vehicle with a jack and install supports.

2. Loosen the adjusting nut on the parking brake pedal.
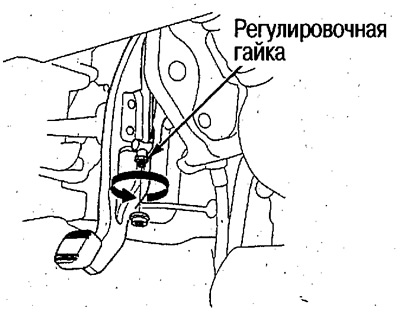
2. Loosen the adjusting nut on the parking brake…


3. Remove the rear wheels and remove the plugs from the brake drums.

4. Turn the regulator through the hole in the direction of spreading the brake shoes (move the teeth up) until the drum locks.

5. Turn the regulator back 8 teeth.
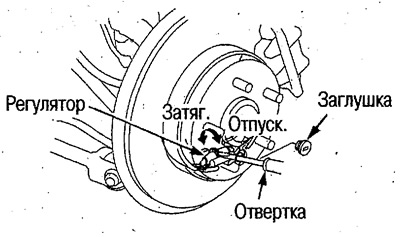
5. Turn the regulator back 8 teeth.


6. Press the parking brake pedal 2 clicks.


7. Rotate the rear wheel with your hands and tighten the pedal adjustment nut until the wheel begins to slow down slightly.

8. Install the plugs on the brake drums.

9. Install the rear wheels, release the parking brake, rotate the rear wheels and make sure that they do not brake.

10. Check the parking brake travel (see above) and adjust if necessary using the adjusting nut.
  • Pedal travel: 5-7 clicks (when pressing the pedal with a force of 294 N (30 kg))


[The text can be found on the website «www.HondaBook.ru»]
This article is available at: russian, bulgarian, belarusian, ukrainian, serbian, croatian, romanian, polish, slovak, hungarian
This information has been verified: Emil Safonov
Share with friends:
◀ Previous
Avancier 1: Brake system
Next ▶

Checking and adjusting the brake pedal
Frequency of checking rubber components and brake booster
Component Locations
Brake system — bleeding
Front Brake Pads — Checking and Replacing
Front brake discs — check for runout
Front brake discs — thickness and parallelism check
Front Brake Discs — Brake Disc Grinding
See also other articles from Honda manuals:
Adjusting the height of the brake pedal Honda Accord 3 (1985-1989)
Checking and adjusting the parking brake Honda Civic 8 (2005-2011)
Parking brake — checking and adjusting Honda Fit 1 (2001-2008)
Adjusting the brake pedal Honda CR-V 1 (1995-2001, petrol)
Parking brake — checking and adjusting Honda HR-V 1 (1998-2006, petrol)
Link in different formats to this article
Comments and feedback from visitors
No comments yet


How much will 18 + 36 ?


Avancier 1 (1999-2003, petrol) 
  • General information
  • Controls and instruments
  • User manual
  • Power unit
  • Engine maintenance
  • Engine repair
  • Cooling system
  • Engine management
  • Power and exhaust system
  • Transmission
  • Automatic gearbox
  • Drive shafts and differential
  • Chassis and running gear
  • Steering
  • Car suspension
  • Brake system
  • Body and interior
  • Doors, locks and windows
  • Interior (internal elements)
  • Exterior (external elements)
  • Air conditioner
  • Electrical equipment
  • Power devices
  • Equipment and devices
  • Headlights and lighting
  • Electrical circuits
HondaBook.ru © 2018–2026 • Mobile version • Sitemap: EN BG BY UA RS HR RO PL SK HU • Feedback • Driver Information • Search system • Bookmark
Accord 3 (1985-1989) • Accord 6 (1997-2002) • Civic 3 and 4 (1983-1991) • Civic 5 and 6 (1991-2000) • Civic 6 (1995-2000) • Civic 7 (2000-2005) • Civic 8 (2005-2011) • Fit 1 (2001-2008) • CR-V 1 (1995-2001) • CR-V 2 (2002-2006) • HR-V 1 (1998-2006) • Avancier 1 (1999-2003) •
 
This website uses cookies to ensure proper functioning. By clicking "OK," you agree.