Examination
Warning! When checking, do not allow dust or other foreign objects to enter the gearbox.
Note:
- Check the fluid level with the engine warmed up to normal operating temperature (radiator fan turns on twice).
- Check the fluid level 60-90 seconds after the engine has stopped.
1. Park the vehicle on level ground, then turn off the engine.
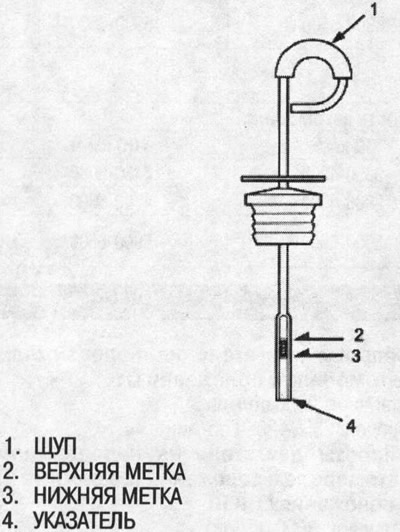
2. Remove the dipstick (with yellow ring) out of the gearbox and wipe with a cloth.
3. Reinsert the dipstick into the transmission, then remove it.
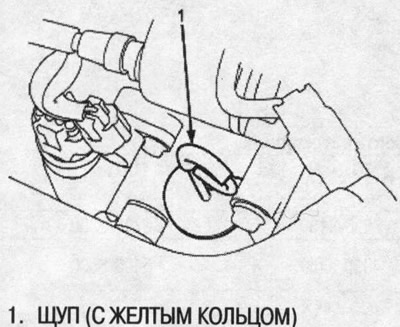
4. Check fluid level. It should be between the top and bottom marks on the index.
5. If the level is below the lower mark, add liquid to the filler hole and bring it to the upper mark. Use only the following recommended fluid.
- Models for Europe: Genuine Honda CVT Fluid.
- Except Europe models: Genuine Honda ATF PREMIUM (Automatic Transmission Fluid-PREMIUM).
The use of other fluids may adversely affect the operation of the transmission and reduce its life.
6. Insert the dipstick back into the gearbox.
Replacement
Warning! When replacing, do not allow dust and other foreign objects to enter the gearbox.
Replacement intervals:
- Models for Europe:
- Under normal and severe operating conditions: Every 45,000 km or 36 months.
Note: Change the CVT fluid every 22,500 km or 18 months if the vehicle is driven mainly at high speeds and at elevated ambient temperatures in addition to severe driving conditions (32°C).
- Except for European models: every 40,000 km or 24 months, then every 20,000 km or 12 months.
1. Warm up the transmission to normal operating temperature (radiator fan turns on), by traveling by car.
2. Park the vehicle on level ground, then turn off the engine.
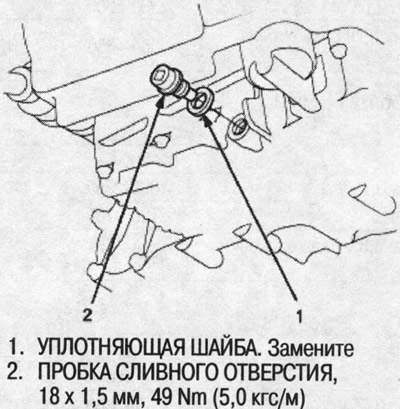
3. Remove the drain plug and drain the transmission fluid.
4. Replace the drain plug with a new washer.
5. Fill the gearbox with the recommended fluid through the filler hole to the top mark on the level indicator scale. Always use the following recommended fluid:
- Models for Europe: Genuine Honda CVT Fluid.
- Except Europe models: Genuine Honda ATF PREMIUM (Automatic Transmission Huid-PREMIUM).
The use of other fluids may adversely affect the operation of the transmission and reduce its life.
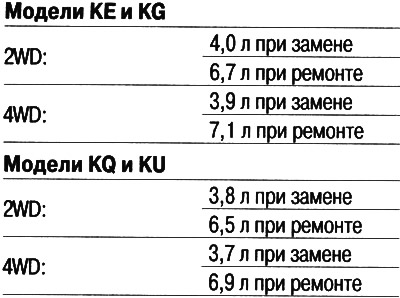
Transmission Fluid Capacity:
Pressure test
Warning!
- Beware of spinning wheels when testing.
- Make sure the lifts, jacks and safety stands are properly installed.
- Make sure the gearbox is filled to the correct level before testing.
- Warm up the engine to normal operating temperature (radiator fan turns on).
- When carrying out the test, do not allow dust or other foreign objects to enter the gearbox.
1. Make sure that the fluid in the gearbox is filled to the required level.
2. Raise the car:
- 2WD: Raise the front of the vehicle and secure it securely. Engage the parking brake and chock the rear wheels.
- 4WD: Raise the vehicle.
3. Ensure that the raised wheels turn freely.
4. Warm up the engine to normal operating temperature (radiator fan turns on), then plug and connect a tachometer.
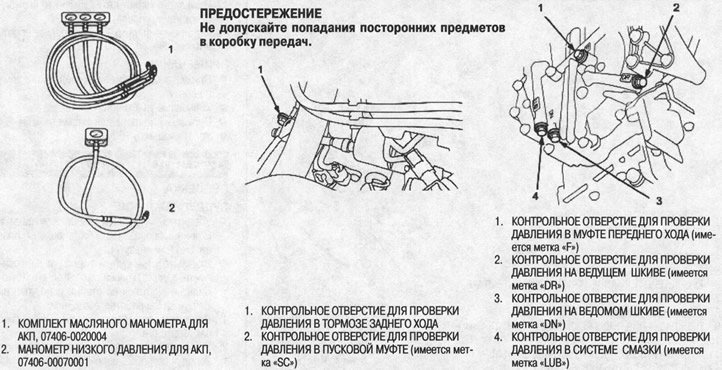
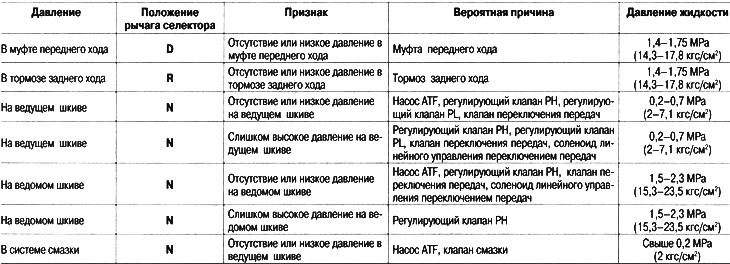
5. Connect a special tool to each of the inspection holes (picture on next page above).
Tightening torque: 18 Nm (1.8 kgf/m).
Note:
- If there is a fault in the transmission that causes the PCM to go into fail-safe mode, the drive pulley pressure may be greater than 3430 kPa (3.43 MPa, 35.0 kgf/cm2).
- Use an oil pressure gauge (available for sale) with measurement limit up to 4900 kPa (4.90 MPa, 50.0 kgf/cm2) or more and a set of oil pressure gauge for automatic transmission and low pressure gauge for automatic transmission.
Warning!
- Connect the oil pressure gauge securely, and prevent dust and other foreign matter from entering the gearbox through the inspection hole.
- If, during troubleshooting, the warning light D indicates a problem, you must use an oil pressure gauge with a measurement range of up to 4900 kPa to measure the pressure in the drive and driven pulleys (4.90 MPa, 50.0 kgf/cm2) or more.
6. Start the engine.
7. Move the selector lever to the appropriate position as shown in the table and measure the pressure in the following components at 1500 rpm.
- Forward clutch pressure
- Reverse brake pressure
- Drive pulley pressure
- Driven pulley pressure
8. Switch to position N and measure the pressure in the lubrication system at a speed of 3000 rpm.
9. Disconnect the special tool after hydraulic testing.
10. Screw the plug into the control hole, installing a new sealing washer and tighten to the required torque.
Tightening torque: 18 Nm (1.8 kgf/m).