
HondaBook.ru
Auto companies Volkswagen Auto companies Ford Auto companies Lada Auto companies Skoda Auto companies BMW Auto companies Mazda Auto companies Peugeot
English Русский
Български
Беларускі
Український
Српски
Hrvatski
Română
Polski
Slovenský
Magyar
Bookmark Contacts Sitemap   


Accord Civic Fit / Jazz CR-V HR-V Others Articles
HR-V 1 (1998-2006, petrol)

Locking system (models KQ and KU) (Honda HR-V 1)

  • Main
  • Honda HR-V
  • 1 (1998-2006, petrol)
  • Transmission
  • Automatic gearbox
  • Locking system (models KQ and KU)
0
Contents: Testing the Key Lock Solenoid ⇊ Testing the Parking Switch ⇊ Testing the Shift Lock Solenoid ⇊ Replacing the Shift Lock Solenoid ⇊

Testing the Key Lock Solenoid


This area contains the Supplemental Restraint System (SRS) components. Review the SRS component locations, precautions, and procedures before performing repairs or maintenance.

1. Remove the lower instrument panel cover.

2. Disconnect the key lock switch connector from the steering column lock assembly.

3. Move the selector lever to position P.

4. Check for conductivity between the connector contacts when the key is inserted and for no conductivity when the key is removed.
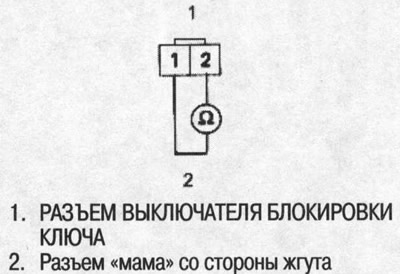
4. Check for conductivity between the connector…


5. Make sure that the key cannot be removed when power is supplied to pin #2 and ground is supplied to pin #1.
  • If the key cannot be removed, the key lock solenoid is OK.
  • If the key can be removed, replace the steering column lock assembly (the key lock solenoid is not supplied separately).

Testing the Parking Switch


1. Remove the front console.

2. Disconnect the parking switch connector.

3. Move the selector lever to position P, then check for continuity between the connector contacts. There should be continuity.
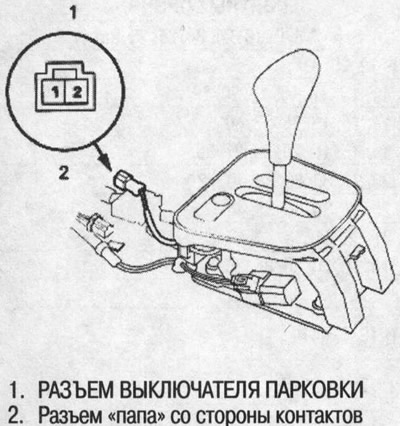


3. Move the selector lever to position P, then…


4. Move the selector lever from position P, then check for continuity. There should be no continuity.

5. If the parking switch is faulty, replace the lock plate.

Note:
  • The parking switch is not supplied separately from the locking plate; they form one whole.
  • If the parking switch needs to be replaced, see the selector lever disassembly below for more details.


Testing the Shift Lock Solenoid


1. Remove the front console.

2. Disconnect the shift lock solenoid connector.

3. Connect terminal #1 to the positive battery terminal and terminal #2 to the negative battery terminal.

4. Check that the selector lever can be moved from the P position. Disconnect the battery terminals from the shift lock solenoid connector, move the selector lever back to the P position and check that it locks in place.
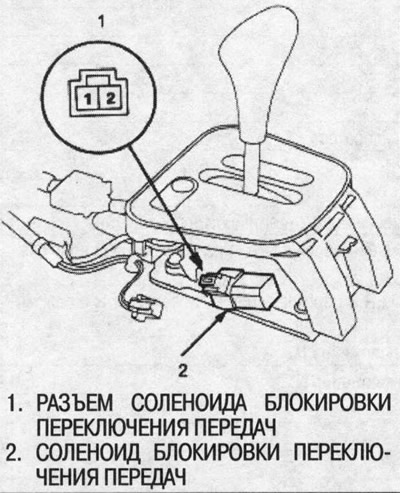
4. Check that the selector lever can be moved…


Note: Do not apply power to pin #2 (reverse polarity) or you will damage the diode inside the solenoid.


5. Check that the gear shift is unlocked when the release lever is pressed and locked when the release lever is released.

6. If the solenoid does not work, replace it.

Replacing the Shift Lock Solenoid


1. Remove the front console.

2. Disconnect the shift lock solenoid connector.

3. Remove the two screws on the side of the automatic transmission selector switch, then remove the shift lock solenoid.

4. Insert the plunger and plunger spring into the new shift lock solenoid.

5. Apply silicone grease to the tip of the shift lock stop on the lock plate and the plunger.

6. Install the shift lock solenoid by aligning the shift lock solenoid plunger joint with the tip of the shift lock limiter.

7. Secure the shift lock solenoid with two screws, then connect the connector.
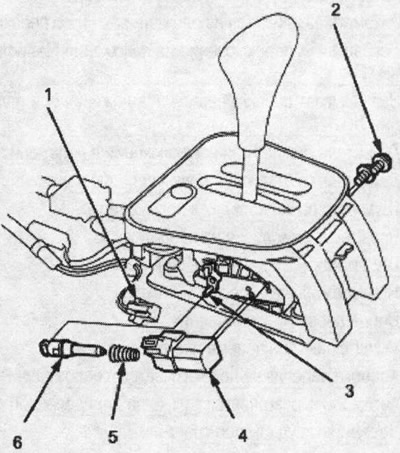
1. SHIFT LOCK SOLENOID CONNECTOR

1. SHIFT LOCK SOLENOID CONNECTOR
2. SCREW, 3 Nm (0.3 kgf/m)
3. TIP OF THE SHIFT LOCK LIMITER
4. GEAR SHIFT LOCK SOLENOID
5. PLUNGER SPRING
6. PLUNGER
This article is available at: russian, bulgarian, belarusian, ukrainian, serbian, croatian, romanian, polish, slovak, hungarian
This information has been verified: Emil Safonov
Share with friends:
◀ Previous
HR-V 1: Automatic gearbox
Next ▶

Automatic transmission range indicator
Automatic transmission selector switch
Starter clutch control
Speed sensors for the leading pulley, driven pulley and secondary shaft
Linear control solenoids and locking solenoid
Table of automatic transmission faults
Road test of automatic transmission
Engine speed when the vehicle is stationary
Fluid level — checking and replacement
Lower valve box — replacement
See also other articles from Honda manuals:
Locking system — general information, checking, replacement and… Honda Accord 6 (1997-2002)
Fuel system unloading (injection models) Honda Civic 3 and 4 (1983-1991)
Central locking and remote control central locking system Honda Fit 1 (2001-2008)
Rear view camera (models with navigation system) Honda CR-V 2 (2002-2006, petrol)
Audio system wiring diagram (models with Premium audio system) Honda Avancier 1 (1999-2003, petrol)
Link in different formats to this article
Comments and feedback from visitors
No comments yet


How much will 35 + 50 ?


HR-V 1 (1998-2006, petrol) 
  • General information
  • User manual
  • Maintenance
  • Power unit
  • Engine repair
  • Lubrication system
  • Cooling system
  • Fuel injection and control
  • Power and exhaust system
  • Engine electrical equipment
  • Transmission
  • Clutch
  • Mechanical gearbox
  • Automatic gearbox
  • Rear differential
  • Drive shafts and cardan
  • Chassis and running gear
  • Steering
  • Car suspension
  • Brake system
  • Body and interior
  • Exterior (external elements)
  • Interior (internal elements)
  • Doors, locks and windows
  • Electrical equipment
  • Equipment and devices
  • Lighting system
  • Electrical circuits
HondaBook.ru © 2018–2026 • Mobile version • Sitemap: EN BG BY UA RS HR RO PL SK HU • Feedback • Driver Information • Search system • Bookmark
Accord 3 (1985-1989) • Accord 6 (1997-2002) • Civic 3 and 4 (1983-1991) • Civic 5 and 6 (1991-2000) • Civic 6 (1995-2000) • Civic 7 (2000-2005) • Civic 8 (2005-2011) • Fit 1 (2001-2008) • CR-V 1 (1995-2001) • CR-V 2 (2002-2006) • HR-V 1 (1998-2006) • Avancier 1 (1999-2003) •
 
This website uses cookies to ensure proper functioning. By clicking "OK," you agree.