
HondaBook.ru
Auto companies Volkswagen Auto companies Ford Auto companies Lada Auto companies Skoda Auto companies BMW Auto companies Mazda Auto companies Peugeot
English Русский
Български
Беларускі
Український
Српски
Hrvatski
Română
Polski
Slovenský
Magyar
Bookmark Contacts Sitemap   


Accord Civic Fit / Jazz CR-V HR-V Others Articles
HR-V 1 (1998-2006, petrol)

Cylinder head — removal (Honda HR-V 1)

  • Main
  • Honda HR-V
  • 1 (1998-2006, petrol)
  • Power unit
  • Engine repair
  • Cylinder head — removal
0
This procedure does not require engine removal.

Note:
  • To avoid damaging the paintwork, cover the fenders with protective cloth.
  • To avoid damaging the wiring, disconnect it carefully by grasping the connector.
  • To avoid damaging the cylinder head, wait until the engine coolant temperature drops to 38°C before loosening the mounting bolts.
  • To avoid incorrect connections, label all wiring and hoses. Also, make sure they do not touch other wiring or hoses or interfere with other components.


1. Fix the hood in the open position.

2. First disconnect the cable from the negative battery terminal, then from the positive one.

3. Drain the engine coolant.

4. Remove air intake B.
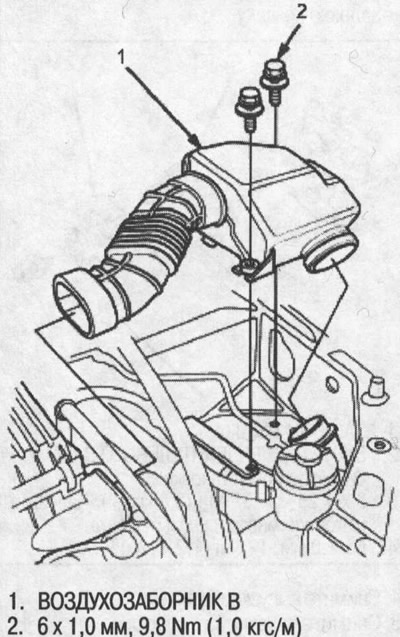
4. Remove air intake B.


5. Remove the breather hose, then disconnect the intake air temperature (IAT) sensor connector.

6. Remove the air filter housing and air intake pipe.
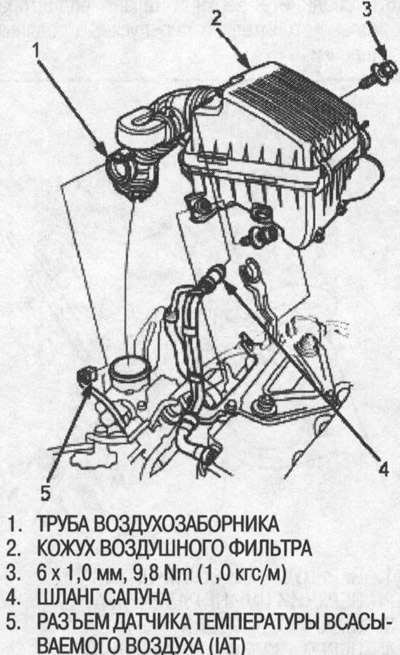
6. Remove the air filter housing and air intake…


7. Remove the mounting bolt and lock bolt, then remove the power steering (P/S) pump drive belt and the pump itself without disconnecting the hoses from the power steering.
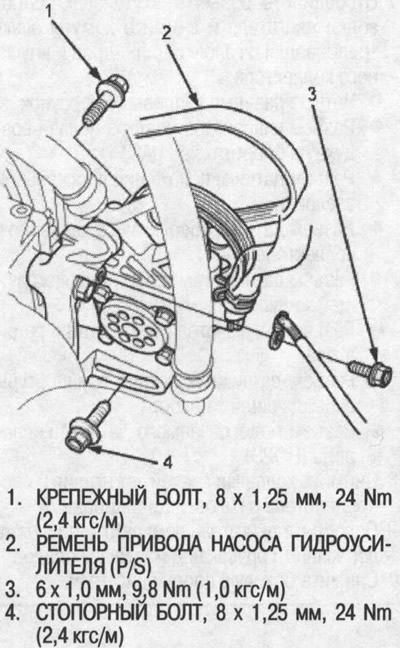


7. Remove the mounting bolt and lock bolt, then…


8. Remove the power steering pump bracket (P/S).
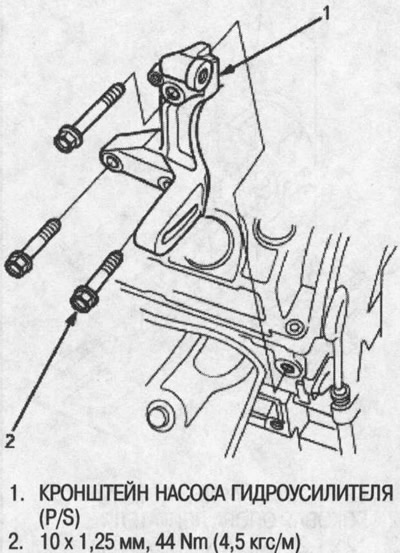
8. Remove the power steering pump bracket (P/S).


9. Loosen the center nut and adjusting bolt of the tension pulley, remove the air conditioning (A/C) compressor drive belt.
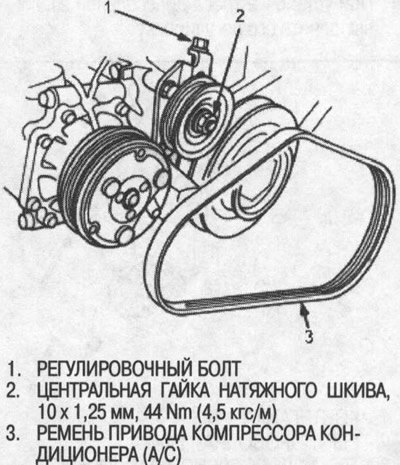
9. Loosen the center nut and adjusting bolt of…


10. Loosen the mounting nut and lock bolt, remove the generator drive belt.
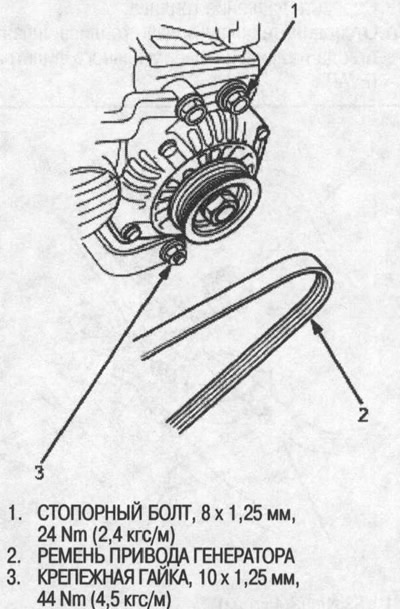
10. Loosen the mounting nut and lock bolt, remove…


11. Remove engine mount bracket A and generator upper bracket.
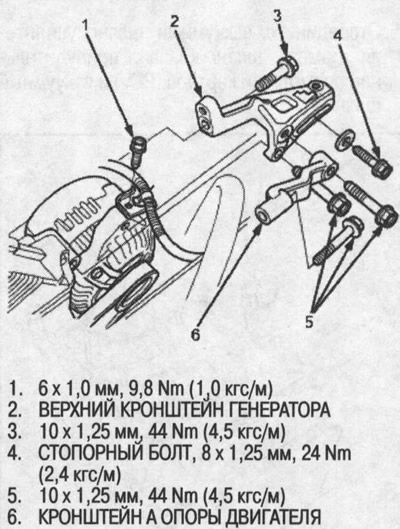


11. Remove engine mount bracket A and generator…


12. Remove the throttle cable by loosening the lock nut, then remove the cable end from the accelerator drive.

Note:
  • Do not bend the cable when removing it. Replace the kinked cable with a new one.
  • When installing the throttle cable, adjust it.
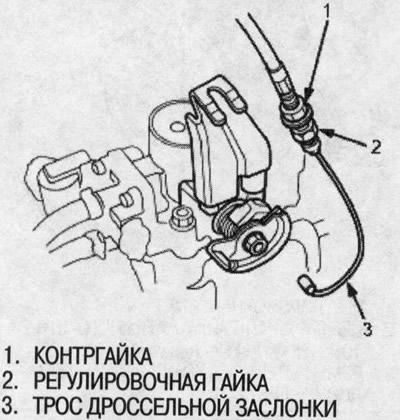

When installing the throttle cable, adjust it.


13. Relieve the fuel pressure.

14. Disconnect the fuel supply hose, fuel return hose and EVAP canister hose.
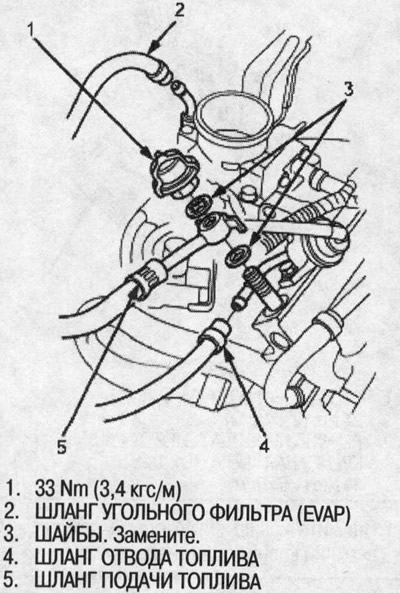
14. Disconnect the fuel supply hose, fuel return…


15. Disconnect the brake booster vacuum hose, positive crankcase ventilation (PCV) valve hose and vacuum hose.
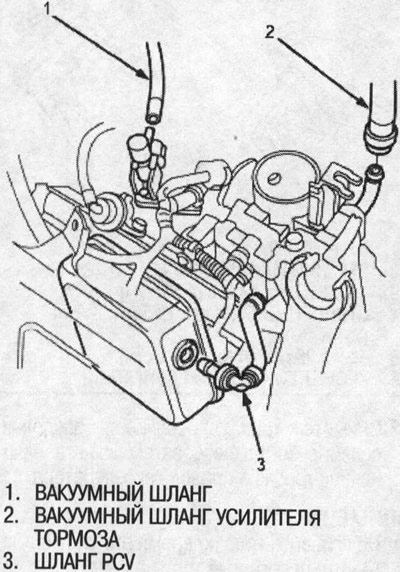


15. Disconnect the brake booster vacuum hose,…


16. Disconnect the upper radiator hose, heater hose and water bypass hoses.
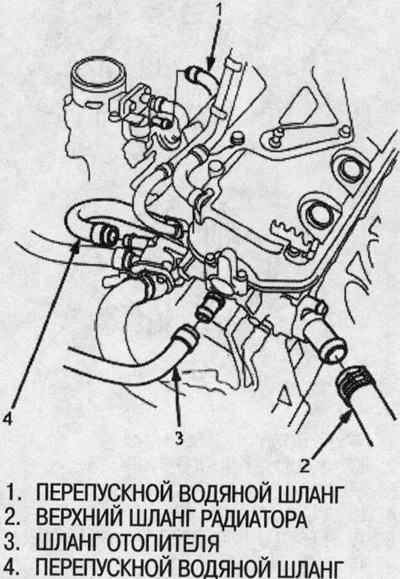
16. Disconnect the upper radiator hose, heater…


17. Disconnect the engine wiring harness connectors and remove the wiring clamps from the cylinder head and intake manifold.
  • Four fuel injector connectors
  • Idle Air Control Valve (IAC) connector
  • Throttle Position Sensor Connector
  • Manifold Absolute Pressure (MAP) Sensor Connector
  • Engine Coolant Temperature (ECT) Sensor Connector
  • Radiator Fan Switch Connector
  • Coolant Temperature Gauge Sensor Connector
  • Heated Oxygen Sensor (HO2S) Connector

18. Remove the spark plug caps and distributor from the cylinder head.

19. Support the engine with a jack, placing a wooden block under the oil pan.

20. Remove the side engine support.
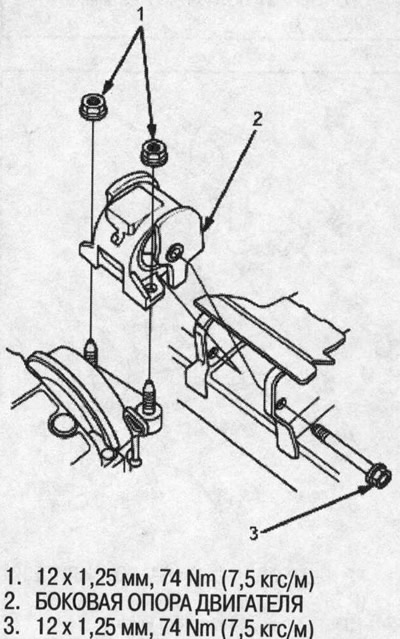
20. Remove the side engine support.


21. Remove the air cleaner housing bracket, then remove the cylinder head cover.
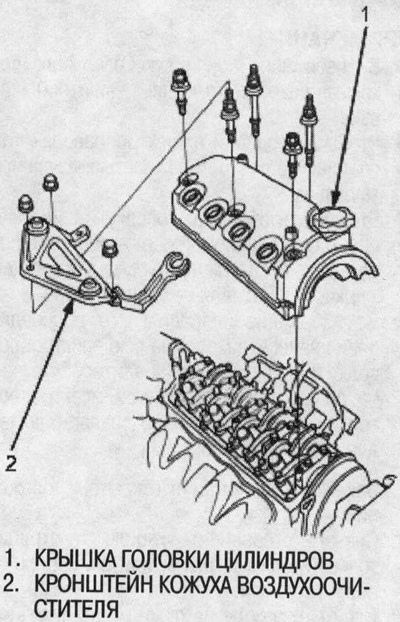


21. Remove the air cleaner housing bracket, then…


22. Remove the timing belt (see above).

23. Remove the camshaft pulley and rear cover.
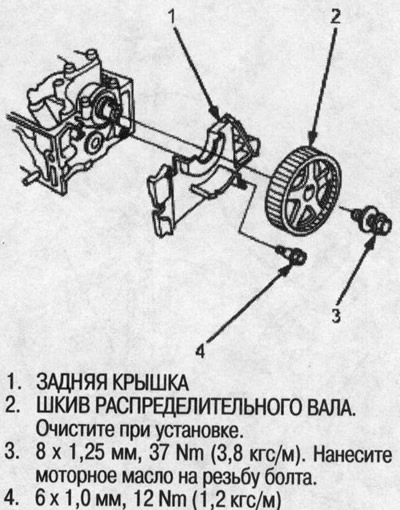
23. Remove the camshaft pulley and rear cover.


24. Remove the exhaust manifold.

25. Remove the intake manifold.

26. Loosen the cylinder head bolts. To prevent the head from warping, loosen the bolts 1/3 of a turn at a time; repeat the operation until all bolts are loosened.
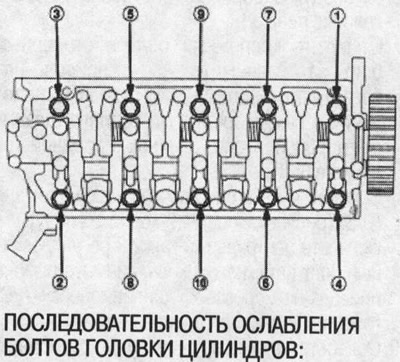
26. Loosen the cylinder head bolts. To prevent…


27. Remove the cylinder head.
This article is available at: russian, bulgarian, belarusian, ukrainian, serbian, croatian, romanian, polish, slovak, hungarian
This information has been verified: Emil Safonov
Share with friends:
◀ Previous
HR-V 1: Engine repair
Next ▶

Cylinder head — design description
Replacing the exhaust pipe and muffler
Replacing the exhaust manifold
Replacing the intake manifold
Timing Belt — Installation
Valve Rocker Arms — Removal
Valve rocker arms — disassembly and assembly
Valve Rocker Arms and Axles — Checking Clearances
Camshaft — Check
Valves, springs and seals — removal
See also other articles from Honda manuals:
Cleaning and inspection of the cylinder head Honda Accord 3 (1985-1989)
Cylinder Head Cover — Removal and Installation Honda Civic 3 and 4 (1983-1991)
Removal the cylinder head Honda Fit 1 (2001-2008)
Checking the general condition of the cylinder head Honda CR-V 1 (1995-2001, petrol)
Cylinder head component arrangement Honda Avancier 1 (1999-2003, petrol)
Link in different formats to this article
Comments and feedback from visitors
No comments yet


How much will 44 + 50 ?


HR-V 1 (1998-2006, petrol) 
  • General information
  • User manual
  • Maintenance
  • Power unit
  • Engine repair
  • Lubrication system
  • Cooling system
  • Fuel injection and control
  • Power and exhaust system
  • Engine electrical equipment
  • Transmission
  • Clutch
  • Mechanical gearbox
  • Automatic gearbox
  • Rear differential
  • Drive shafts and cardan
  • Chassis and running gear
  • Steering
  • Car suspension
  • Brake system
  • Body and interior
  • Exterior (external elements)
  • Interior (internal elements)
  • Doors, locks and windows
  • Electrical equipment
  • Equipment and devices
  • Lighting system
  • Electrical circuits
HondaBook.ru © 2018–2026 • Mobile version • Sitemap: EN BG BY UA RS HR RO PL SK HU • Feedback • Driver Information • Search system • Bookmark
Accord 3 (1985-1989) • Accord 6 (1997-2002) • Civic 3 and 4 (1983-1991) • Civic 5 and 6 (1991-2000) • Civic 6 (1995-2000) • Civic 7 (2000-2005) • Civic 8 (2005-2011) • Fit 1 (2001-2008) • CR-V 1 (1995-2001) • CR-V 2 (2002-2006) • HR-V 1 (1998-2006) • Avancier 1 (1999-2003) •
 
This website uses cookies to ensure proper functioning. By clicking "OK," you agree.