
HondaBook.ru
Auto companies Volkswagen Auto companies Ford Auto companies Lada Auto companies Skoda Auto companies BMW Auto companies Mazda Auto companies Peugeot
English Русский
Български
Беларускі
Український
Српски
Hrvatski
Română
Polski
Slovenský
Magyar
Bookmark Contacts Sitemap   


Accord Civic Fit / Jazz CR-V HR-V Others Articles
Accord 3 (1985-1989) Accord 6 (1997-2002)

Rear Wheel Bearing — Prelude (Honda Accord 3)

  • Main
  • Honda Accord
  • 3 (1985-1989)
  • Chassis and running gear
  • Rear suspension
  • Rear Wheel Bearing — Prelude
0
WARNING: Requires the use of special tools or equivalent. A hydraulic press and appropriately sized punches and stands are required to disassemble the hub and bearing.


1. Loosen the rear wheel nuts slightly. Raise the car and secure it securely.

2. Release the parking brake. Remove the rear wheel.

3. Remove the bolts holding the brake caliper and remove the caliper from the knuckle. Do not leave the caliper hanging on the brake hose; secure it with a piece of wire.

4. Remove the two 6mm screws from the brake disc. Install the two 8x12mm bolts into the holes in the brake disc, then remove the disc from the rear hub.

5. Remove the cotter pin from the lower control arm B on 2-wheel steering vehicles, or from the tie rod on 4-wheel steering vehicles, and remove the castle nut.

6. Separate the ball joint of the connecting rod using a special tool for removing ball joints.

7. Remove the cotter pin and loosen the lower arm ball joint nut by half the thread length.

8. Separate the ball joint and lower arm using a puller.

9. Remove the castle nut and cotter pin. Separate the upper ball joint using the special tool. Remove the knuckle assembly from the vehicle.

10. Remove the spindle nut from the rear hub. Remove the mudguard mounting bolts.

11. Remove the mudguard and 68mm snap ring from the knuckle.

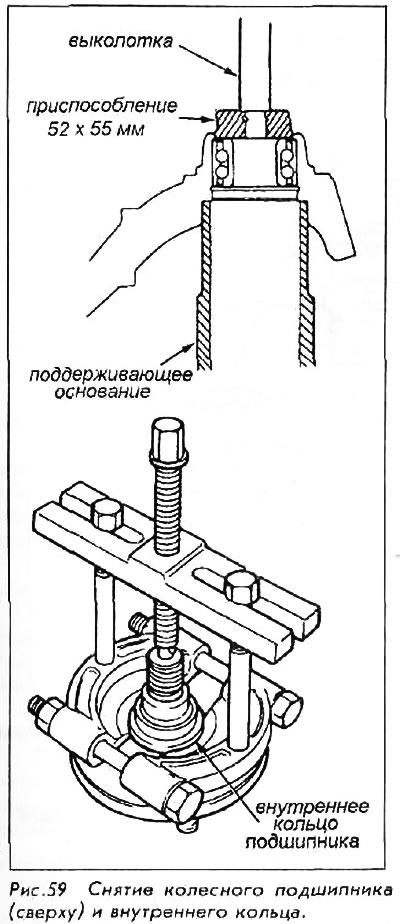
12. Using a hydraulic press and the necessary tools, press the wheel bearing out of the knuckle.

13. Remove the inner bearing ring using a bearing puller.
13. Remove the inner bearing ring using a bearing…


To install:


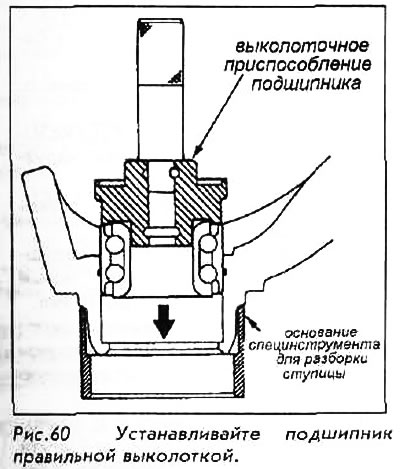
14. Place the rear wheel bearing in the special tool clamps. Install the knuckle in place and apply a hydraulic press. Seat the 68 mm snap ring in the groove on the knuckle.


14. Place the rear wheel bearing in the special…


15. Install the mudguard. Place the hub in the clamps of the special tool, then install the knuckle in place and apply a hydraulic press. Install the rear hub nut and tighten the spindle nut to 250 Nm.

16. Install the knuckle assembly onto the vehicle and tighten all nuts and bolts. Tighten the lower ball joint nut to 55 Nm, then install a new cotter pin, tightening the nut a little more if necessary.

17. On vehicles with 4-wheel steering, tighten the tie rod end joint to 44 Nm, then install a new cotter pin, tightening the joint further if necessary.
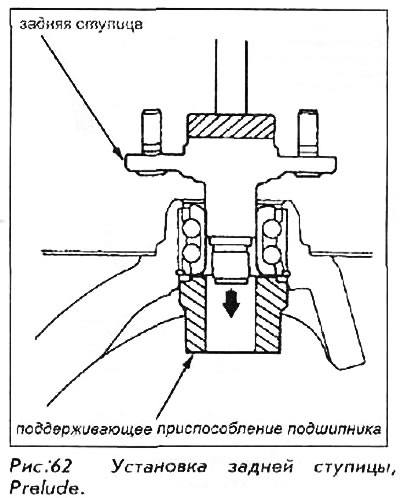
17. On vehicles with 4-wheel steering, tighten…


18. Once everything is assembled, lower the car to the ground and tighten the rubber bushing nuts and bolts. Tighten the upper bushing nut to 44 Nm and the lower bushing bolt to 55 Nm.
This article is available at: russian, bulgarian, belarusian, ukrainian, serbian, croatian, romanian, polish, slovak, hungarian
This information has been verified: Yaroslav Shiryaev
Share with friends:
◀ Previous
Accord 3: Rear suspension
Next ▶

Rear Wheel Bearing — Accord 1986-91
Rear Wheel Bearing — 1984-85 Accord
Suspension arms — removal and installation
Spring and Shock — Prelude 1988-91
Spring and Shock — Prelude 1984-87
Rear wheel bearing — adjustment
Rear Suspension Tightening Torque Specifications
See also other articles from Honda manuals:
Removal and installation the rear hub assembly with wheel bearing Honda Civic 6 (1995-2000)
Checking the axial clearance in the rear wheel hub bearing Honda Fit 1 (2001-2008)
Checking the rear wheel alignment Honda CR-V 2 (2002-2006, petrol)
Rear Wheel Bearing — Replacement Honda HR-V 1 (1998-2006, petrol)
Rear Suspension Knuckle and Hub (4WD Models) — Wheel Bearing… Honda Avancier 1 (1999-2003, petrol)
Link in different formats to this article
Comments and feedback from visitors
No comments yet


How much will 10 + 36 ?


Accord 6 (1997-2002) 
  • General information
  • Introduction to the guide
  • User manual
  • Maintenance
  • Power unit
  • Four-cylinder engines
  • Six-cylinder engines
  • Engine overhaul
  • Cooling system
  • Heater and air conditioner
  • Power and exhaust systems
  • Engine electrical equipment
  • Engine management
  • Transmission
  • Mechanical gearbox
  • Automatic gearbox
  • Clutch and drive shafts
  • Chassis and running gear
  • Brake system
  • Car suspension
  • Steering
  • Body and interior
  • Exterior (external elements)
  • Interior (internal elements)
  • Electrical equipment
  • Equipment and devices
  • Electrical circuits
Accord 3 (1985-1989) 
  • General information
  • Maintenance
  • Power unit
  • Engine adjustment
  • Engine repair
  • Engine electrics
  • Emission management
  • Engine management (carburetor)
  • Electronic injection
  • Programmable injection
  • Schematic of emission system
  • Fuel system
  • Feedback management
  • Transmission
  • Manual gearbox
  • Automatic gearbox
  • Clutch
  • Chassis and running gear
  • Front suspension
  • Rear suspension
  • Steering
  • Brake system
  • Electrical equipment
  • Ventilation and heating
  • Air conditioner
  • Cruise control system
  • Equipment and devices
HondaBook.ru © 2018–2026 • Mobile version • Sitemap: EN BG BY UA RS HR RO PL SK HU • Feedback • Driver Information • Search system • Bookmark
Accord 3 (1985-1989) • Accord 6 (1997-2002) • Civic 3 and 4 (1983-1991) • Civic 5 and 6 (1991-2000) • Civic 6 (1995-2000) • Civic 7 (2000-2005) • Civic 8 (2005-2011) • Fit 1 (2001-2008) • CR-V 1 (1995-2001) • CR-V 2 (2002-2006) • HR-V 1 (1998-2006) • Avancier 1 (1999-2003) •
 
This website uses cookies to ensure proper functioning. By clicking "OK," you agree.