
HondaBook.ru
Auto companies Volkswagen Auto companies Ford Auto companies Lada Auto companies Skoda Auto companies BMW Auto companies Mazda Auto companies Peugeot
English Русский
Български
Беларускі
Український
Српски
Hrvatski
Română
Polski
Slovenský
Magyar
Bookmark Contacts Sitemap   


Accord Civic Fit / Jazz CR-V HR-V Others Articles
HR-V 1 (1998-2006, petrol)

Crankshaft — installation (Honda HR-V 1)

  • Main
  • Honda HR-V
  • 1 (1998-2006, petrol)
  • Power unit
  • Engine repair
  • Crankshaft — installation
0
Before installing the crankshaft, apply engine oil to the main and connecting rod bearings.

1. Insert thrust washers onto journal No.4 of the cylinder block.

2. Insert the bearing shells into the cylinder block bed and onto the connecting rods.

3. Hold the crankshaft so that the crankpins for cylinders No.2 and No.3 are at the bottom.

4. Lower the crankshaft into the cylinder block bed, seating the crankpins in connecting rods No.2 and No.3, install the caps and tighten the nuts by hand.
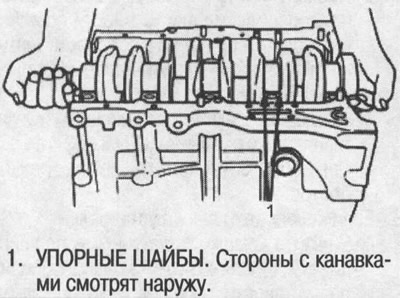
4. Lower the crankshaft into the cylinder block…


5. Turn the crankshaft clockwise, seat the journals in connecting rods No.1 and No.4, install the caps and tighten the nuts by hand.

Note: Install the caps so that the recesses in the bearings are on the same side as the recesses in the connecting rods.


6. Check the connecting rod bearing clearance using a Plastigage gauge (see above), then tighten the cover nuts to 31 Nm (3.2 kgf/m). Apply engine oil to the bolt threads.

Note: The reference numbers on the connecting rods indicate the diameter of the big end of the connecting rod and have no bearing on the location of the piston in the engine.


7. Install the thrust washers on journal No.4. Lubricate the surfaces of the thrust washers with oil.
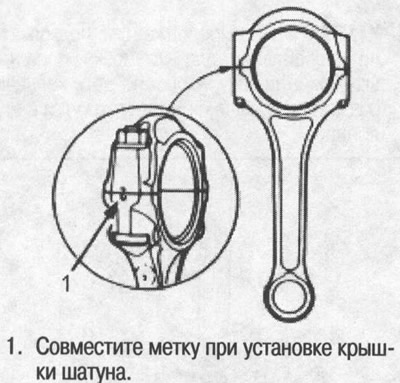


7. Install the thrust washers on journal No.4.…


8. Install the main bearing caps.

9. Check the gap using a calibrated Plastigage wire (see above), then tighten the bearing cap bolts in two passes.
  • 1st pass: 25 Nm (2.5 kgf/m)
  • 2nd pass: 51 Nm (5.2 kgf/m)

Note: Apply oil to the surfaces of the thrust washers and the threads of the bolts.


Note: If you replace the main or connecting rod bearing, after assembly, let the engine run at idle speed until it warms up to normal operating temperature, then for about 15 more minutes.


Note:
  • Use sealant P/N 08C70-K0234M, 08C70-K0334M or 08C70-X0331S.
  • Before applying sealant, ensure that the contact surfaces are clean and dry.
  • Apply the sealant evenly, distributing it over the entire contact surface.
  • To prevent oil leakage, apply sealant to the threads of the bolt holes.
  • Do not install components if more than five minutes have passed since applying the sealant. Instead, reapply the sealant, removing any traces of the old one.
  • After assembly, wait at least 30 minutes before adding oil to the engine.


10. Apply sealant to the contact surface of the cylinder block on the right cover side, then install it on the cylinder block.
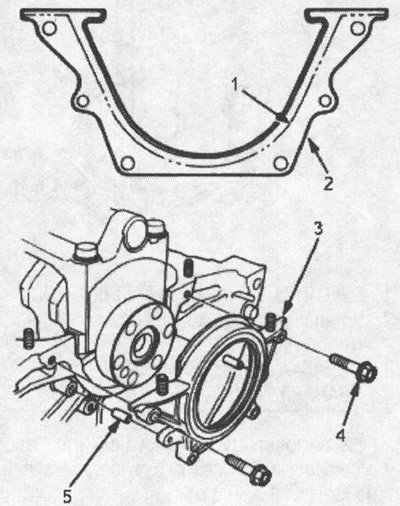


1. Apply sealant along the dotted line.

1. Apply sealant along the dotted line.
2. RIGHT COVER
3. RIGHT COVER
4. 6x1.0 mm 11 Nm (1.1 kgf/m)
5. REFERENCE PIN


11.Apply sealant to the contact surface of the cylinder block on the oil pump side, then install the oil pump to the cylinder block.
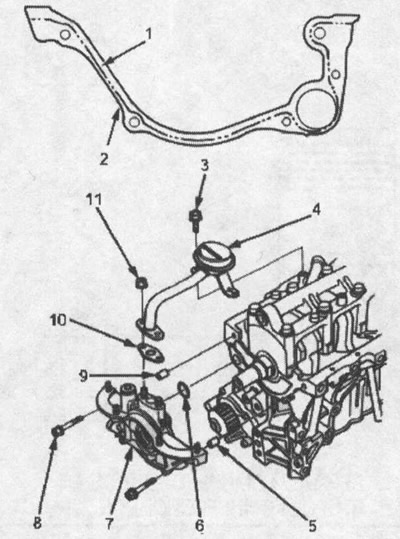
1. Apply sealant along the dotted line.

1. Apply sealant along the dotted line.
2. OIL PUMP HOUSING
3. 3x1.0 mm, 11 Nm (1.1 kgf/m)
4. MESH OIL FILTER
5. REFERENCE PIN
6. O-RING. Replace.
7. OIL PUMP
8. 6x1.0 mm, 11 Nm (1.1 kgf/m)
9. REFERENCE PIN
10. GASKET. Replace.
11. 6x1.0 mm, 11 Nm (1.1 kgf/m)


Apply grease to the lips of the oil seals. Then install the oil pump, aligning the internal gear with the crankshaft. After installing the pump, remove excess grease from the crankshaft, then make sure the oil seal is not deformed.

[The original is located on the website: www.hondabook.ru]
This article is available at: russian, bulgarian, belarusian, ukrainian, serbian, croatian, romanian, polish, slovak, hungarian
This information has been verified: Emil Safonov
Share with friends:
◀ Previous
HR-V 1: Engine repair
Next ▶

Pistons — installation
Crankshaft oil seal — installation
Piston rings — checking and replacing
Piston pins — installation and inspection
Connecting rods — selection
Oil pan — installation
Cylinder Head and Valve Train Specifications
Cylinder Block Specifications
See also other articles from Honda manuals:
Crankshaft and Main Bearings — Removal and Installation Honda Accord 3 (1985-1989)
Crankshaft oil seal — replacement Honda Civic 3 and 4 (1983-1991)
Checking the axial clearance of the connecting rod and crankshaft Honda Fit 1 (2001-2008)
Crankshaft pulley — removal and installation Honda CR-V 1 (1995-2001, petrol)
Replacing the crankshaft pulley and pulley bolt Honda Avancier 1 (1999-2003, petrol)
Link in different formats to this article
Comments and feedback from visitors
No comments yet


How much will 44 + 24 ?


HR-V 1 (1998-2006, petrol) 
  • General information
  • User manual
  • Maintenance
  • Power unit
  • Engine repair
  • Lubrication system
  • Cooling system
  • Fuel injection and control
  • Power and exhaust system
  • Engine electrical equipment
  • Transmission
  • Clutch
  • Mechanical gearbox
  • Automatic gearbox
  • Rear differential
  • Drive shafts and cardan
  • Chassis and running gear
  • Steering
  • Car suspension
  • Brake system
  • Body and interior
  • Exterior (external elements)
  • Interior (internal elements)
  • Doors, locks and windows
  • Electrical equipment
  • Equipment and devices
  • Lighting system
  • Electrical circuits
HondaBook.ru © 2018–2026 • Mobile version • Sitemap: EN BG BY UA RS HR RO PL SK HU • Feedback • Driver Information • Search system • Bookmark
Accord 3 (1985-1989) • Accord 6 (1997-2002) • Civic 3 and 4 (1983-1991) • Civic 5 and 6 (1991-2000) • Civic 6 (1995-2000) • Civic 7 (2000-2005) • Civic 8 (2005-2011) • Fit 1 (2001-2008) • CR-V 1 (1995-2001) • CR-V 2 (2002-2006) • HR-V 1 (1998-2006) • Avancier 1 (1999-2003) •
 
This website uses cookies to ensure proper functioning. By clicking "OK," you agree.