HondaBook.ru
Auto companies Volkswagen Auto companies Ford Auto companies Lada Auto companies Skoda Auto companies BMW Auto companies Mazda Auto companies Peugeot
English Русский
Български
Беларускі
Український
Српски
Hrvatski
Română
Polski
Slovenský
Magyar
Bookmark Contacts Sitemap   


Accord Civic Fit / Jazz CR-V HR-V Others Articles
HR-V 1 (1998-2006, petrol)

Pistons — installation (Honda HR-V 1)

  • Main
  • Honda HR-V
  • 1 (1998-2006, petrol)
  • Power unit
  • Engine repair
  • Pistons — installation
0
Before installing the pistons, apply a thin layer of motor oil to the ring grooves and cylinder walls.

1. If the crankshaft is already installed:
  • Set the crankshaft to the BDC position for each cylinder.
  • Remove the connecting rod caps and place short pieces of rubber hose over the threaded ends of the connecting rod bolts.
  • Install the piston ring installer, make sure the bearing is securely locked, then insert the piston into the cylinder and tap it with a wooden hammer handle.
  • Stop knocking when the piston ring installer is released and check the alignment of the connecting rod and crankpin before seating the piston in place.
  • Install the bearing caps and tighten the nuts to 31 Nm (3.2 kgf/m). Apply engine oil to the bolt threads.

2. If the crankshaft is not installed:
  • Remove the connecting rod bearing caps, install the piston ring installer, then insert the piston into the cylinder and tap it with the wooden handle of a hammer.
  • Set all pistons to TDC position.

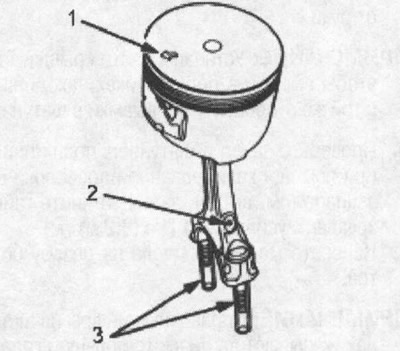
1. The arrow should point towards the engine…

1. The arrow should point towards the engine timing belt.
2. Connecting rod oil hole
3. Pieces of rubber hose


Note: Continue to apply pressure on the piston ring installer from above to prevent the rings from spreading before they are in the cylinder.
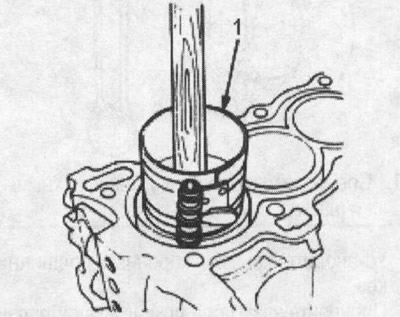


1. Device for installing piston rings

1. Device for installing piston rings
This article is available at: russian, bulgarian, belarusian, ukrainian, serbian, croatian, romanian, polish, slovak, hungarian
This information has been verified: Emil Safonov
Share with friends:
◀ Previous
HR-V 1: Engine repair
Next ▶

Crankshaft oil seal — installation
Piston rings — checking and replacing
Piston pins — installation and inspection
Connecting rods — selection
Piston pins — removal
Crankshaft — installation
Oil pan — installation
Cylinder Head and Valve Train Specifications
Cylinder Block Specifications
See also other articles from Honda manuals:
Pistons and connecting rods — removal Honda Accord 3 (1985-1989)
Pistons and crankshaft Honda Civic 5 and 6 (1991-2000)
Removal the crankshaft and pistons Honda Fit 1 (2001-2008)
Checking cylinders, pistons and connecting rods Honda CR-V 1 (1995-2001, petrol)
Selection of main bearings for pistons, crankshafts, cylinders Honda Avancier 1 (1999-2003, petrol)
Link in different formats to this article
Comments and feedback from visitors
No comments yet


How much will 43 + 42 ?


HR-V 1 (1998-2006, petrol) 
  • General information
  • User manual
  • Maintenance
  • Power unit
  • Engine repair
  • Lubrication system
  • Cooling system
  • Fuel injection and control
  • Power and exhaust system
  • Engine electrical equipment
  • Transmission
  • Clutch
  • Mechanical gearbox
  • Automatic gearbox
  • Rear differential
  • Drive shafts and cardan
  • Chassis and running gear
  • Steering
  • Car suspension
  • Brake system
  • Body and interior
  • Exterior (external elements)
  • Interior (internal elements)
  • Doors, locks and windows
  • Electrical equipment
  • Equipment and devices
  • Lighting system
  • Electrical circuits
HondaBook.ru © 2018–2026 • Mobile version • Sitemap: EN BG BY UA RS HR RO PL SK HU • Feedback • Driver Information • Search system • Bookmark
Accord 3 (1985-1989) • Accord 6 (1997-2002) • Civic 3 and 4 (1983-1991) • Civic 5 and 6 (1991-2000) • Civic 6 (1995-2000) • Civic 7 (2000-2005) • Civic 8 (2005-2011) • Fit 1 (2001-2008) • CR-V 1 (1995-2001) • CR-V 2 (2002-2006) • HR-V 1 (1998-2006) • Avancier 1 (1999-2003) •
 
This website uses cookies to ensure proper functioning. By clicking "OK," you agree.