
HondaBook.ru
Auto companies Volkswagen Auto companies Ford Auto companies Lada Auto companies Skoda Auto companies BMW Auto companies Mazda Auto companies Peugeot
English Русский
Български
Беларускі
Український
Српски
Hrvatski
Română
Polski
Slovenský
Magyar
Bookmark Contacts Sitemap   


Accord Civic Fit / Jazz CR-V HR-V Others Articles
Accord 3 (1985-1989) Accord 6 (1997-2002)

Cleaning the engine block (Honda Accord 6)

  • Main
  • Honda Accord
  • 6 (1997-2002)
  • Power unit
  • Engine overhaul
  • Cleaning the engine block
0
1. Remove the main bearing cap bridge and remove the bearing shells from their beds in the caps and block. Mark the shells with tape to match their beds (bearing number, block/cap) and set them aside.

2. Scrape off all traces of the old gasket material from the mating surface of the block. Try not to leave any burrs.

3. Remove all covers and threaded plugs of oil galleries from the block. The plugs are usually tightened very tightly, so it is quite possible that they will have to be drilled out and then the thread in the hole restored. When assembling the block, the plugs should be replaced with new ones.

4. If the engine is heavily externally contaminated, it should be taken to a car service workshop for steam cleaning or heat treatment.

5. After returning the block from the workshop, thoroughly clean all oil holes and galleries again - special cylindrical brushes of a special shape are produced for this purpose (ask in car accessory stores). Rinse the cavities and channels with warm water - continue rinsing until clean water begins to flow out from the opposite side of the block. Dry the block thoroughly, then lightly lubricate all machined surfaces with liquid oil to protect them from corrosion. If you have access to a source of compressed air, use it to speed up the drying process of the block and blow out hard-to-reach cavities and channels.

Attention! When working with compressed air, do not forget to wear protective glasses!


6. If the block is heavily soiled or slagged, use a brush cleaning with hot water and soap. Do not try to save time by neglecting the cleaning of the block. Regardless of the method chosen, make sure that hard-to-reach cavities, channels and holes are thoroughly cleaned. Finally, dry the block and lubricate the machined surfaces with liquid oil to protect them from corrosion.
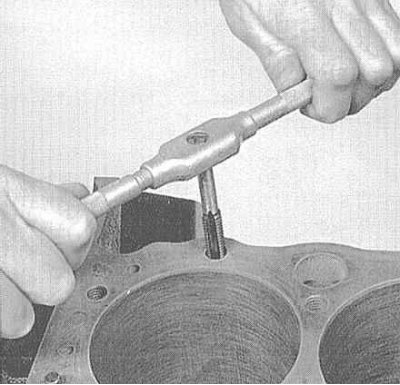


6. If the block is heavily soiled or slagged, use…


7. Run a tap of the appropriate size through all the threaded holes in the block to ensure that the torque wrench indicator readings correspond to the actual tightening forces developed when assembling the engine. If possible, then blow out the run holes with compressed air, removing all small debris and chips from them. After finishing the holes, run a tap along the threaded part of the bolts.

8. Install the main bearing caps in place, hand tightening their fasteners.

9. Lubricate the threads of the new plugs with non-hardening sealant and seal the holes in the oil galleries with them. Make sure the plugs are tightened securely.

10. If you are not going to start assembling the engine immediately, place the block in a large plastic bag to protect it from contamination.

[The article was taken from the website www.HondaBook.ru]
This article is available at: russian, bulgarian, belarusian, ukrainian, serbian, croatian, romanian, polish, slovak, hungarian
This information has been verified: Timofey Goryachev
Share with friends:
◀ Previous
Accord 6: Engine overhaul
Next ▶

Removal the crankshaft
Removal connecting rod and piston assemblies
Removal and checking the condition of the balance shafts (4-cylinder engines)
Cylinder head assembly
Valve maintenance
Checking the condition of the engine block
Honing of cylinder mirrors
Checking the condition of the connecting rod and piston group components
Checking the condition of the crankshaft
Checking the condition and selecting the liners of the main and connecting rod…
See also other articles from Honda manuals:
Engine Block — Cleaning Honda Civic 3 and 4 (1983-1991)
Engine number and identification plates Honda Fit 1 (2001-2008)
Location of serviced units and assemblies in the engine compartment Honda CR-V 1 (1995-2001, petrol)
Engine Starting Procedure Honda HR-V 1 (1998-2006, petrol)
Starting the engine Honda Avancier 1 (1999-2003, petrol)
Link in different formats to this article
Comments and feedback from visitors
No comments yet


How much will 20 + 41 ?


Accord 6 (1997-2002) 
  • General information
  • Introduction to the guide
  • User manual
  • Maintenance
  • Power unit
  • Four-cylinder engines
  • Six-cylinder engines
  • Engine overhaul
  • Cooling system
  • Heater and air conditioner
  • Power and exhaust systems
  • Engine electrical equipment
  • Engine management
  • Transmission
  • Mechanical gearbox
  • Automatic gearbox
  • Clutch and drive shafts
  • Chassis and running gear
  • Brake system
  • Car suspension
  • Steering
  • Body and interior
  • Exterior (external elements)
  • Interior (internal elements)
  • Electrical equipment
  • Equipment and devices
  • Electrical circuits
Accord 3 (1985-1989) 
  • General information
  • Maintenance
  • Power unit
  • Engine adjustment
  • Engine repair
  • Engine electrics
  • Emission management
  • Engine management (carburetor)
  • Electronic injection
  • Programmable injection
  • Schematic of emission system
  • Fuel system
  • Feedback management
  • Transmission
  • Manual gearbox
  • Automatic gearbox
  • Clutch
  • Chassis and running gear
  • Front suspension
  • Rear suspension
  • Steering
  • Brake system
  • Electrical equipment
  • Ventilation and heating
  • Air conditioner
  • Cruise control system
  • Equipment and devices
HondaBook.ru © 2018–2026 • Mobile version • Sitemap: EN BG BY UA RS HR RO PL SK HU • Feedback • Driver Information • Search system • Bookmark
Accord 3 (1985-1989) • Accord 6 (1997-2002) • Civic 3 and 4 (1983-1991) • Civic 5 and 6 (1991-2000) • Civic 6 (1995-2000) • Civic 7 (2000-2005) • Civic 8 (2005-2011) • Fit 1 (2001-2008) • CR-V 1 (1995-2001) • CR-V 2 (2002-2006) • HR-V 1 (1998-2006) • Avancier 1 (1999-2003) •
 
This website uses cookies to ensure proper functioning. By clicking "OK," you agree.