
HondaBook.ru
Auto companies Volkswagen Auto companies Ford Auto companies Lada Auto companies Skoda Auto companies BMW Auto companies Mazda Auto companies Peugeot
English Русский
Български
Беларускі
Український
Српски
Hrvatski
Română
Polski
Slovenský
Magyar
Bookmark Contacts Sitemap   


Accord Civic Fit / Jazz CR-V HR-V Others Articles
Accord 3 (1985-1989) Accord 6 (1997-2002)

Checking the condition and replacing fuel lines (Honda Accord 6)

  • Main
  • Honda Accord
  • 6 (1997-2002)
  • Power unit
  • Power and exhaust systems
  • Checking the condition and replacing fuel lines
0
Contents: Steel tubes ⇊ Flexible hoses ⇊ Removal and installation ⇊ Repair ⇊
Warning! See warnings at the beginning of the Section Relieving pressure in the fuel system.


1. Before servicing the fuel lines or their fittings, it is necessary to relieve the pressure in the fuel system (see Section Relieving pressure in the fuel system).

2. The fuel lines of the fuel system are laid between the gas tank and the engine compartment. Steel tubes and flexible fuel hoses are attached to the bottom of the car with clamps and screw fasteners. Every time the car is raised above the ground for any purpose (for example, to inspect or replace exhaust system components), try to take the opportunity to check the condition of the fuel lines and their fittings. Carefully inspect all hoses and tubes of the fuel system for cracks, twists, deformations and other damage.

3. If signs of internal contamination or obstruction are detected, the corresponding section of the fuel line must be removed and blown out with compressed air. It is also mandatory to check the condition of the mesh filter of the fuel pump intake (see Section Removal and installation the fuel pump).

Steel tubes


1. Use only high-strength steel tubes from reputable manufacturers as replacement sections.

2. Remember that copper and aluminum tubes are not able to withstand vibration loads that occur during vehicle operation.

3. Remember that fuel lines on models equipped with injection systems must withstand high internal pressure.


4. Often, sections of metal tubes equipped with threaded nipples can be purchased in branded car accessory stores. When loosening and tightening nipple connections, use two wrenches to avoid turning the mating part of the connector. Be sure to check the condition of the sealing rings used to seal the nipple connections. Replace worn or mechanically damaged rings immediately. Try to use only branded parts as replacement components.

Flexible hoses


Caution: When replacing fuel hoses, use only original components designed for high internal pressure.


Flexible fuel hoses must be installed no closer than 10 cm (4 in) from exhaust system components and no closer than 25 cm (10 in) from the catalytic converter. Make sure that the fuel lines do not come into contact with body parts or suspension components. The minimum permissible clearance is 6.3 mm (0.24 in).

Removal and installation


1. Release the pressure in the fuel system (see Section Relieving pressure in the fuel system).
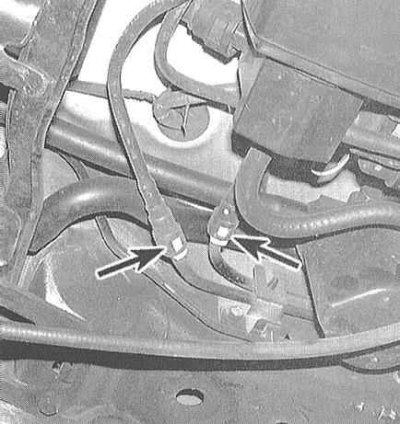
1. Release the pressure in the fuel system (see…


2. Release the section of the fuel line to be removed from the intermediate fasteners securing it to the vehicle underbody. Note: Quick-connect fittings are not subject to repair and if they fail, the corresponding section of the line must be replaced as a whole.


3. Installation is carried out in the reverse order. Do not forget to replace the sealing rings of the threaded nipple connections. Before snapping the quick-connect connectors, make sure that the dogs of the locking tongues are correctly aligned with the corresponding grooves.

Repair


Damaged sections of fuel lines (tubes or hoses) must be removed and replaced with new, original parts.

The text can be found on the website www.hondabook.ru
This article is available at: russian, bulgarian, belarusian, ukrainian, serbian, croatian, romanian, polish, slovak, hungarian
This information has been verified: Timofey Goryachev
Share with friends:
◀ Previous
Accord 6: Power and exhaust systems
Next ▶

Checking the fuel pump for proper operation, measuring fuel pressure
Relieving pressure in the fuel system
Fuel and exhaust system — general description
Location of fuel system components in the engine compartment
Power and exhaust system specifications
Removal and installation the fuel pump
Checking the condition and replacing the sensor
Removal and installation the fuel tank
Fuel Tank Cleaning and Repair — General Information
Removal and installation the air cleaner assembly
See also other articles from Honda manuals:
Checking the condition and replacing fuel lines and their fittings Honda Civic 6 (1995-2000)
Checking tire pressure and condition Honda Fit 1 (2001-2008)
Checking fuel lines Honda CR-V 2 (2002-2006, petrol)
Fuel lines of the power supply system Honda HR-V 1 (1998-2006, petrol)
Checking fuel lines Honda Avancier 1 (1999-2003, petrol)
Link in different formats to this article
Comments and feedback from visitors
No comments yet


How much will 48 + 27 ?


Accord 6 (1997-2002) 
  • General information
  • Introduction to the guide
  • User manual
  • Maintenance
  • Power unit
  • Four-cylinder engines
  • Six-cylinder engines
  • Engine overhaul
  • Cooling system
  • Heater and air conditioner
  • Power and exhaust systems
  • Engine electrical equipment
  • Engine management
  • Transmission
  • Mechanical gearbox
  • Automatic gearbox
  • Clutch and drive shafts
  • Chassis and running gear
  • Brake system
  • Car suspension
  • Steering
  • Body and interior
  • Exterior (external elements)
  • Interior (internal elements)
  • Electrical equipment
  • Equipment and devices
  • Electrical circuits
Accord 3 (1985-1989) 
  • General information
  • Maintenance
  • Power unit
  • Engine adjustment
  • Engine repair
  • Engine electrics
  • Emission management
  • Engine management (carburetor)
  • Electronic injection
  • Programmable injection
  • Schematic of emission system
  • Fuel system
  • Feedback management
  • Transmission
  • Manual gearbox
  • Automatic gearbox
  • Clutch
  • Chassis and running gear
  • Front suspension
  • Rear suspension
  • Steering
  • Brake system
  • Electrical equipment
  • Ventilation and heating
  • Air conditioner
  • Cruise control system
  • Equipment and devices
HondaBook.ru © 2018–2026 • Mobile version • Sitemap: EN BG BY UA RS HR RO PL SK HU • Feedback • Driver Information • Search system • Bookmark
Accord 3 (1985-1989) • Accord 6 (1997-2002) • Civic 3 and 4 (1983-1991) • Civic 5 and 6 (1991-2000) • Civic 6 (1995-2000) • Civic 7 (2000-2005) • Civic 8 (2005-2011) • Fit 1 (2001-2008) • CR-V 1 (1995-2001) • CR-V 2 (2002-2006) • HR-V 1 (1998-2006) • Avancier 1 (1999-2003) •
 
This website uses cookies to ensure proper functioning. By clicking "OK," you agree.