
Caution: Before disconnecting and connecting the connector, turn the ignition key to the OFF position.
Turn the ignition key to the ON (II) position and check that the; the sound of a running pump can be heard.
If you cannot hear the sound, try the following test.
1. Remove the inspection hole cover in the luggage compartment and disconnect the 5-pin (4-pin on 4WD models) fuel pump connector. Check that after turning the ignition key to the ON (II) position for approx. 2 sec., battery voltage is supplied between the terminal with the yellow/green wire (+) and the terminal with the black wire.
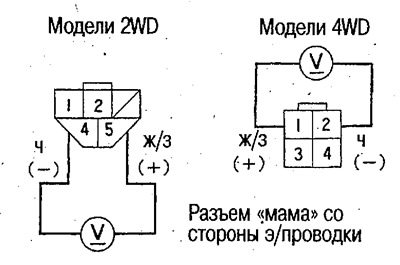
If voltage is present, check for an open in the black wire connecting the fuel pump connector to ground G552, and if there is no open, replace the fuel pump.
If there is no voltage, check the PGM-Fi main relays and wiring.
Checking the performance of the fuel pump
Attention. Observe fire safety regulations.
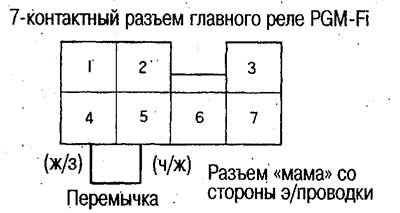
1. Turn the ignition switch to the OFF position and disconnect the PGM-Fi main relay connector.
2. Connect a jumper between pin #4 and pin #5 of the 7-pin PGM-Fi main relay connector.
3. Relieve the pressure in the fuel tank by opening the fuel filler cap.
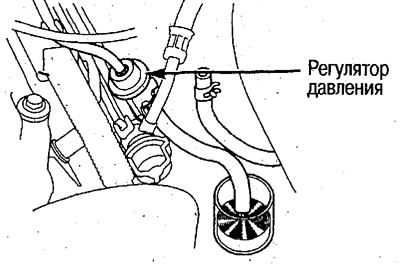
4. Disconnect the fuel return hose from the pressure regulator side and connect the same hose to the regulator.
5. Turn the ignition key to the ON (II) position and check the performance of the fuel pump. If the pump operates, turn the ignition key to the OFF position, remove the incoming fuel, turn the ignition key to the ON (II) position again and measure the amount of fuel coming from the pump within 10 seconds.
The measurement is performed with the load disconnected (headlights, fan, radiator fan, air conditioner, etc.).
- Standard capacity (at 12V): 100 ml (cm³)
If the performance is below normal or not present, perform the following checks and if there are no faults, replace the fuel pump.
- Electrical wiring breakage, poor connection (see below).
- Fuel filter clogged.
- Pressure regulator failure (see above).
(The text can be found on the website: HondaBook)