
HondaBook.ru
Auto companies Volkswagen Auto companies Ford Auto companies Lada Auto companies Skoda Auto companies BMW Auto companies Mazda Auto companies Peugeot
English Русский
Български
Беларускі
Український
Српски
Hrvatski
Română
Polski
Slovenský
Magyar
Bookmark Contacts Sitemap   


Accord Civic Fit / Jazz CR-V HR-V Others Articles
Avancier 1 (1999-2003, petrol)

Removal and installation fuel injectors (Honda Avancier 1)

  • Main
  • Honda
  • Avancier 1 (1999-2003, petrol)
  • Power unit
  • Power and exhaust system
  • Removal and installation fuel injectors
0
Contents: Removal ⇊ Installation ⇊
Attention. Observe fire safety regulations.


Removal


1. Disconnect the (-) battery cable.

2. Relieve fuel pressure (see above).

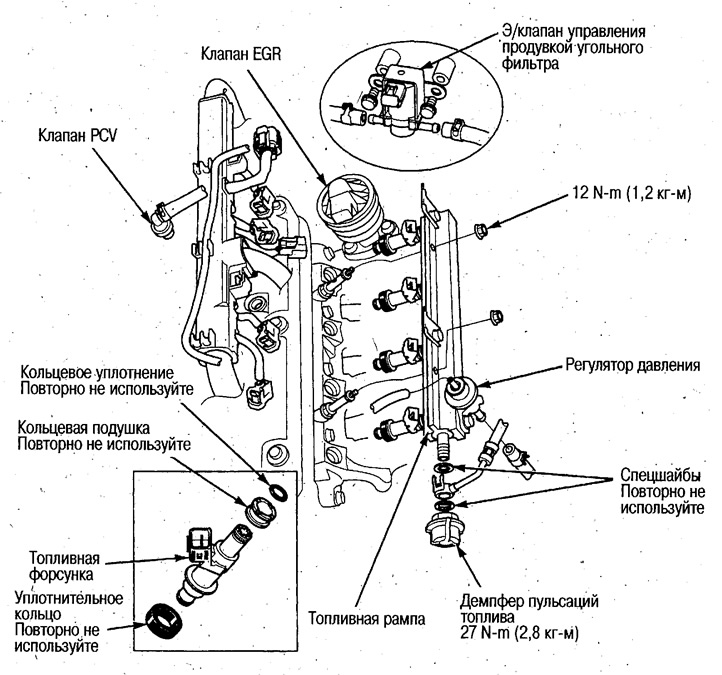
3. Disconnect the fuel injector connectors, EGR valve, remove the carbon filter purge control solenoid valve, remove the PCV valve, disconnect the additional vacuum tube.

4. Disconnect the vacuum tube and fuel line hose from the pressure regulator. Cover the regulator with a cloth before disconnecting the hose.

5. Unscrew the two nuts securing the fuel pipe.

6. Remove the fuel pipe.

7. Remove the intake manifold and fuel injectors.

Installation


1. Install the ring pad onto the fuel injector.

2. Install the O-ring lubricated with engine oil into the groove of the fuel injector. Install all 4 injectors to the fuel rail.

Caution: Do not damage the O-rings when installing the injectors on the fuel rail. Insert the injectors without tilting at a right angle.


3. Install the O-rings, lubricated with engine oil, onto the intake manifold.

4. Install the fuel rail assembled in step 2 onto the intake manifold.

Caution: To avoid damaging the injector O-rings, first install the injectors on the fuel rail, then install the entire assembly on the intake manifold.
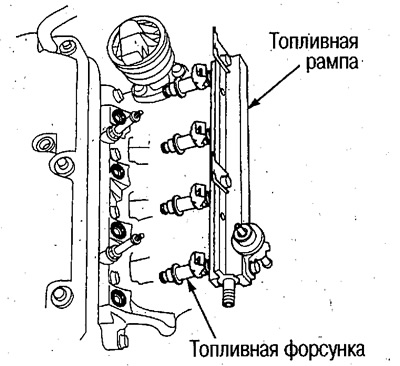
Caution: To avoid damaging the injector O-rings,…


Caution: To avoid damaging the injector O-rings,…


5. Tighten the fuel pipe mounting nuts.


6. Connect the vacuum tube and fuel line hose to the pressure regulator.

7. Connect the fuel injector, EGR valve and carbon canister purge control solenoid valve connectors, install the PCV valve, attach the additional vacuum tube and install the carbon canister purge control solenoid valve.

8. Connect the (-) battery cable, turn the ignition key to the ON (II) position (do not turn on the starter). In this case, the fuel pump is turned on for 2 seconds and the pressure in the fuel pipes and high-pressure hoses rises. Repeat this action 2-3 times and check for fuel leaks in various areas of the fuel system.
  • After disassembly, be sure to replace the O-rings, sealing rings and O-ring cushions.
  • Before installing O-rings and seals, apply engine oil to them. Never apply brake fluid, coolant, vegetable oils or alcohol to them.
This article is available at: russian, bulgarian, belarusian, ukrainian, serbian, croatian, romanian, polish, slovak, hungarian
This information has been verified: Emil Safonov
Share with friends:
◀ Previous
Avancier 1: Power and exhaust system
Next ▶

Checking fuel injectors
Checking fuel pressure
Fuel pressure relief
Removal and installation fuel pipes with quick-release couplings
Checking fuel lines
Checking the pressure regulator
Removal and installation the pressure regulator
Replacing the fuel filter
Checking the fuel pump
Removal and installation the fuel pump
See also other articles from Honda manuals:
Fuel Injectors — 1985 Accord Honda Accord 3 (1985-1989)
Fuel injectors — inspection, removal and installation Honda Civic 3 and 4 (1983-1991)
Fuel quantity indicator Honda Fit 1 (2001-2008)
Fuel filter — removal and installation Honda CR-V 1 (1995-2001, petrol)
Fuel injectors — description and testing Honda HR-V 1 (1998-2006, petrol)
Link in different formats to this article
Comments and feedback from visitors
No comments yet


How much will 10 + 30 ?


Avancier 1 (1999-2003, petrol) 
  • General information
  • Controls and instruments
  • User manual
  • Power unit
  • Engine maintenance
  • Engine repair
  • Cooling system
  • Engine management
  • Power and exhaust system
  • Transmission
  • Automatic gearbox
  • Drive shafts and differential
  • Chassis and running gear
  • Steering
  • Car suspension
  • Brake system
  • Body and interior
  • Doors, locks and windows
  • Interior (internal elements)
  • Exterior (external elements)
  • Air conditioner
  • Electrical equipment
  • Power devices
  • Equipment and devices
  • Headlights and lighting
  • Electrical circuits
HondaBook.ru © 2018–2026 • Mobile version • Sitemap: EN BG BY UA RS HR RO PL SK HU • Feedback • Driver Information • Search system • Bookmark
Accord 3 (1985-1989) • Accord 6 (1997-2002) • Civic 3 and 4 (1983-1991) • Civic 5 and 6 (1991-2000) • Civic 6 (1995-2000) • Civic 7 (2000-2005) • Civic 8 (2005-2011) • Fit 1 (2001-2008) • CR-V 1 (1995-2001) • CR-V 2 (2002-2006) • HR-V 1 (1998-2006) • Avancier 1 (1999-2003) •
 
This website uses cookies to ensure proper functioning. By clicking "OK," you agree.