
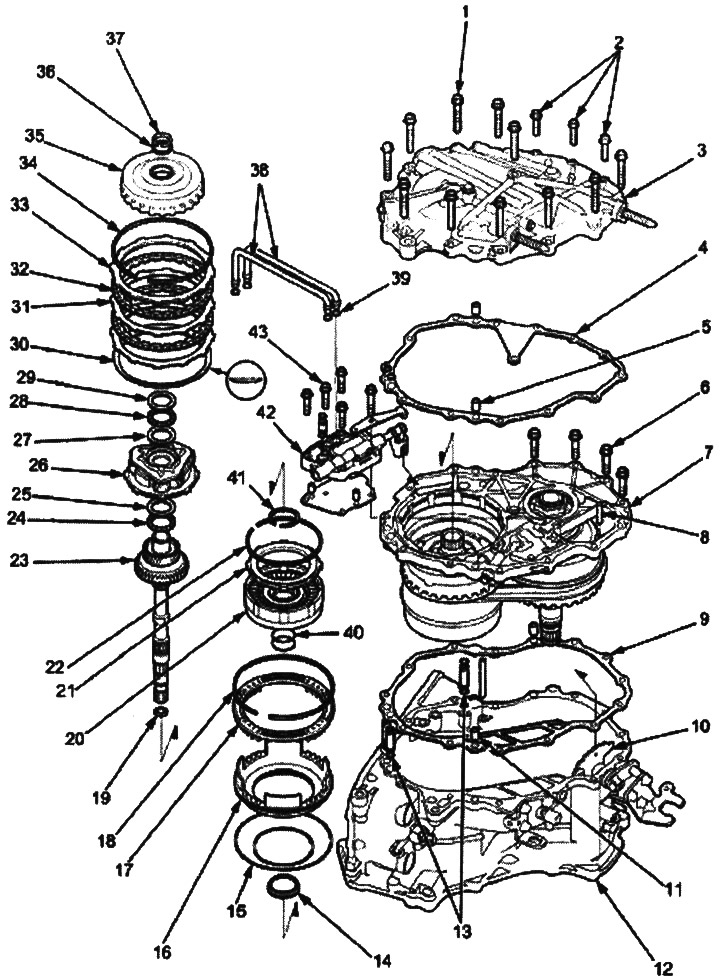
1. 8x1.25 mm, 11 bolts
2. 6x1.0 mm, 3 bolts
3. RIGHT COVER
4. RIGHT COVER GASKET. Replace
5. REFERENCE PIN
6. 8x1.25mm, 4 bolts
7. INTERMEDIATE CASE ASSEMBLY
8. ROLLER
9. GEARBOX CASE GASKET. Replace
10. CONTROL SHAFT ASSEMBLY
11. REFERENCE PIN
12. GEARBOX CASE
13. O-RINGS. Replace
14. RETAINING RING HOLDER
15. O-RINGS. Replace
16. REVERSE BRAKE PISTON
17. SPRING HOLDER/RETURN SPRINGS ASSEMBLY
18. RETAINING RING
19. SEAL RING (RUBBER). Replace
20. FORWARD CLUTCH ASSEMBLY
21. END COVER OF THE COUPLING
22. RETAINING RING
23. SUN GEAR/DRIVE SHAFT ASSEMBLY
24. THRUST NEEDLE BEARING
25. THRUST WASHER
26. CARRIER ASSEMBLY
27. THRUST WASHER
28. THRUST NEEDLE BEARING
29. THRUST WASHER
30. DISC SPRING
31. PLATE
32. DISC
33. REVERSE BRAKE END PLATE
34. RETAINING RING
35. RING GEAR
36. THRUST GASKET, 25x31 mm. Selected on site
37. RETAINING RING
38. MANUAL CONTROL VALVE BODY TUBES
39. O-RINGS. Replace
40. O-RING. Replace
41. RETAINING RING
42. MANUAL CONTROL VALVE BODY
43. 6x1.0 mm, BOLT
Note:
- Clean all parts thoroughly with solvent or carburetor cleaner and dry with compressed air.
- Blow out all channels.
- When removing the right cover/intermediate case, replace the following components:
- - O-ring seals
- - Right cover gasket
- - Gearbox housing gasket
- - Sealing washers
1. Remove the side cover (three 6mm bolts, eleven 8mm bolts).
2. Remove tubes A and B from the manual control valve body.
3. Remove the snap ring securing the ring gear, then remove the thrust lining and ring gear.
4. Remove the snap ring securing the reverse brake discs and plates, then remove the reverse brake end plate, brake discs and plates, and disc spring.
5. Remove the planet carrier assembly with thrust washers and thrust needle bearing from the forward clutch.
6. Remove the sun gear/drive shaft assembly using a puller.
7. Remove the snap ring securing the forward clutch, and remove the snap ring securing the forward clutch end cover, then remove the forward clutch end cover.
8. Install the carrier onto the forward clutch, then secure the carrier assembly with the retaining ring onto the forward clutch end cover.
9. Remove the forward clutch and carrier assembly together.
10. Install the special tool and remove the snap ring securing the reverse brake return spring holder as shown in the figure.
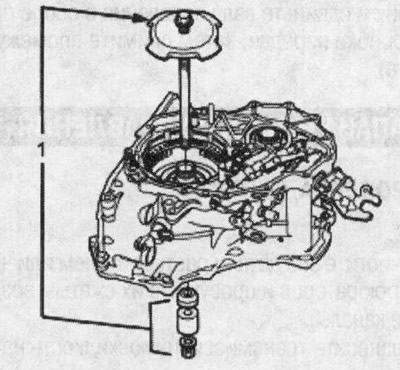
1. REVERSE BRAKE RETURN SPRING COMPRESSOR, 07TAE-P4V0110
11. Compress the return springs, then remove the retaining ring.
Note: If the spring retainer tab is on the reverse brake piston, the spring retainer may be damaged. Make sure the spring retainer tab is not on the piston.
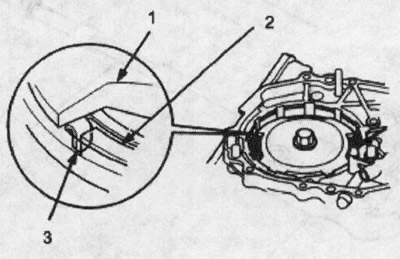
1. SPECIAL TOOL
2. PISTON
3. SPRING HOLDER TONGUE
12. Remove the special tool, then remove the spring retainer/return spring assembly.
13. Remove the plug from the inspection hole to check the pressure in the reverse brake.
14. Apply compressed air to the inspection hole and remove the piston from the reverse brake.
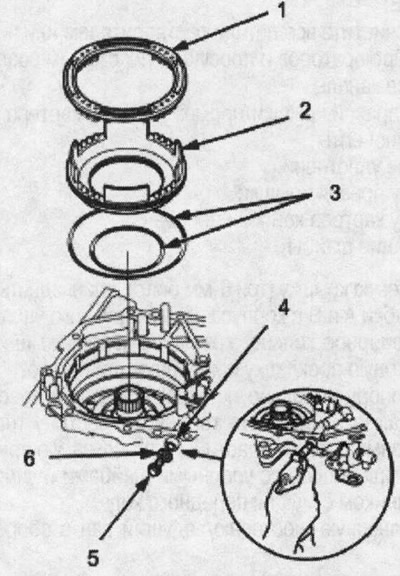
1. SPRING HOLDER/RETURN SPRING ASSEMBLY
2. REVERSE BRAKE PISTON
3. O-RINGS. Replace
4. TEST HOLE FOR CHECKING REVERSE BRAKE PRESSURE
5. 8x1.25 mm, 18 Nm (1.8 kgf/m)
6. SEALING WASHER. Replace
15. Remove the snap ring holder from the drive pulley shaft.
16. Remove the manual control valve housing (five bolts).
17. Remove the roller and slide the control shaft assembly away from the gearbox housing, then remove the intermediate housing (four bolts).
Article source on the website: hondabook.ru