HondaBook.ru
Auto companies Volkswagen Auto companies Ford Auto companies Lada Auto companies Skoda Auto companies BMW Auto companies Mazda Auto companies Peugeot
English Русский
Български
Беларускі
Український
Српски
Hrvatski
Română
Polski
Slovenský
Magyar
Bookmark Contacts Sitemap   


Accord Civic Fit / Jazz CR-V HR-V Others Articles
HR-V 1 (1998-2006, petrol)

Disassembling the steering rack (Honda HR-V 1)

  • Main
  • Honda HR-V
  • 1 (1998-2006, petrol)
  • Chassis and running gear
  • Steering
  • Disassembling the steering rack
0
Perform disassembly taking into account the following:
  • Before disassembling the steering gear, wash it with solvent and a brush.
  • Do not wash seals and O-rings in solvent.

1. Remove the steering gear (see above).

2. Remove the tie rod end and lock nut.

3. Remove the boot clamps and the steering rod clamps. Pull the boots off the ends of the steering gear.
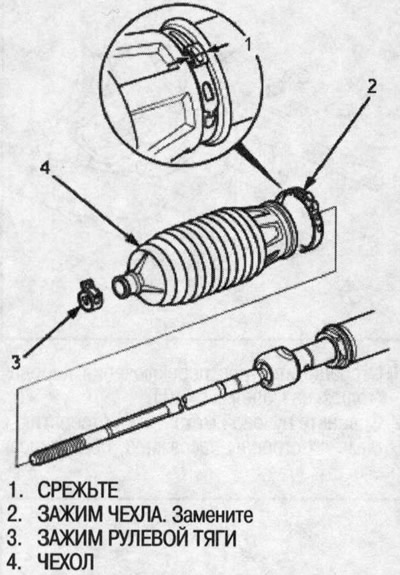
3. Remove the boot clamps and the steering rod…


4. Bend the lock washer.

4. Bend the lock washer.


5. Unscrew both rack tips with a wrench. Do not damage the rack surface with the wrench. Remove the lock washer.
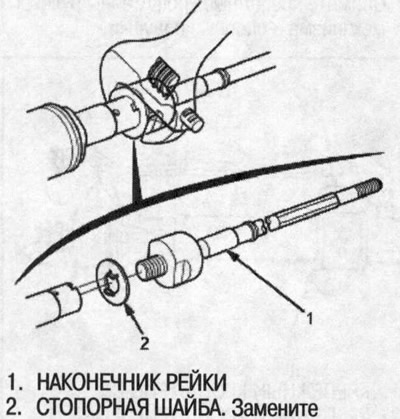
5. Unscrew both rack tips with a wrench. Do not…


6. Loosen the lock nut, then remove the guide rack screw.
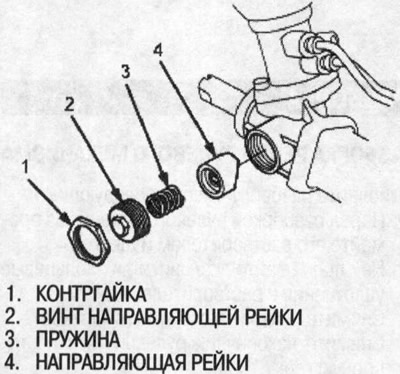


6. Loosen the lock nut, then remove the guide…


7. Remove the spring and rack guide from the steering gear.

8. Secure the steering gear in a vice with soft jaws. Be careful not to damage the housing with the vice jaws.

9. Remove the rubber bushing of the worm shaft, the nipple of the outlet hose, the tubes of cylinders A and B from the steering gear.

10. Drain the fluid from the cylinder nipples by slowly moving the steering rack forward and backward.
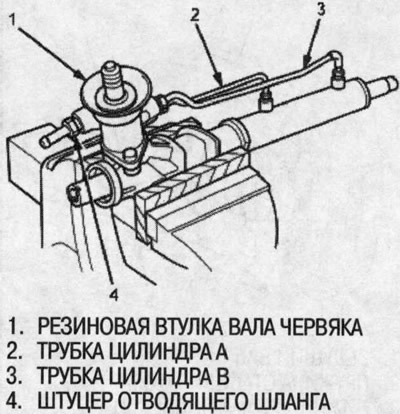
10. Drain the fluid from the cylinder nipples by…


11. Remove the valve body assembly from the steering gear. Disassembling the valve body assembly see above.
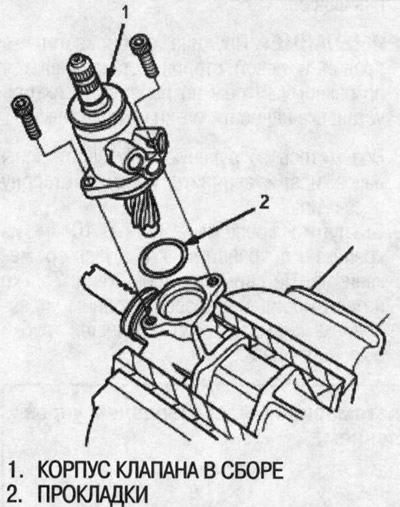
11. Remove the valve body assembly from the…


12. Drill a hole of 3 mm diameter and about 2.5-3.0 mm deep at the punched point on the cylinder. Do not allow metal chips to enter the cylinder body. After removing the end of the cylinder, remove burrs at the punched point.
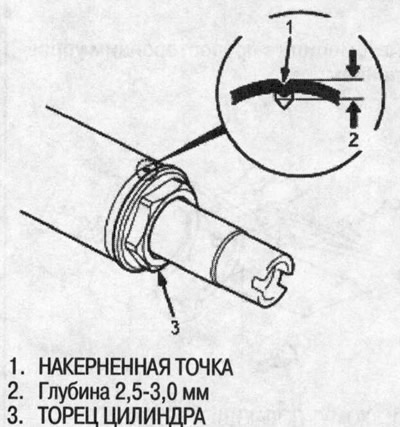


12. Drill a hole of 3 mm diameter and about…


13. Loosen and remove the cylinder end.
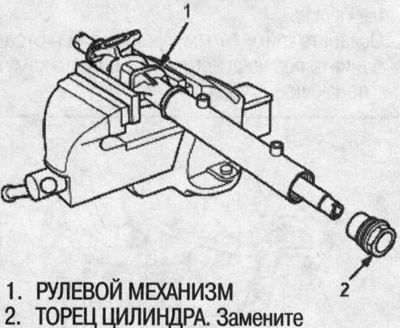
13. Loosen and remove the cylinder end.


14. Place a long-head wrench on the steering rack.
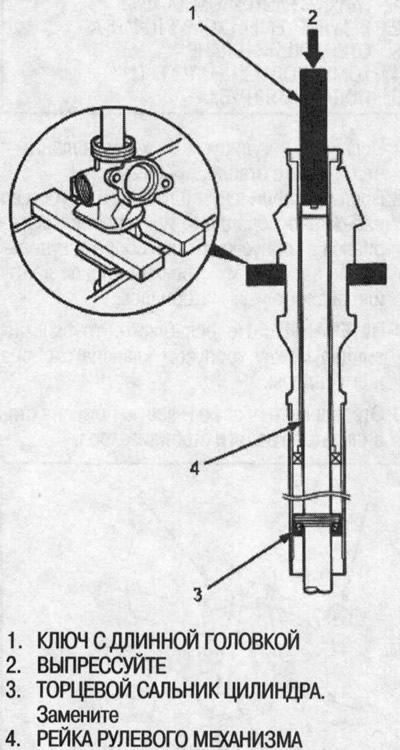
14. Place a long-head wrench on the steering rack.


15. Fix the steering gear in the press with the driver side facing up, then press out the cylinder end seal and the rack from the steering gear. After pressing out the rack from the cylinder, hold it so that it does not fall. Do not damage the inner surface of the cylinder body with the special tool.


16. Remove the cylinder end seal from the steering rack.

17. Insert the special tool into the cylinder. Make sure that the special tool is securely positioned on the edges of the protective ring. Do not damage the inner surface of the cylinder body with the special tool.

18. Secure the steering gear in a press, then press out the cylinder, oil seal and protective ring from the steering gear. Press out the cylinder end seal taking into account the following:
  • To avoid damaging the cylinder walls, hold the special tool vertically. When removing the cylinder end seal, check the angle of the special tool and adjust it if necessary.
  • Remove the cylinder end seal using a press. Do not attempt to remove the seal by hitting the special tool. You will break the protective ring and the cylinder end seal will remain in the steering gear.
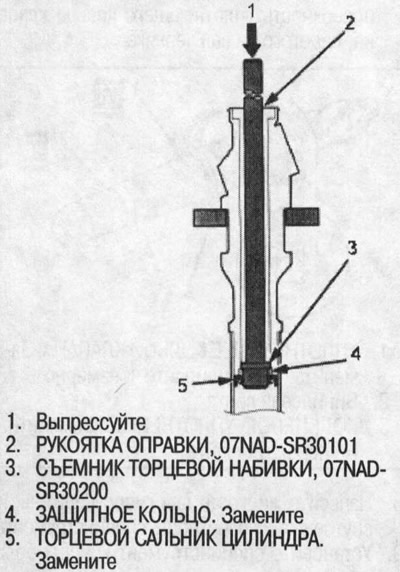
Remove the cylinder end seal using a press. Do…


19. Carefully pry up the piston sealing ring and O-ring and remove the racks from the piston. When removing the sealing ring, be careful not to damage the inside of the sealing ring groove or the piston edges.
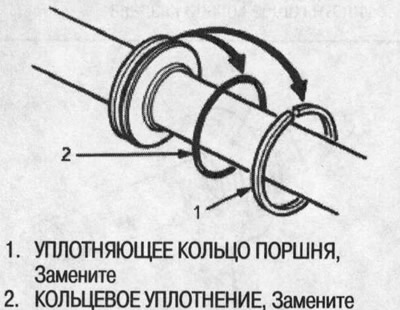
19. Carefully pry up the piston sealing ring and…
This article is available at: russian, bulgarian, belarusian, ukrainian, serbian, croatian, romanian, polish, slovak, hungarian
This information has been verified: Emil Safonov
Share with friends:
◀ Previous
HR-V 1: Steering
Next ▶

Steering gear — removal
Power Steering Pump — Assembly
Power Steering Pump — Check
Power Steering Pump — Disassembly
Power Steering Pump — Replacement
Disassembling the steering gear valve body
Steering gear — assembly
Steering gear valve body assembly
Steering rack assembly
Steering gear — installation
See also other articles from Honda manuals:
Rack and worm (direct acting steering) Honda Accord 3 (1985-1989)
Steering rack adjustment Honda Civic 5 and 6 (1991-2000)
Adjusting the position of the steering wheel Honda Fit 1 (2001-2008)
Adjusting the steering rack guide Honda CR-V 2 (2002-2006, petrol)
Adjusting the steering column and mirrors Honda Avancier 1 (1999-2003, petrol)
Link in different formats to this article
Comments and feedback from visitors
No comments yet


How much will 15 + 38 ?


HR-V 1 (1998-2006, petrol) 
  • General information
  • User manual
  • Maintenance
  • Power unit
  • Engine repair
  • Lubrication system
  • Cooling system
  • Fuel injection and control
  • Power and exhaust system
  • Engine electrical equipment
  • Transmission
  • Clutch
  • Mechanical gearbox
  • Automatic gearbox
  • Rear differential
  • Drive shafts and cardan
  • Chassis and running gear
  • Steering
  • Car suspension
  • Brake system
  • Body and interior
  • Exterior (external elements)
  • Interior (internal elements)
  • Doors, locks and windows
  • Electrical equipment
  • Equipment and devices
  • Lighting system
  • Electrical circuits
HondaBook.ru © 2018–2026 • Mobile version • Sitemap: EN BG BY UA RS HR RO PL SK HU • Feedback • Driver Information • Search system • Bookmark
Accord 3 (1985-1989) • Accord 6 (1997-2002) • Civic 3 and 4 (1983-1991) • Civic 5 and 6 (1991-2000) • Civic 6 (1995-2000) • Civic 7 (2000-2005) • Civic 8 (2005-2011) • Fit 1 (2001-2008) • CR-V 1 (1995-2001) • CR-V 2 (2002-2006) • HR-V 1 (1998-2006) • Avancier 1 (1999-2003) •
 
This website uses cookies to ensure proper functioning. By clicking "OK," you agree.