
HondaBook.ru
Auto companies Volkswagen Auto companies Ford Auto companies Lada Auto companies Skoda Auto companies BMW Auto companies Mazda Auto companies Peugeot
English Русский
Български
Беларускі
Український
Српски
Hrvatski
Română
Polski
Slovenský
Magyar
Bookmark Contacts Sitemap   


Accord Civic Fit / Jazz CR-V HR-V Others Articles
HR-V 1 (1998-2006, petrol)

Steering gear valve body assembly (Honda HR-V 1)

  • Main
  • Honda HR-V
  • 1 (1998-2006, petrol)
  • Chassis and running gear
  • Steering
  • Steering gear valve body assembly
0
1. Apply grease to the ball bearing and use the special tool to press it onto the worm shaft. Then securely place the new ring clamp into the groove on the worm shaft.

2. Wrap the stepped portion of the worm shaft with vinyl tape and apply power steering fluid over the vinyl tape. Install the protective ring.

3. Apply power steering fluid to the inside surface of the new valve seal.

4. Place the valve seal on the worm shaft without damaging the sealing lip. Install the valve seal with the grooved side facing away from the bearing.

5. Place a new O-ring into the groove on the worm shaft. Then place the new valve seal ring onto the shaft and into the groove on the worm shaft.

6. Remove the vinyl tape from the worm shaft.

7. Apply power steering fluid to the surface of the valve seal ring mounted on the worm shaft.
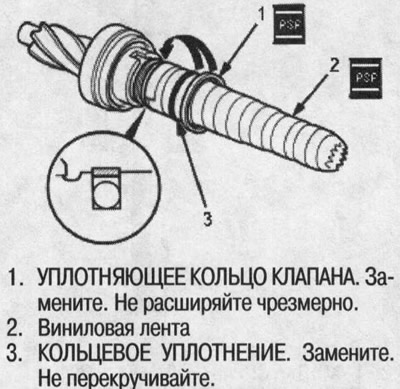
7. Apply power steering fluid to the surface of…


8. Apply power steering fluid to the inside surface of the special tool.

9. Install the special tool with the larger diameter end onto the valve sealing ring.

10. Move the special tool up and down several times until the valve sealing ring enters the worm shaft.

11. Remove the special tool.


12. Turn the special tool over and install it with the smaller diameter end on the valve sealing ring.
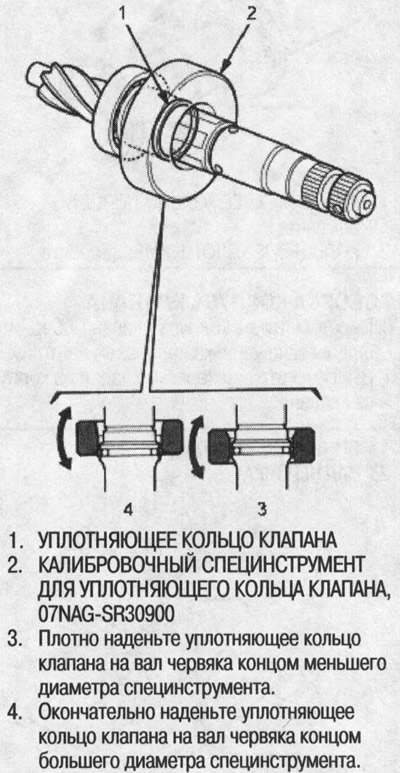
12. Turn the special tool over and install it…


13. Apply power steering fluid to the inside of the special tool. Install new sealing rings on the special tool from the smaller diameter side and expand the sealing rings. Install the sealing rings taking into account the following:
  • Do not expand the sealing ring excessively. Put the rings on carefully so as not to damage them. After putting them on, compress the sealing rings using the special tool (gauge).
  • There are two types of liner seals: black and brown. Do not mix different types of liner seals as they are not interchangeable.

14. Align the special tool with the grooves on the liner and firmly push the sealing rings into the grooves. After installation, temporarily squeeze the sealing rings with your fingers.
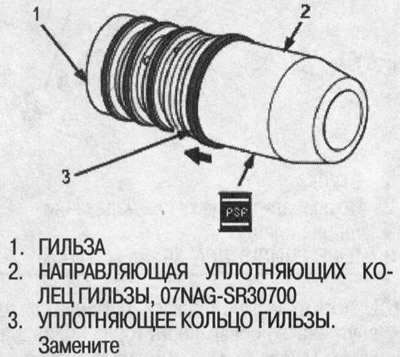
14. Align the special tool with the grooves on…


15. Apply power steering fluid to the sealing rings on the sleeve and to the entire inside surface of the special tool.


16. Slowly insert the sleeve into the special tool.

17. Move the sleeve several times in all directions and make sure that the sealing rings are tightly seated in the sleeve.

Note: Make sure that the sealing rings are not reversed.
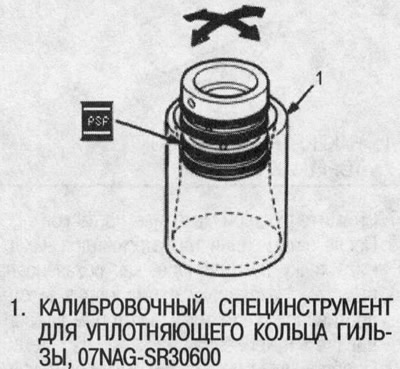

Note: Make sure that the sealing rings are not…


18. Apply power steering fluid to the surface of the worm shaft. Place the sleeve on the worm shaft, aligning the reference pin inside the sleeve with the notch in the shaft. Then securely place the new ring clamp in the groove of the worm shaft. Be careful not to damage the valve seal ring when installing the sleeve.
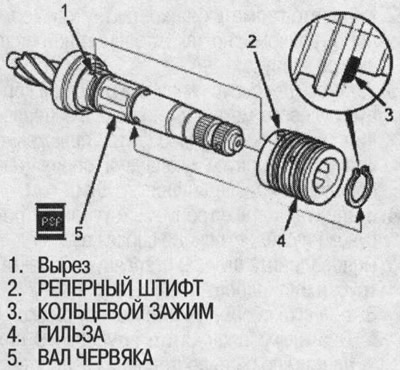
18. Apply power steering fluid to the surface of…


19. Apply power steering fluid to the edge of the valve seal ring, then use the special tool to press the seal into the valve body as shown in the figure. Press the valve seal with the groove side facing the special tool.
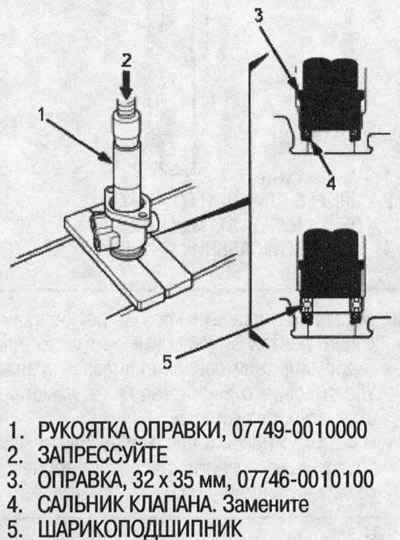


19. Apply power steering fluid to the edge of the…


20. Using the special tool, press the new ball bearing into the valve body as shown in the figure.

21. Wrap the worm shaft with vinyl tape, then apply power steering fluid over the vinyl tape.

22. Insert the worm shaft into the valve body. Do not damage the valve sealing rings.

23. Remove the vinyl tape from the worm shaft, then remove the remaining adhesive layer of the tape.
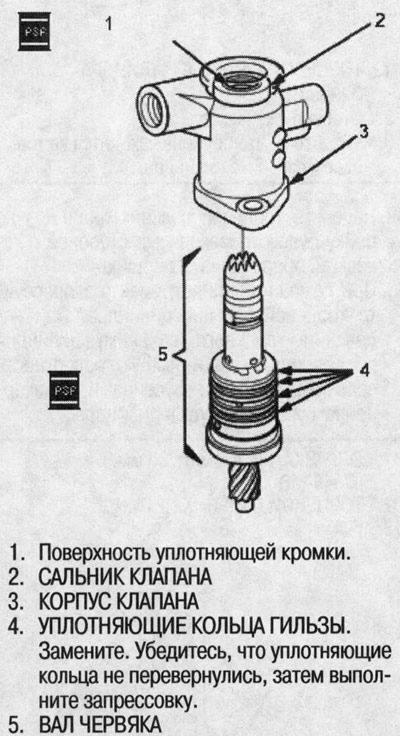
23. Remove the vinyl tape from the worm shaft,…


24. Using the special tool, press in the worm shaft/sleeve. Make sure the worm shaft/sleeve turns smoothly by turning the worm shaft.
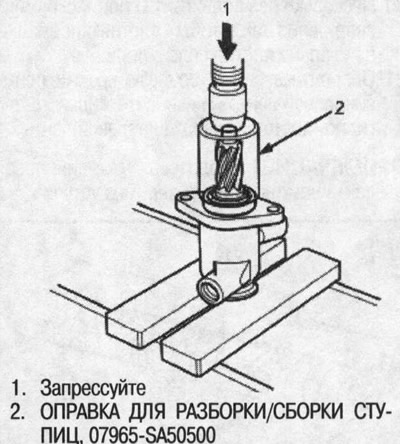
24. Using the special tool, press in the worm…


Publication reprinted from the website HONDABOOK
This article is available at: russian, bulgarian, belarusian, ukrainian, serbian, croatian, romanian, polish, slovak, hungarian
This information has been verified: Emil Safonov
Share with friends:
◀ Previous
HR-V 1: Steering
Next ▶

Steering gear — assembly
Disassembling the steering gear valve body
Disassembling the steering rack
Steering gear — removal
Power Steering Pump — Assembly
Steering rack assembly
Steering gear — installation
Replacing ball joint covers
Steering Specifications
See also other articles from Honda manuals:
Replacing the steering gear protective covers Honda Accord 6 (1997-2002)
Steering gear dust boots — replacement Honda Civic 3 and 4 (1983-1991)
Removal and installation the steering gear Honda Fit 1 (2001-2008)
Power steering gear — removal and installation Honda CR-V 1 (1995-2001, petrol)
Steering gear — component layout Honda Avancier 1 (1999-2003, petrol)
Link in different formats to this article
Comments and feedback from visitors
No comments yet


How much will 18 + 27 ?


HR-V 1 (1998-2006, petrol) 
  • General information
  • User manual
  • Maintenance
  • Power unit
  • Engine repair
  • Lubrication system
  • Cooling system
  • Fuel injection and control
  • Power and exhaust system
  • Engine electrical equipment
  • Transmission
  • Clutch
  • Mechanical gearbox
  • Automatic gearbox
  • Rear differential
  • Drive shafts and cardan
  • Chassis and running gear
  • Steering
  • Car suspension
  • Brake system
  • Body and interior
  • Exterior (external elements)
  • Interior (internal elements)
  • Doors, locks and windows
  • Electrical equipment
  • Equipment and devices
  • Lighting system
  • Electrical circuits
HondaBook.ru © 2018–2026 • Mobile version • Sitemap: EN BG BY UA RS HR RO PL SK HU • Feedback • Driver Information • Search system • Bookmark
Accord 3 (1985-1989) • Accord 6 (1997-2002) • Civic 3 and 4 (1983-1991) • Civic 5 and 6 (1991-2000) • Civic 6 (1995-2000) • Civic 7 (2000-2005) • Civic 8 (2005-2011) • Fit 1 (2001-2008) • CR-V 1 (1995-2001) • CR-V 2 (2002-2006) • HR-V 1 (1998-2006) • Avancier 1 (1999-2003) •
 
This website uses cookies to ensure proper functioning. By clicking "OK," you agree.