
Note:
- Conduct the check at the operating temperature of the variator working fluid (50-80°C).
- The duration of each check should not exceed five seconds.
1. Warm up the CVT working fluid to operating temperature (50-80°C).
2. Place the front of the vehicle on stands.
3. Apply the parking brake and place chocks under the rear wheels.
4. Remove the lower protective covers.
5. Make sure the front wheels can turn freely.
6. Warm up the engine to operating temperature (until the radiator fan of the cooling system turns on).
7. Unscrew the plug and connect a special pressure gauge to hole "A" to check the forward clutch pressure.
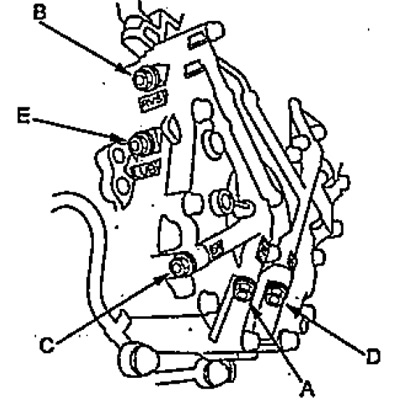
8. Connect a special pressure gauge to hole "B" to check the reverse brake pressure.
9. Connect pressure gauges (with a measured pressure of at least 4.9 MPa) to hole "C" to measure the pressure of the driving pulley and to hole "D" to measure the pressure of the driven pulley.
Note: if a malfunction occurs in the electrical part of the variator control system and the control unit switches to emergency operation mode, the pressure of the leading and driven pulleys can reach 3.43 MPa.
10. Connect a special pressure gauge to the "E" hole to measure the lubricant pressure.
11. Start the engine.
12. Move the selector to position "D" and measure the forward clutch pressure at an engine speed of 1700 rpm.
- Nominal pressure - 1.44-1.71 MPa
13. Move the selector to the "R" position and measure the reverse brake pressure at an engine speed of 1700 rpm.
- Nominal pressure - 1.44-1.71 MPa
14. Move the selector to the "N" position and measure the pressure of the leading pulley and the pressure of the driven pulley at an engine speed of 1700 rpm.
Nominal pressure:
- leading pulley - 0.31 - 0.53 MPa
- driven pulley - 0.43 - 0.91 MPa
15. Measure the lubrication pressure at an engine crankshaft speed of 2500 rpm.
- Nominal pressure - 0.27 - 0.40 MPa
16. After checking, disconnect all pressure gauges.
17. Install the plugs with new gaskets.
- Tightening torque - 18 Nm
18. If the measured pressures do not correspond to the nominal values, then determine the possible malfunction using the "Hydraulic Test" table.
[Refer to the original source on the website: www.HondaBook.ru]