
Disappearing error
Term "disappearing error" refers to systems that have an error, but, the test of which at the moment shows that there is no malfunction. If the malfunction indicator "Malfunction indicator lamp" ("Check Engine") off, check all connectors associated with the circuit under test for poor connections and loose leads. If the indicator lights up, but then goes out, then this malfunction has the character of disappearing.
Diagnostic system "Honda Diagnostic System"
Fault indicator on:
1. Start the engine and check the indicator.
Note: when the ignition key is in position and the engine is not running, the indicator lights up for 15-20 seconds.
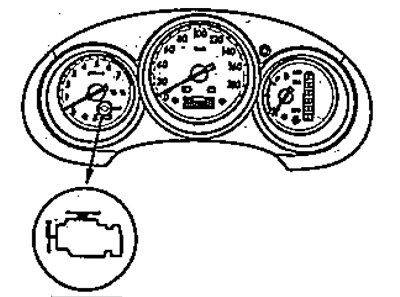
Fault indicator "Malfunction Indicator Lamp" ("Check Engine").
2. If the indicator continues to burn, connect the tester to the diagnostic socket (DLG).
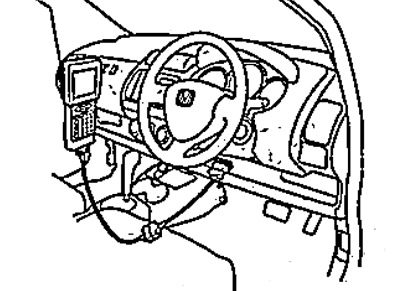
3. Turn the ignition key to position "ON (ll) and wait 30 seconds.
4. Read fault codes and write them down. Also check the archived and/or current data, download any found data.
Note:
- Historical data shows the state of the engine before the first malfunction, misfire or fuel failure.
- The scanner can read fault codes, history data, current data, and other engine/transmission control unit data.
Fault indicator light off: If the indicator light is off but the vehicle is faulty, diagnose it.
Erasing codes
Using a scanner
When using a scanner, make sure that the mode is set to erase all data of the electronic control unit at once (self-learning data; data "freeze frame" and stored fault codes). After erasing all data, perform the following procedures in the following sequence: ECU self-learning idle, stroke characteristics (see below), self-learning crankshaft position sensor (see section "Control system").
1. Clear trouble codes with a scanner with the engine stopped.
2. Turn the ignition key to position "OFF".
3. Turn the ignition key; into position "ON (II) " and wait 30 seconds.
4. Turn the ignition key to position "OFF" and disconnect the scanner from the diagnostic socket.
Without using a scanner
1. Turn the ignition key to position "OFF".
2. Slide the fuse box out, remove fuse #20 (15 A).
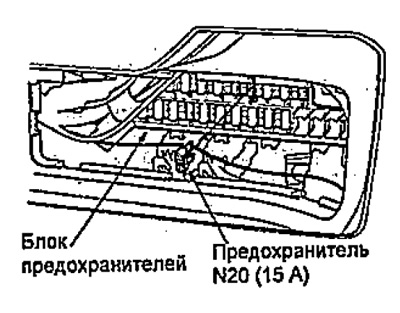
3. Install fuse #20, back after 10 seconds or more.
Resetting the electronic control unit
1. Reset the ECU data using a scanner with the engine off.
2. Turn the ignition key to position "OFF".
3. Turn the ignition key to position "ON (II) " and wait 30 seconds.
4. Turn the ignition key to position "OFF", and disconnect the scanner from the diagnostic socket.
5. Carry out the procedure for learning the electronic control unit.
Training of the electronic control unit for idling characteristics
This procedure is necessary for learning the ECU.
The training procedure must be carried out in the following cases:
- ECU replacement;
- ECU data reset;
- ECU data update;
- replacing or cleaning the throttle body.
Note: Erasing trouble codes with a scanner does not require ECU training.
1. Make sure all accessories are disabled (radio, air conditioning, lighting, etc.).
2. Reset the ECU using a scanner.
3. Turn the ignition key to position "ON (II) '' and wait 2 seconds.
4. Start the engine. Keeping the engine speed at 3000 rpm, wait for the fan, radiator to turn on or until the engine temperature reaches 90°C.
5. Let the engine run for about 5 minutes idling at wide throttle.
Note: If the radiator fan is running, do not include the time it was running at 5 minutes.
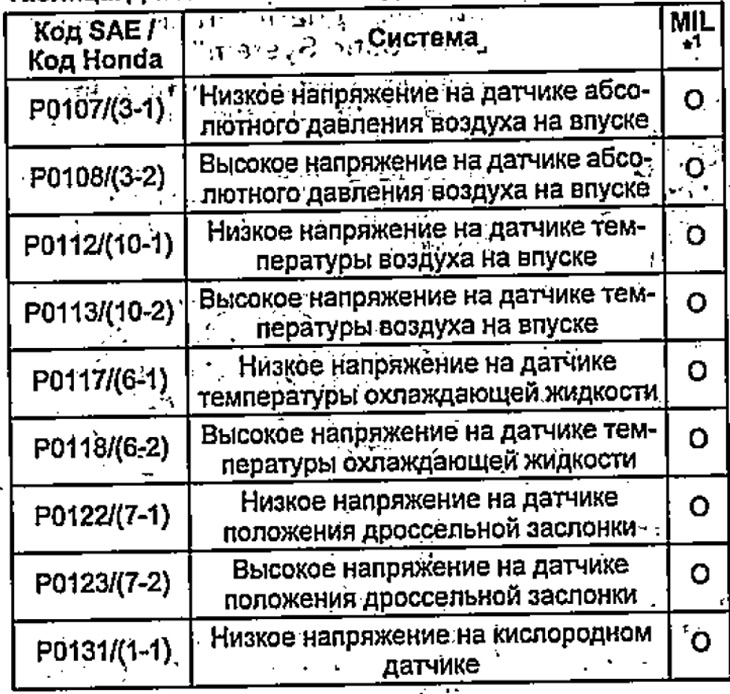
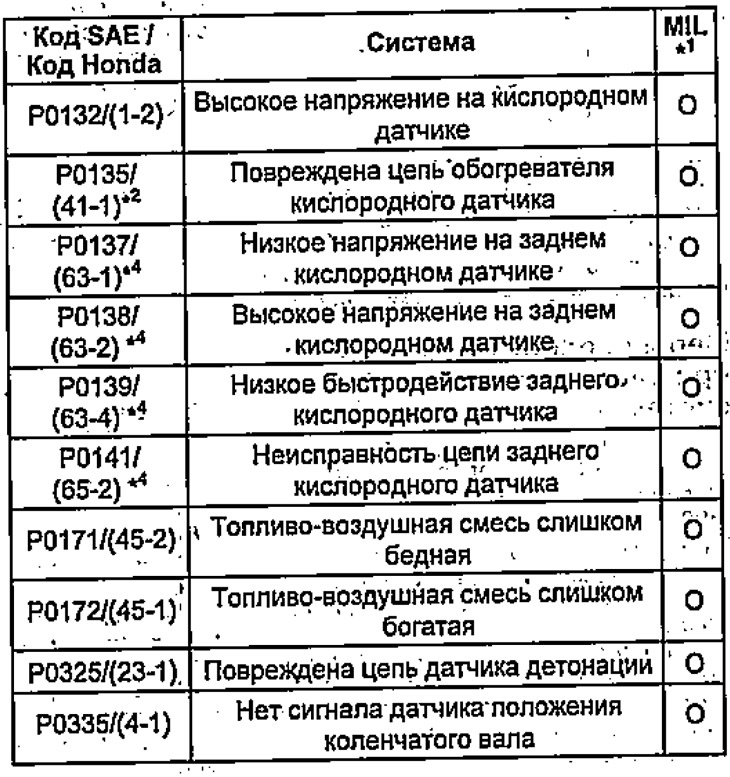
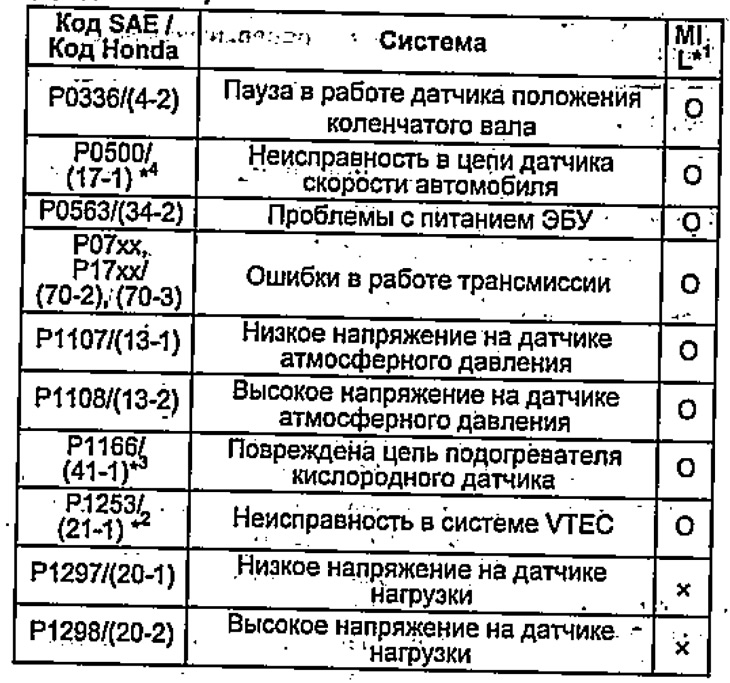
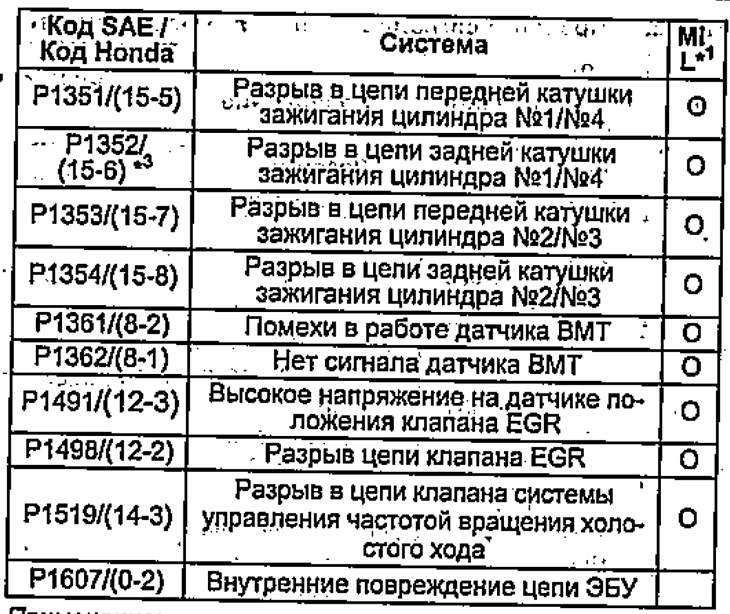
Diagnostic Trouble Codes
Table. Diagnostic Trouble Codes.
 |  |
 |  |
Note:
- *1 fault indicator (Malfunction indicator lamp or Check Engine), "0" - burns, "X" - does not burn.
- *2 L15A models from 09.2002
- *3 models L13A from 06.2001
- *4 L15A models from 06.2004
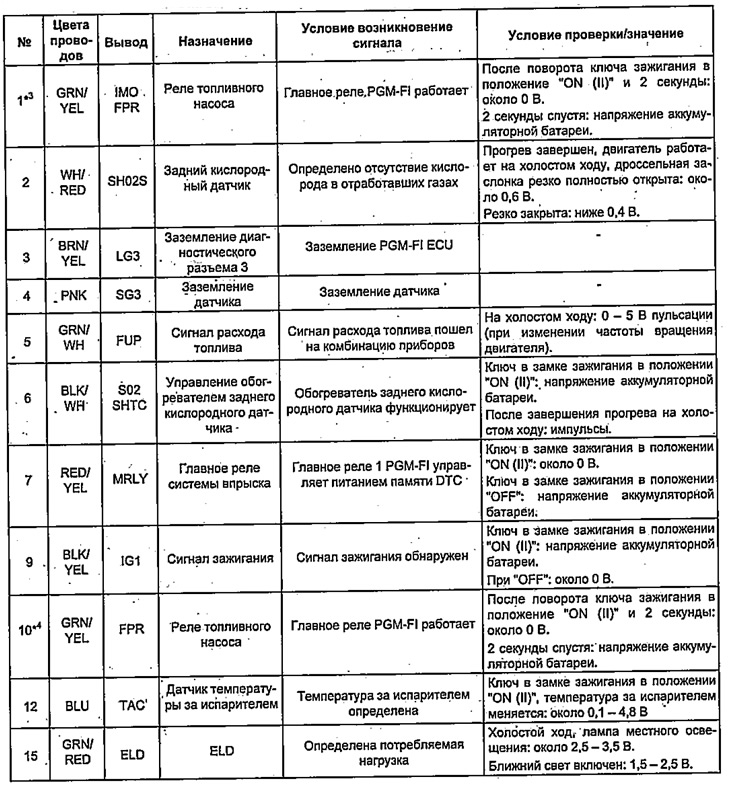
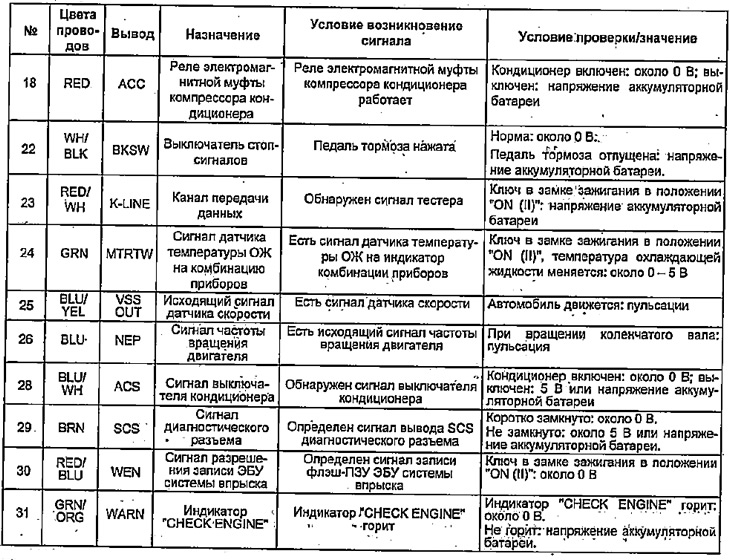
Checking the signals at the terminals of the electronic control unit (L13A from 06.2001)
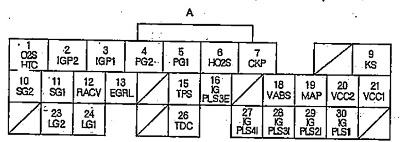
Table. Checking the signals at the terminals of the electronic control unit (L13A from 06.2001).
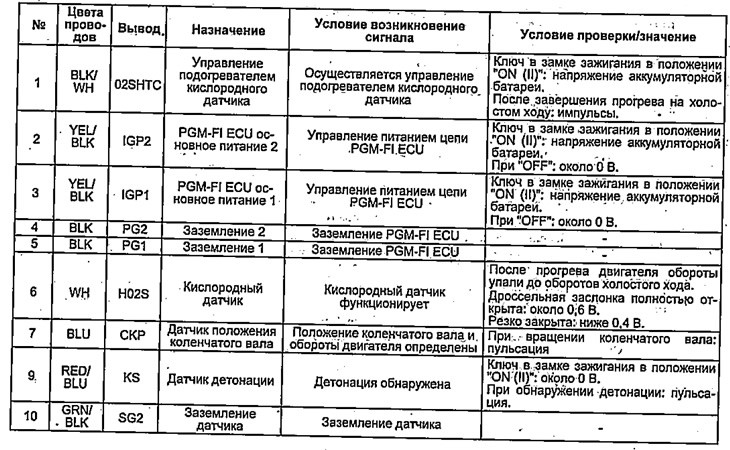
Note:*1 models from 11.2002
Table. Checking the signals at the terminals of the electronic control unit (L13A since 06.2001).

Note:*1 pre-2002 models

Table. Checking the signals at the terminals of the electronic control unit (L13A from 06.2001).
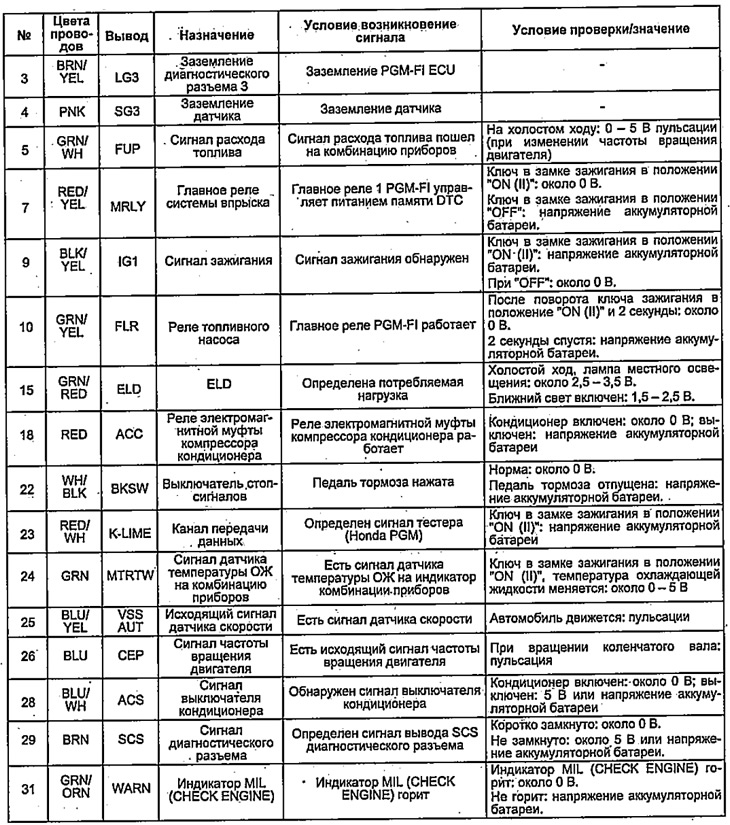
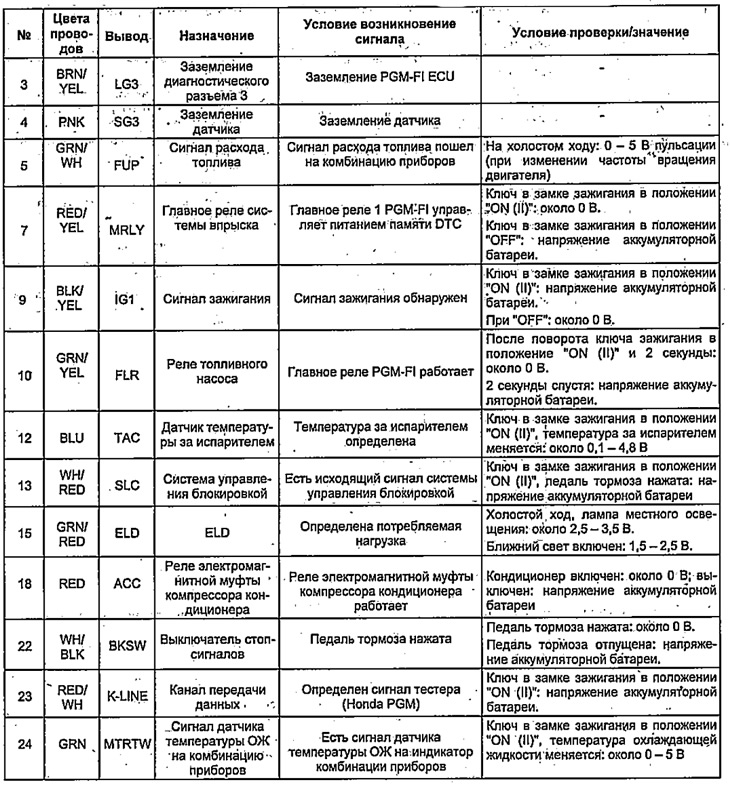
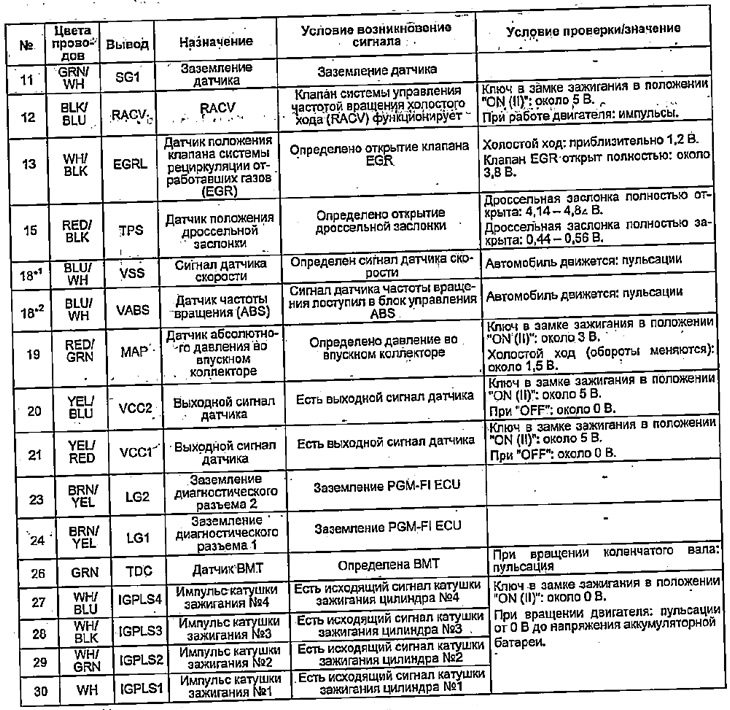
Checking the signals at the terminals of the electronic control unit (L15A from 09.2002)

Table. Checking the signals at the terminals of the electronic control unit (L15A since 09.2002).
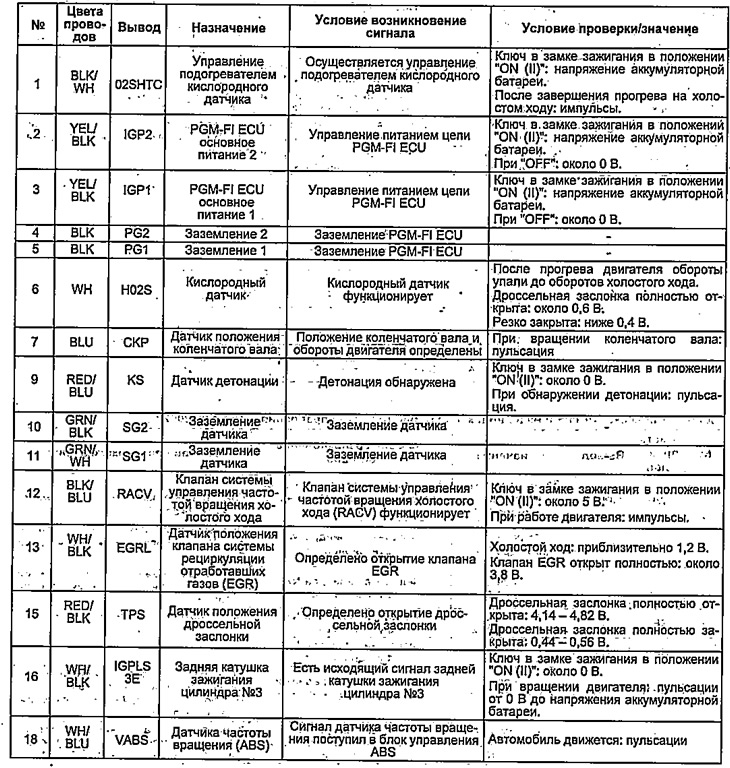
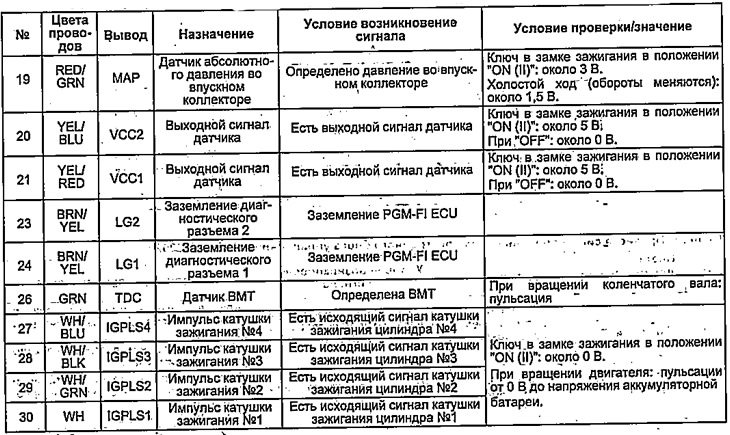
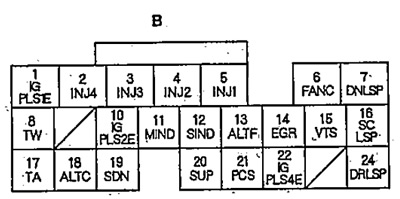
Table. Checking the signals at the terminals of the electronic control unit (L15A from 09.2002).

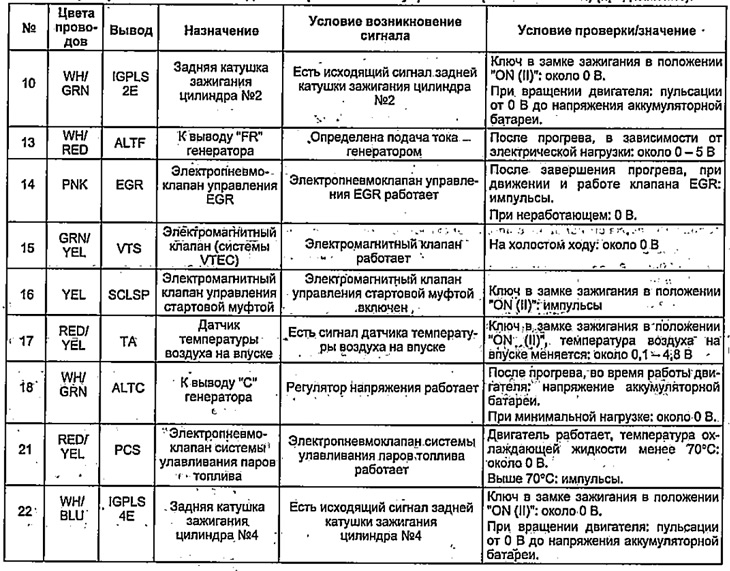
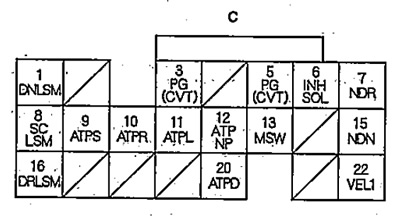
Table. Checking the signals at the terminals of the electronic control unit (L15A from 09.2002).
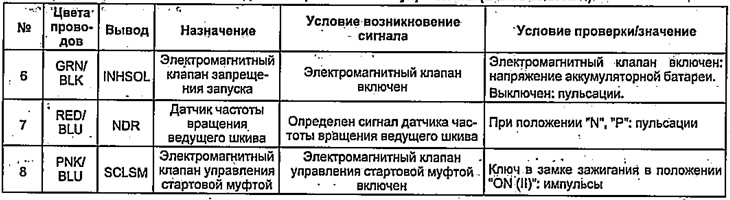
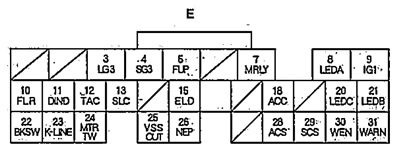
Table. Checking the signals at the terminals of the electronic control unit (L45A from 09.2002)

Checking the signals at the terminals of the electronic control unit (L15A from 06.2004)
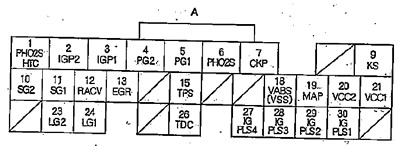
Table. Checking the signals at the terminals of the electronic control unit (L15A from 06.2002).
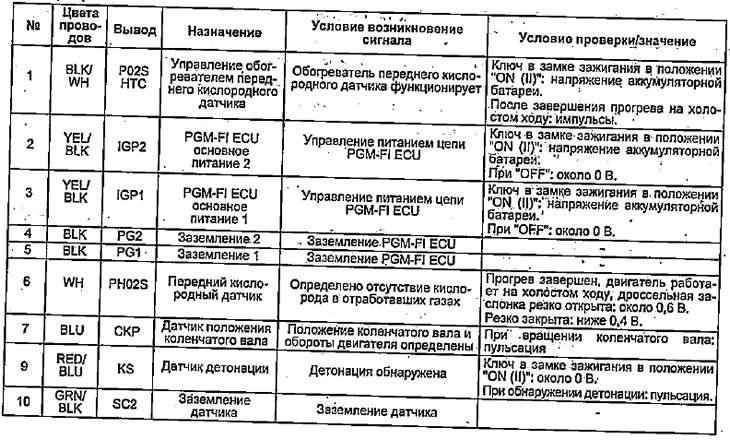
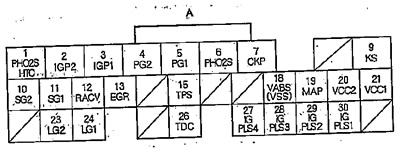
Table. Checking the signals at the terminals of the electronic control unit (L15A from 06.2004).
Note:
- *1 - models with manual transmission,
- *2 - models with Honda Multi Malic S+7 SPEED MODE.
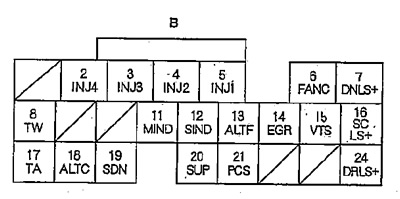
Table. Checking the signals at the terminals of the electronic control unit (L15A from 06.2004).


Table. Checking the signals at the terminals of the electronic control unit (L15A from 06.2004).
Note:
- *3 - models with immobilizer,
- *4 - models without immobilizer.