
HondaBook.ru
Auto companies Volkswagen Auto companies Ford Auto companies Lada Auto companies Skoda Auto companies BMW Auto companies Mazda Auto companies Peugeot
English Русский
Български
Беларускі
Український
Српски
Hrvatski
Română
Polski
Slovenský
Magyar
Bookmark Contacts Sitemap   


Accord Civic Fit / Jazz CR-V HR-V Others Articles
Fit 1 (2001-2008)

Checking and adjusting the front wheel alignment angles (Honda Fit 1)

  • Main
  • Honda Fit
  • 1 (2001-2008)
  • Chassis and running gear
  • Car suspension
  • Checking and adjusting the front wheel alignment angles
0
Contents: Checking the wheel turning angles ⇊ Checking the wheel alignment and…⇊ Wheel alignment ⇊ Checking and adjusting the alignment ⇊
The values of the wheel alignment angles are given in the table "Wheel alignment angles".

Checking the wheel turning angles


Place the vehicle on a dynamometer and check the maximum wheel turning angles.

Note: If a portable alignment stand is used for adjustment, the rear wheels are placed on a stand so that the car is level.
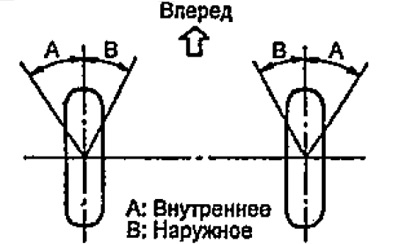

Note: If a portable alignment stand is used for…


Checking the wheel alignment and longitudinal tilt of the steering axis


1. Place the vehicle on the stand.

2. Unscrew the wheel hub mounting nut.

3. Install the special device.
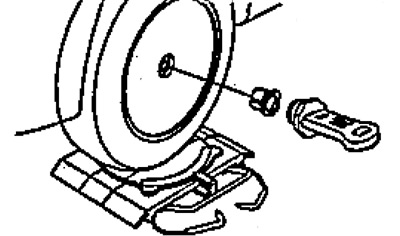
3. Install the special device.


4. Measure the wheel alignment and caster angle.


5. Remove the special device.

6. Tighten the new wheel hub nut.

If the longitudinal angle of the steering axis does not correspond to the established norm, check the suspension elements for damage and bending. If necessary, replace the faulty element.

If the camber does not correspond to the established norm, make adjustments.

Wheel alignment


1. Jack up the front of the car and remove the wheels.

2. Remove the front wheels.

3. Loosen the two nuts at the bottom of the front suspension strut.

4. Adjust the camber by moving the lower part of the strut.
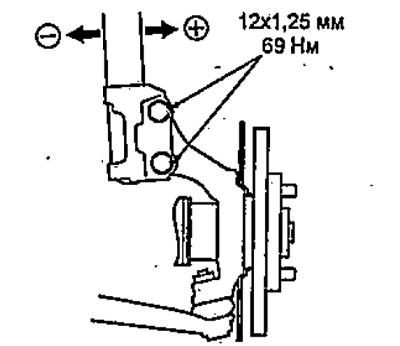
4. Adjust the camber by moving the lower part of…


If the wheel camber does not meet the established standards, select the adjusting bolt (A) and adjust the camber value.

Note:
  • Using one adjusting bolt, camber adjustment is possible within a range of ±20'.
  • By using two adjusting bolts, the camber can be adjusted within a range of ±50'.
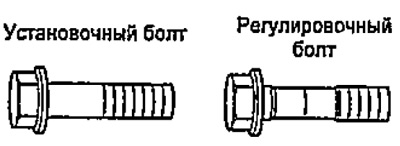

By using two adjusting bolts, the camber can be…


5. Tighten the two nuts.


  • Tightening torque - 103 Nm

6. Install the front wheels and lower the vehicle.

7. Check the camber of the front wheels.

Note: After adjusting the front wheel camber, check the toe-in.


Checking and adjusting the alignment


1. Measure the toe-in value.

a) Rock the car up and down to stabilize the suspension.

b) Roll the car forward approximately 1 meter on a horizontal surface, with the front wheels straight.

c) Mark the center of the tread on the rear side of the wheels and measure the distance "B" between the marks on the left and right tires.

d) Roll the vehicle forward so that the marks on the rear side of the wheels are in front at the height of the gauge.

Note: If the marks are below the level of the gauge when rolling the vehicle, repeat the procedure from point (c).
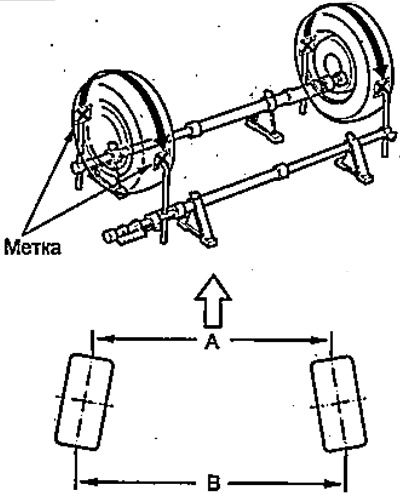

Note: If the marks are below the level of the…


d) Measure the distance between the marks on the right and left wheels at the front and calculate the toe-in.
  • Convergence = B - A

If the toe-in value does not meet the specified conditions, adjust by rotating the steering rods.

2. Adjusting the front wheel alignment.

a) Remove the cover clamps.

b) Loosen the tie rod end locknuts.

c) Rotate the left and right rods (A) by the same number of turns to adjust the toe-in.
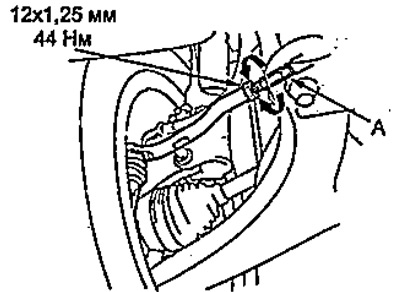


c) Rotate the left and right rods (A) by the same…


Note: Make sure the right and left rods are the same length.


d) Tighten the tie rod end locknuts.
  • Tightening torque - 44 Nm

d) Install the covers in place and tighten them with clamps.

Note: Make sure the covers are not twisted.


(The text of the article is available on the website «HondaBook.ru»)
This article is available at: russian, bulgarian, belarusian, ukrainian, serbian, croatian, romanian, polish, slovak, hungarian
This information has been verified: Varvara Vereshchagina
Share with friends:
◀ Previous
Fit 1: Car suspension
Next ▶

Preliminary checks
Checking the rear wheel alignment angles
Checking the wheel runout
Front suspension — schematic diagram
Front wheel steering knuckle and hub
Front Wheel Steering Knuckle and Hub — Removal
See also other articles from Honda manuals:
Front wheel alignment Honda Accord 3 (1985-1989)
Checking and adjusting the front wheel alignment angles Honda Civic 7 (2000-2005)
Checking/adjusting front wheel alignment Honda CR-V 2 (2002-2006, petrol)
Wheel alignment angles Honda HR-V 1 (1998-2006, petrol)
Wheel alignment — procedure for adjusting wheel alignment angles Honda Avancier 1 (1999-2003, petrol)
Link in different formats to this article
Comments and feedback from visitors
No comments yet


How much will 17 + 43 ?


Fit 1 (2001-2008) 
  • General information
  • User manual
  • Maintenance
  • Power unit
  • Engine repair
  • Cooling and lubrication system
  • Injection and power system
  • Control system
  • Engine electrical equipment
  • Transmission
  • Clutch
  • Mechanical gearbox
  • Automatic gearbox
  • Variator (CVT)
  • Drive shafts and gearbox
  • Chassis and running gear
  • Car suspension
  • Steering
  • Brake system
  • Body and interior
  • Exterior (external elements)
  • Interior (internal elements)
  • Doors, locks and windows
  • Heater and air conditioner
  • Safety system
  • Electrical equipment
  • Equipment and devices
  • Wiring diagrams (since 06.2001)
  • Wiring diagrams (since 06.2004)
HondaBook.ru © 2018–2026 • Mobile version • Sitemap: EN BG BY UA RS HR RO PL SK HU • Feedback • Driver Information • Search system • Bookmark
Accord 3 (1985-1989) • Accord 6 (1997-2002) • Civic 3 and 4 (1983-1991) • Civic 5 and 6 (1991-2000) • Civic 6 (1995-2000) • Civic 7 (2000-2005) • Civic 8 (2005-2011) • Fit 1 (2001-2008) • CR-V 1 (1995-2001) • CR-V 2 (2002-2006) • HR-V 1 (1998-2006) • Avancier 1 (1999-2003) •
 
This website uses cookies to ensure proper functioning. By clicking "OK," you agree.