
- Installation is carried out in the reverse order of removal, as follows.
- If only the balancing shaft belt is installed, perform the work starting from point 12.
Attention. Before installing the top and bottom covers, be sure to wipe them with a cloth.
1. Install the balance shaft drive pulley (see above).
2. Set the crankshaft and camshaft pulley to the position corresponding to the TDC position of the compression stroke of the piston of cylinder No. 1.
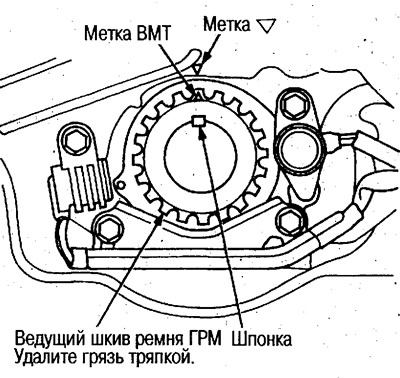
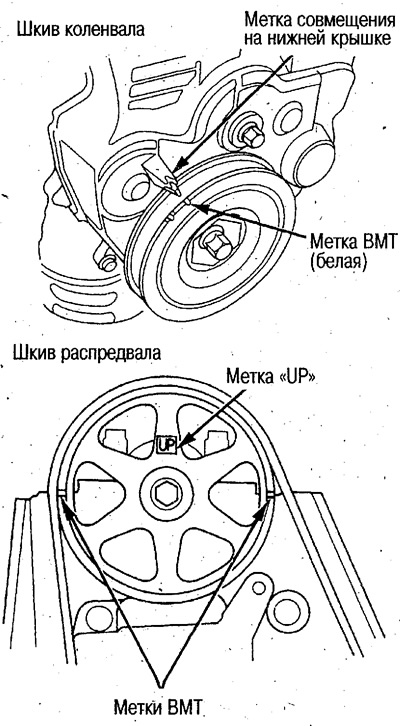
A. Align the TDC mark on the timing belt drive pulley with the triangular mark on the oil pump.
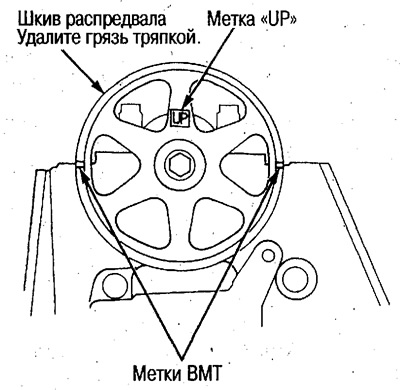
B. Align the TDC marks on the camshaft pulley with the top edge of the rear cover.
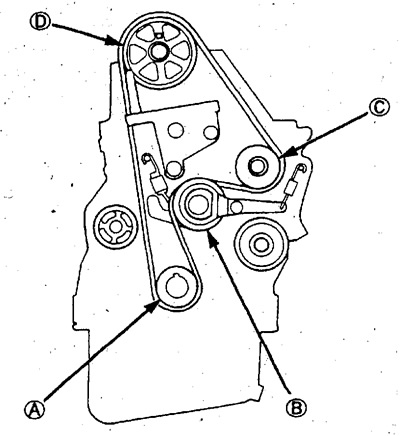
3. Install the timing belt in the order shown in the figure.
A: drive pulley (crankshaft) → B: Adjusting pulley → C: Water pump pulley → D: Camshaft pulley.
 |  |
After installing the belt, be sure to check that the position of the marks on the timing belt drive pulley and the camshaft pulley correspond to the TDC position of the compression stroke of the No. 1 cylinder.
4. Install the balance shaft belt drive pulley and bottom cover.
Attention:
- If the rubber seals were removed from the bottom cover, apply sealant to the bottom cover and install the rubber seals on it. Remove excess sealant.
- In case of replacement of rubber seals, clean the groove in the bottom cover, cut the rubber seal to the desired length from the repair kit and install so that there is an equal thickness along the entire length.
- Before installation, be sure to remove dirt from the bottom cover with a rag.
- Before installation, make sure that the rubber seals are not cracked or cut.
5. Install the crankshaft pulley and tighten the bolt to the required torque (see above).
6. Loosen the adjusting nut, install the belt, and then tighten the adjusting nut to the required torque.
7. Turn the crankshaft 5-6 turns to run the belt in.
8. Adjust timing belt (see above).
9. Recheck that the crankshaft pulley and camshaft pulley positions are at TDC on the compression stroke of cylinder #1.
10. If the pulley positions do not correspond to TDC, reinstall the belt (see above).
11. Remove the crankshaft pulley and bottom cover.
12. Set the timing belt drive pulley to the position corresponding to the TDC of the compression stroke of the piston of cylinder No. 1 (see above).
13. Fix the timing belt adjuster lever with the 6x1.0mm bolt (see above).
14. Loosen the adjusting nut 2/3-1 turns and check that the balance shaft belt tensioner moves freely.
15. Press the tensioner in the direction of the belt loosening and tighten the adjusting nut (see above).
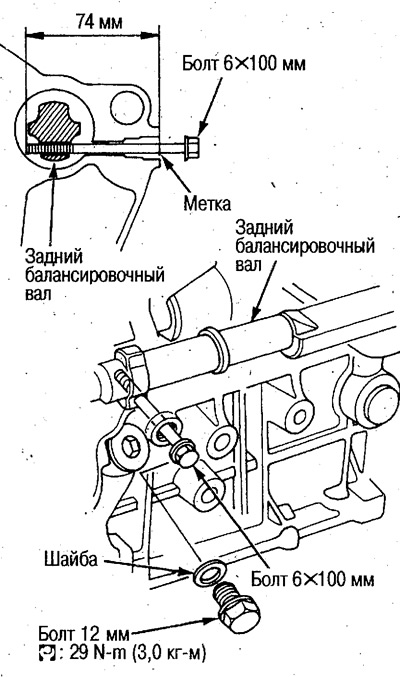
16. Remove the 12mm bolt from the rear side of the cylinder head and fix the rear balancing shaft with the 6x100mm bolt.
- Make a mark from the end of the bolt at a distance of 74 mm.
- Screw the bolt into the service hole to the mark.
17. Align the mark on the driven pulley of the balance shaft belt or the mark on the balance shaft (excavation) marked on the oil pump.
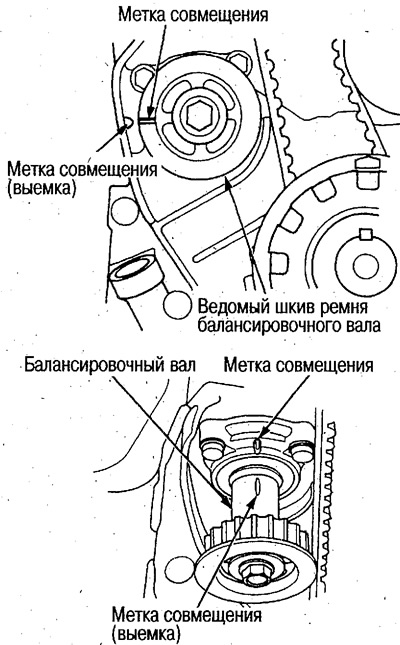
18. Install the balance shaft belt, loosen the adjusting nut and install the belt.
19. Unscrew the 6x100mm bolt and screw in the 12mm bolt.
20. Install the crankshaft pulley and tighten the pulley bolt to the required torque (see above).
21. Turn the crankshaft pulley approx. 1 turn and tighten the adjusting nut.
22. Make sure the adjusting nut is tight and remove the 6x1.0mm bolt from the adjusting arm.
23. Remove the crankshaft pulley and install the bottom cover.
- Before installing, be sure to wipe the bottom cover with a cloth.
24. Install the adjuster rubber on the adjusting nut
- Do not loosen the adjusting nut.
25. Install the crankshaft pulley and tighten the pulley bolt to the required torque (see above).
26. After installing all components, adjust all belts.
- See section «Checking and adjusting the alternator belt».
- See section «Checking and adjusting the steering pump belt».