HondaBook.ru
Auto companies Volkswagen Auto companies Ford Auto companies Lada Auto companies Skoda Auto companies BMW Auto companies Mazda Auto companies Peugeot
English Русский
Български
Беларускі
Український
Српски
Hrvatski
Română
Polski
Slovenský
Magyar
Bookmark Contacts Sitemap   


Accord Civic Fit / Jazz CR-V HR-V Others Articles
Avancier 1 (1999-2003, petrol)

Engine installation (Honda Avancier 1)

  • Main
  • Honda
  • Avancier 1 (1999-2003, petrol)
  • Power unit
  • Engine repair
  • Engine installation
0
The engine is installed in the reverse order of removal. To reduce engine noise and vibration, and to increase the durability of the bushings, tighten the engine mounting bolts and nuts as follows.

Tightening order of engine mounting bolts and nuts


1. Install the upper bracket and tighten the bolts and nuts in the order shown in the figure.
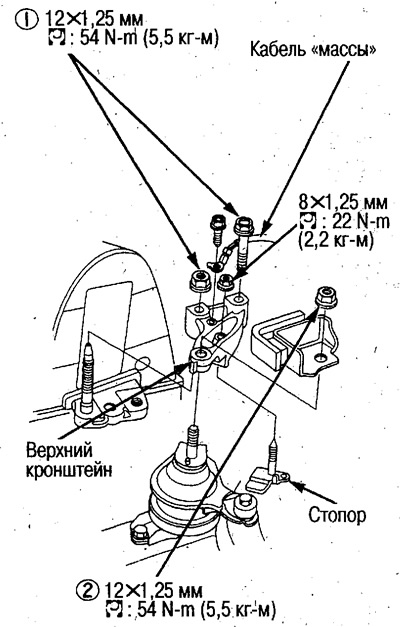
1. Install the upper bracket and tighten the…


2. Install the stopper and connect the ground cable.

3. Install the gearbox bracket and tighten the bolts and nuts in the order shown in the figure.
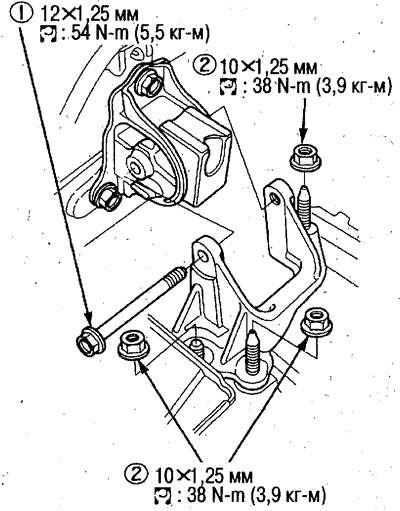
3. Install the gearbox bracket and tighten the…


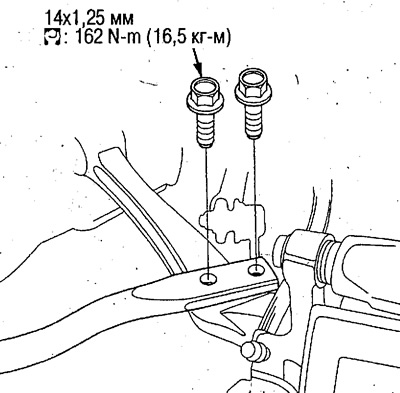
4. Install the front beam, align the marks and tighten the bolts.

5. Tighten the longitudinal rod bolts.

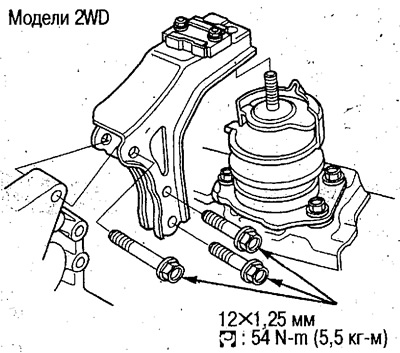
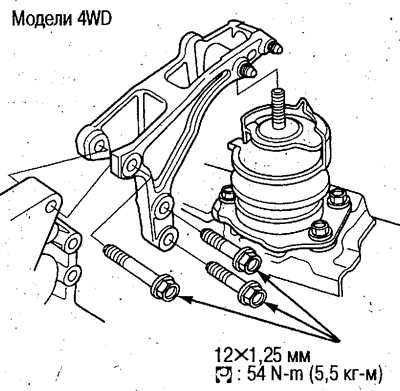
6. Tighten the rear bracket mounting bolts.
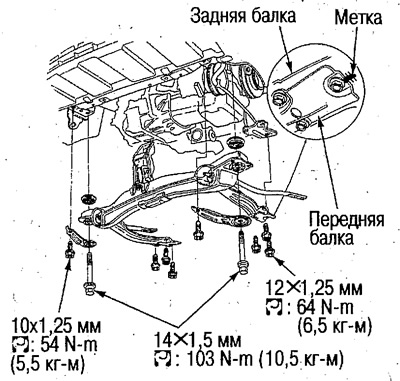
6. Tighten the rear bracket mounting bolts.

6. Tighten the rear bracket mounting bolts.

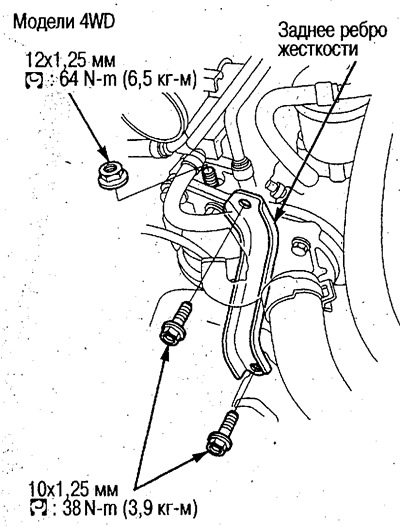
7. Tighten the rear mount bracket mounting nuts and install the rear stiffener.


On 4WD models, degrease the mounting nuts and threaded holes of the rear mount before installation.
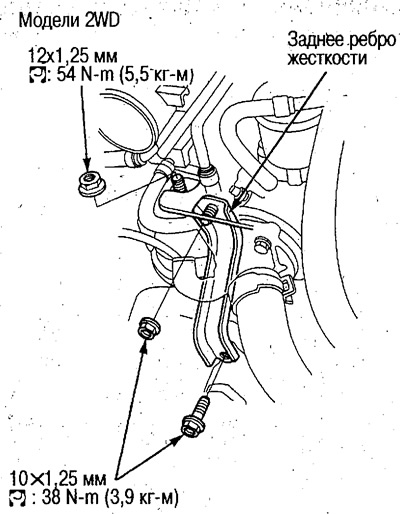
On 4WD models, degrease the mounting nuts and…

8. Tighten the front mount bracket bolts in the order shown in the illustration.
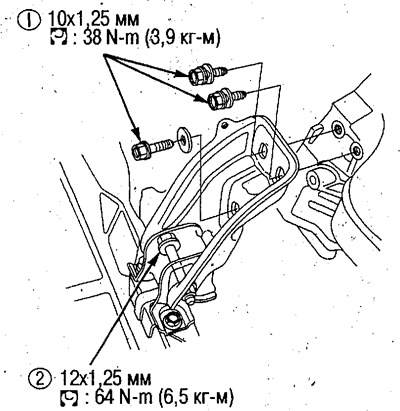
8. Tighten the front mount bracket bolts in the…


9. After installing all components, perform the following checks and adjustments.

1) Before installing the drive and intermediate shafts, clean the areas of the connections to the differential with flushing oil, blow with compressed air and make sure that there are no foreign particles.


2) Carefully insert the drive shaft without damaging the seal lips and make sure that the locating ring on the end of the shaft is securely seated in the groove of the differential gear.

3) Adjust the throttle cable (see chapter Engine Management System).

4) Check that each position of the selector lever corresponds to the indicator reading. If necessary, adjust (see chapter Automatic transmission).

5) Adjust the alternator belt (air conditioning compressor belt) (see above).

6) Adjust the power steering pump belt (see above).

7) Fill with coolant and bleed air (see below).

Caution: When adding coolant, be careful not to let it come into contact with connectors, fuse box, other electrical components, or paintwork. If you are concerned that coolant may spill, cover the components with film beforehand.


8) Fill with engine oil (see above).

9) Fill the gearbox with fluid (see chapter Automatic transmission).

10) When the ignition key is turned to the ON (II) position (without turning on the starter), the fuel pump is activated for approx. 2 seconds and the fuel pressure in the fuel system rises. Repeat this action 2-3 times and check for fuel leakage in various areas of the fuel system.

11) Start the engine and check the correct operation of all systems.

12) Adjust the idle speed (see chapter Engine Management System).

13) Check the wheel alignment angles and adjust if necessary.

Engine mount tightening torques
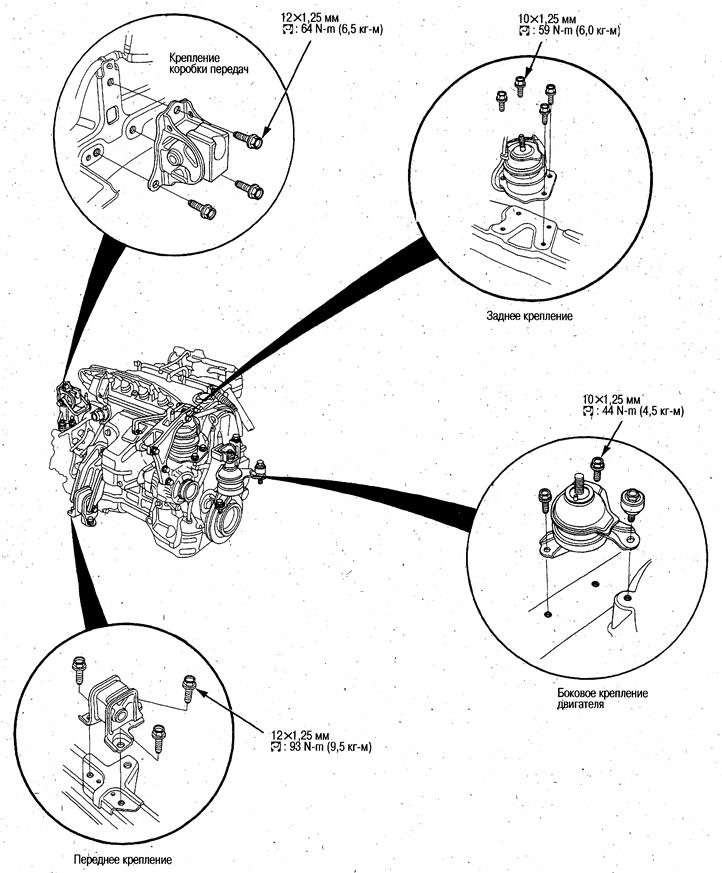
Engine mount tightening torques
This article is available at: russian, bulgarian, belarusian, ukrainian, serbian, croatian, romanian, polish, slovak, hungarian
This information has been verified: Emil Safonov
Share with friends:
◀ Previous
Avancier 1: Engine repair
Next ▶

Removal the engine
Installing the cylinder head
Removal the cylinder head
Cylinder head component arrangement
Replacing the TDC/Crankshaft Sensor
Active Engine Mount Control System Component Locations
Electrical diagram of the active engine mount control system
Active Engine Mount Control System Fault Diagnosis
Replacing the intake manifold
Exhaust pipe/muffler replacement
See also other articles from Honda manuals:
Engine Oil Recommendations Honda Accord 3 (1985-1989)
Emergency engine start Honda Civic 3 and 4 (1983-1991)
Engine number and identification plates Honda Fit 1 (2001-2008)
Location of serviced units and assemblies in the engine compartment Honda CR-V 1 (1995-2001, petrol)
Engine Starting Procedure Honda HR-V 1 (1998-2006, petrol)
Link in different formats to this article
Comments and feedback from visitors
No comments yet


How much will 50 + 24 ?


Avancier 1 (1999-2003, petrol) 
  • General information
  • Controls and instruments
  • User manual
  • Power unit
  • Engine maintenance
  • Engine repair
  • Cooling system
  • Engine management
  • Power and exhaust system
  • Transmission
  • Automatic gearbox
  • Drive shafts and differential
  • Chassis and running gear
  • Steering
  • Car suspension
  • Brake system
  • Body and interior
  • Doors, locks and windows
  • Interior (internal elements)
  • Exterior (external elements)
  • Air conditioner
  • Electrical equipment
  • Power devices
  • Equipment and devices
  • Headlights and lighting
  • Electrical circuits
HondaBook.ru © 2018–2026 • Mobile version • Sitemap: EN BG BY UA RS HR RO PL SK HU • Feedback • Driver Information • Search system • Bookmark
Accord 3 (1985-1989) • Accord 6 (1997-2002) • Civic 3 and 4 (1983-1991) • Civic 5 and 6 (1991-2000) • Civic 6 (1995-2000) • Civic 7 (2000-2005) • Civic 8 (2005-2011) • Fit 1 (2001-2008) • CR-V 1 (1995-2001) • CR-V 2 (2002-2006) • HR-V 1 (1998-2006) • Avancier 1 (1999-2003) •
 
This website uses cookies to ensure proper functioning. By clicking "OK," you agree.