
HondaBook.ru
Auto companies Volkswagen Auto companies Ford Auto companies Lada Auto companies Skoda Auto companies BMW Auto companies Mazda Auto companies Peugeot
English Русский
Български
Беларускі
Український
Српски
Hrvatski
Română
Polski
Slovenský
Magyar
Bookmark Contacts Sitemap   


Accord Civic Fit / Jazz CR-V HR-V Others Articles
Avancier 1 (1999-2003, petrol)

Installing the cylinder head (Honda Avancier 1)

  • Main
  • Honda
  • Avancier 1 (1999-2003, petrol)
  • Power unit
  • Engine repair
  • Installing the cylinder head
0
Installation is performed in the reverse order of removal. Before installation, do the following:.
  • Replace the cylinder head and manifold gaskets with new ones.
  • Thoroughly clean the mounting surfaces of the cylinder head and cylinder block.
  • Set the piston of cylinder No.1 to the TDC position of the compression stroke.

Attention:
  • Make sure that no foreign particles get between the gasket and the cylinder head/cylinder block.
  • Be careful not to damage the contact surface of the block and cylinder head gasket.
  • There are metal components on the gasket, so do not bend it.
  • Check the washers for wear and damage, check the seating surfaces of the washers.
  • Before installing the top and bottom covers, be sure to wipe them with a cloth.


1. Install the cylinder head gasket and dowel pins onto the cylinder block.
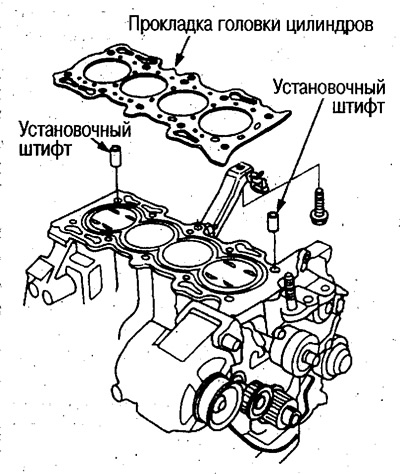
1. Install the cylinder head gasket and dowel…


2. Install the cylinder head onto the cylinder block and align it precisely with the dowel pins.

3. Apply engine oil to the bolt threads and washers. Tighten the bolts in the order shown in the figure to 29 N·m (3.0 kg·m).
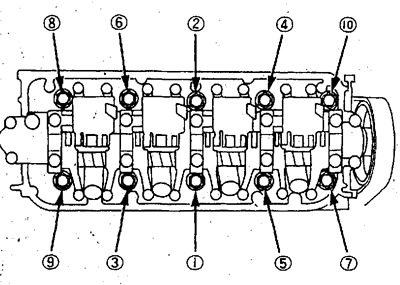
3. Apply engine oil to the bolt threads and…

  • Retighten the bolts to 29 N·m (3.0 kg·m).

Attention:
  • Use a TORX key.
  • If the bolt squeaks, loosen it and retighten it.


4. Tighten the bolts 90° twice in the above sequence.


  • If the bolts have been replaced with new ones, tighten them an additional 90°.

5. Tighten the bolt connecting the intake manifold and the strut (see above).

6. Install the exhaust manifold stand and tighten the self-locking nut (see above).

7. Install the timing belt (see above).

8. Install the valve cover gasket, aligning the corner sections precisely.
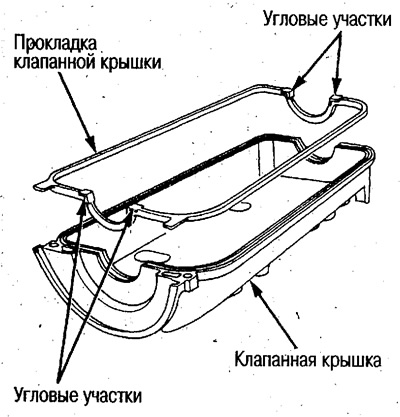
8. Install the valve cover gasket, aligning the…


Attention:
  • Before installing the gasket, clean the grooves in the valve cover and wipe the gasket with a rag.
  • When installing the gasket, make sure that it does not move or rise in the corner areas.


9. Apply sealant to the corner areas of the gasket.
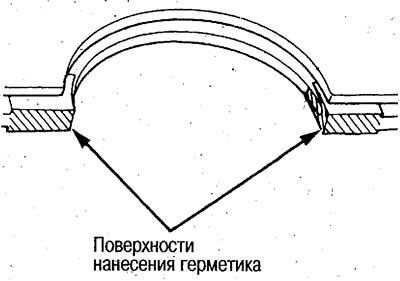
9. Apply sealant to the corner areas of the…


Attention:
  • Use genuine Honda sealant 1216, 5699, 1216E or 5999.
  • Do not use old sealant.
  • Remove dirt and oil from sealant application areas.
  • Do not install the gasket if more than 5 minutes have passed since applying the sealant. Remove the sealant and apply it again.
  • Add engine oil 30 minutes or more after installing the valve cover.


10. To prevent the gasket from falling out during installation, hold it with your fingers on the areas where it contacts the camshaft bearings (semi-circular areas). Install the cover on the cylinder head and rock it a little to get the gasket into place.


Attention:
  • Before installation, wipe the contact surface of the cylinder head with a rag.
  • Avoid touching areas where sealant has been applied.
  • Check the washers for wear and damage. Check the seating surfaces of the washers.
  • Before installing the valve cover, apply engine oil to the edges of the spark plug tube seals with your finger.
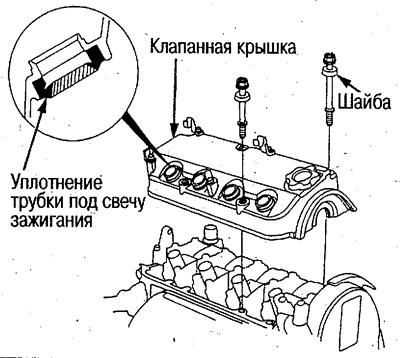

Before installing the valve cover, apply engine…

  • After installation, visually check the seals for tightness.
  • Remove excess oil.

11. Tighten the bolts in the order shown in the figure.
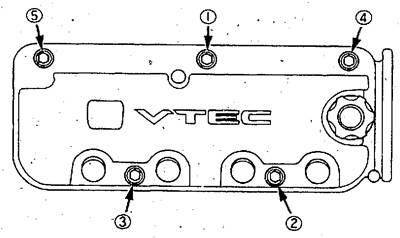
11. Tighten the bolts in the order shown in the…

  • Tighten in 3 stages.

: 12 N·m (1.2 kg·m)
This article is available at: russian, bulgarian, belarusian, ukrainian, serbian, croatian, romanian, polish, slovak, hungarian
This information has been verified: Emil Safonov
Share with friends:
◀ Previous
Avancier 1: Engine repair
Next ▶

Removal the cylinder head
Cylinder head component arrangement
Replacing the TDC/Crankshaft Sensor
Installing the timing belt and balance shaft belt
Removal the timing belt and balance shaft belt
Removal the engine
Engine installation
Active Engine Mount Control System Component Locations
Electrical diagram of the active engine mount control system
Active Engine Mount Control System Fault Diagnosis
See also other articles from Honda manuals:
Cleaning and inspection of the cylinder head Honda Accord 3 (1985-1989)
Removal and installation the cylinder head — removing, checking and… Honda Civic 6 (1995-2000)
Installing the cylinder head Honda Fit 1 (2001-2008)
Installing the cylinder head Honda CR-V 2 (2002-2006, petrol)
Cylinder head — design description Honda HR-V 1 (1998-2006, petrol)
Link in different formats to this article
Comments and feedback from visitors
No comments yet


How much will 32 + 46 ?


Avancier 1 (1999-2003, petrol) 
  • General information
  • Controls and instruments
  • User manual
  • Power unit
  • Engine maintenance
  • Engine repair
  • Cooling system
  • Engine management
  • Power and exhaust system
  • Transmission
  • Automatic gearbox
  • Drive shafts and differential
  • Chassis and running gear
  • Steering
  • Car suspension
  • Brake system
  • Body and interior
  • Doors, locks and windows
  • Interior (internal elements)
  • Exterior (external elements)
  • Air conditioner
  • Electrical equipment
  • Power devices
  • Equipment and devices
  • Headlights and lighting
  • Electrical circuits
HondaBook.ru © 2018–2026 • Mobile version • Sitemap: EN BG BY UA RS HR RO PL SK HU • Feedback • Driver Information • Search system • Bookmark
Accord 3 (1985-1989) • Accord 6 (1997-2002) • Civic 3 and 4 (1983-1991) • Civic 5 and 6 (1991-2000) • Civic 6 (1995-2000) • Civic 7 (2000-2005) • Civic 8 (2005-2011) • Fit 1 (2001-2008) • CR-V 1 (1995-2001) • CR-V 2 (2002-2006) • HR-V 1 (1998-2006) • Avancier 1 (1999-2003) •
 
This website uses cookies to ensure proper functioning. By clicking "OK," you agree.