
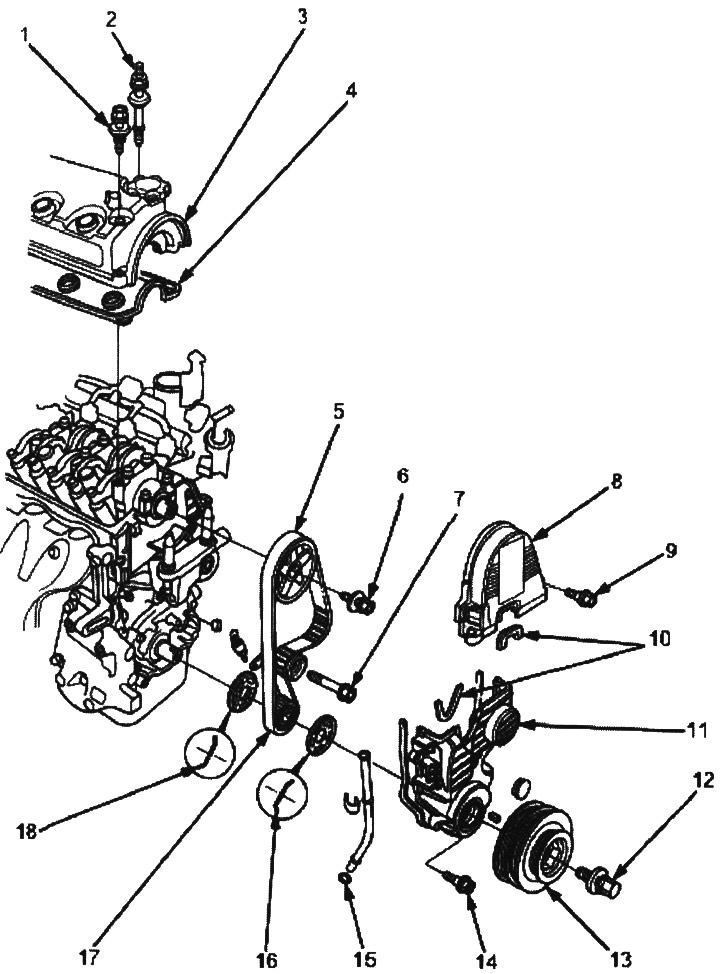
1. WASHER, Replace if damaged or out of order.
2. 6x1.0 mm, 9.8 Nm (1.0 kgf/m)
3. CYLINDER HEAD COVER, when installing see below.
4. CYLINDER HEAD COVER GASKET Replace if there are signs of leakage, if it is damaged or out of order. Apply sealant to the four corners of the recesses.
5. TIMING BELT.
Examination (see below)
Tension adjustment (see below)
Removal (see below)
Installation (see below)
6. 8x1.25 mm, 37 Nm (3.8 kgf/m), Apply engine oil to the bolt threads.
7. ADJUSTING BOLT, 10x1.25 mm, 44 Nm (4.5 kgf/m)
8. TOP COVER
9. 6x1.0 mm, 9.8 Nm (1.0 kgf/m)
10. RUBBER SEALS, Replace if damaged or worn out.
11. LOWER COVER
12. PULLEY BOLT, 14x1.25 mm, 20 Nm (2.0 kgf/m) + 90°. Replacement (see above). Do not use an impact wrench during installation.
13. CRANKSHAFT PULLEY, Replacement (see above).
14. 6x1.0 mm, 9.8 Nm (1.0 kgf/m)
15. O-RING, Replace
16. TIMING BELT GUIDE PLATE, Install with the concave surface OUTWARD.
17. TIMING BELT INPUT PULLEY, REPLACEMENT (see above).
18. TIMING BELT GUIDE PLATE, Install with the concave surface facing inward.
Note:
- For information on how to install the crankshaft and pulley before installing the belt, see below.
- Before removing the belt, mark the direction of rotation on the belt.
- Do not use the top and bottom covers to store removed components.
- Before installation, clean the top and bottom covers.
- Replace the camshaft and crankshaft seals if there is an oil leak.
(Original article on the website: «HondaBook»)