
Attention:
- Be sure to relieve fuel pressure before disconnecting the fuel supply hose (see ch. Engine power system).
- Observe fire safety measures.
- Do not open the radiator cap on a hot engine. The coolant is under pressure and may spill out. After the coolant has cooled down, cover the cap with a cloth and slowly open it.
- Install the jack, supports and lifting hooks in their designated locations.
- For safety reasons, place the removed wheels behind a stand under the sills.
- Block the rear wheels with the parking brake and support them with wheel chocks.
- In order not to damage the paintwork, cover with a film.
- In order not to damage the e / wiring, disconnect the connectors carefully, holding the connector. In addition, make sure that the e / wiring and hoses do not pinch or touch the surrounding components.
- Keep coolant away from electrical components and paintwork. If coolant does get on them, wipe them off immediately.
- After changing the oil, dispose of the used oil properly.
1. Disconnect the cables from the battery terminals.
Attention. Disconnect the cable from the negative terminal first.
Before connecting cables, clean the contact surfaces of the terminals with sandpaper and apply lubricant to them.
2. Remove the air intake tube and air cleaner cover assembly.

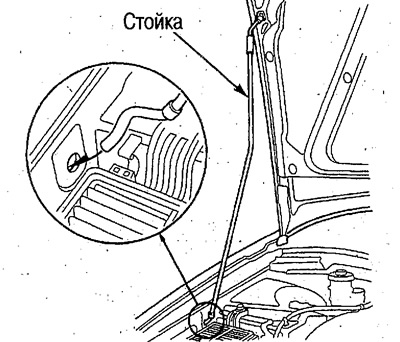
3. Open the hood cover and fix with a stand as shown in the figure.
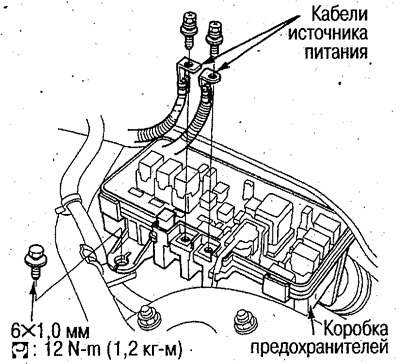
4. Disconnect the power supply cables from the fuse box.
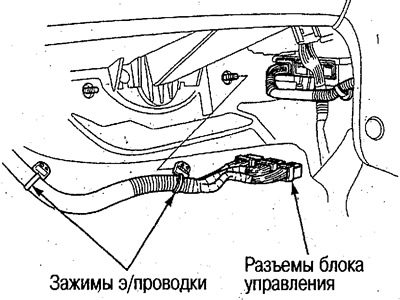
5. Disconnect the connectors of the control unit (ECU) and main e / wiring, remove the clips e / wiring.
6. Remove the rubber plug and pull out e/conducting of the engine.
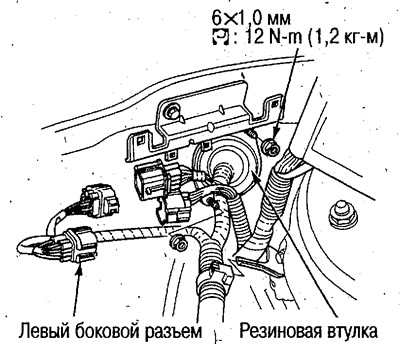
7. Pull the left side connector out of the rack and disconnect it.
8. Relieve fuel pressure (see ch. Engine power system).
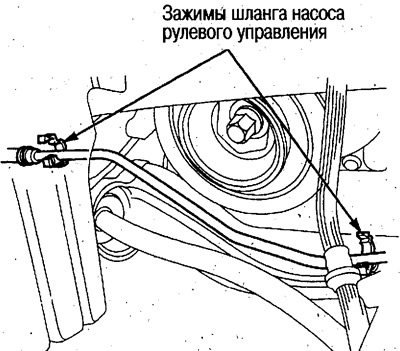
9. Disconnect the carbon filter hoses, fuel supply and return hoses, remove the steering pump hose clamps.

10. Disconnect the throttle cable.
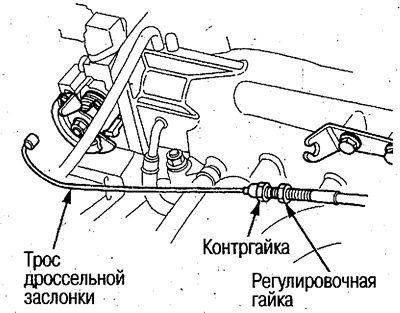
Attention:
- Do not kink the cable when disconnecting and connecting.
- If the cable is bent, replace with a new one.
- Place a mark on the location of the adjusting nut.
- After attaching the cable, be sure to adjust (see ch. Engine management system).
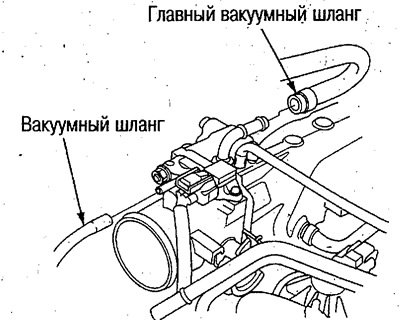
11. Disconnect vacuum hoses and main vacuum hose.
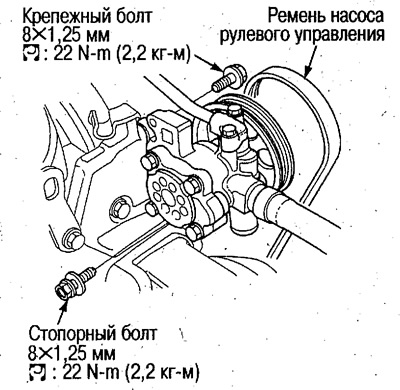
12. Turn off fixing and lock bolts, remove a belt and the pump of a steering.
- Do not disconnect the steering pump hoses.
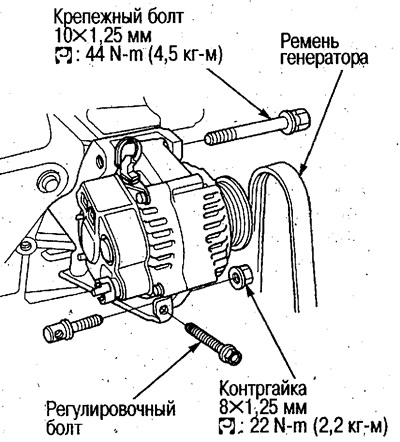
13. Loosen the mounting and locking bolt, locknut and adjusting bolt, remove the alternator belt.
 |  |
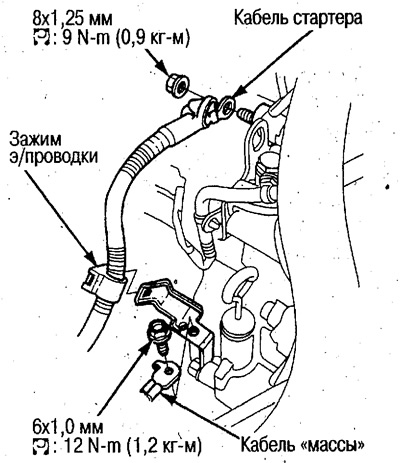
14. Disconnect the starter cable, cable «masses», remove the clamp e / wiring.
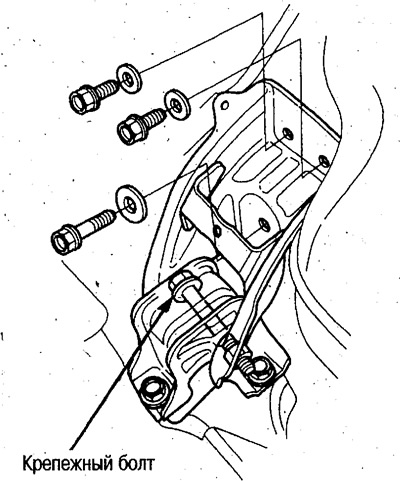
15. Remove the front mounting bracket mounting bolts and loosen the mounting bolt.
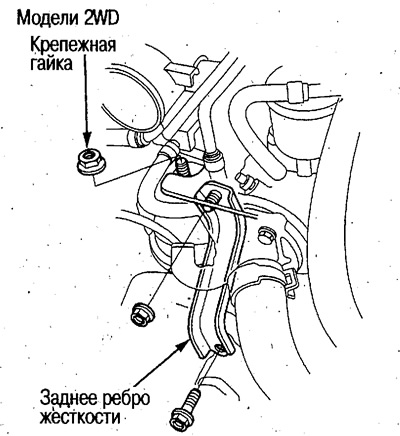
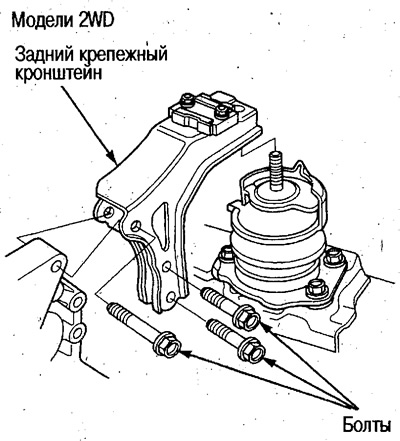
16. Turn off a fixing nut and remove a back rib of rigidity of a fixing arm.
17. Remove the radiator cap.
18. Raise the front of the car with a jack and place it on a rigid support.
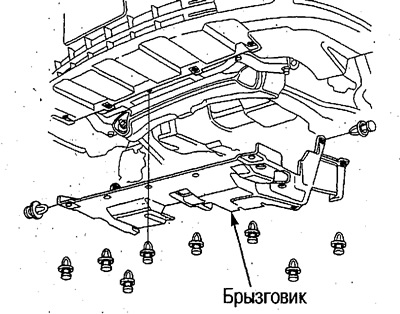
19. Remove the mudguard.
20. Loosen the radiator drain cock and drain the coolant (see below).
21. Drain the fluid from the gearbox (see ch. Automatic transmission).
- Use a 9.5mm socket to loosen the drain bolt (3/8 inch).
- When installing the bolt, be sure to replace the washer.
22. Drain engine oil (see above).
- When installing the bolt, be sure to replace the washer.
Attention. Do not overtighten the drain bolt.
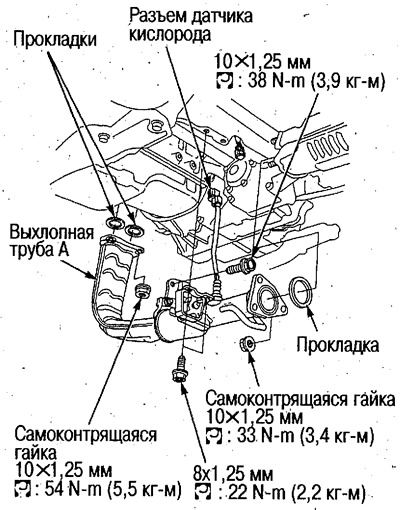
23. Disconnect the oxygen sensor connector.
24. Remove exhaust pipe A.
25. Remove shock absorber forks (see ch. Front and rear suspension).
26. Remove the ball joints of the lower suspension arms (see ch. Front and rear suspension).
27. Remove the drive shafts from the differential and from the intermediate shaft (see ch. Drive shafts and rear differential).
28. Remove the control cable.
2WD Models
1) Loosen the control cable post mounting bolts and remove the control cable cover.
Attention. If you remove the control cable cover without unscrewing the cable post bolts, the lever may break.
2) Remove the lever from the control shaft and remove the cable.
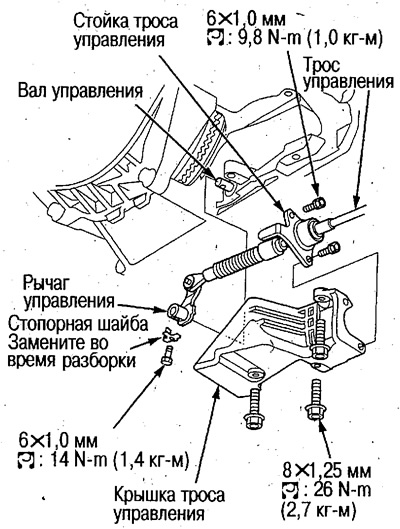
- Do not bend the cable.
- After installation, adjust (see ch. Automatic transmission).
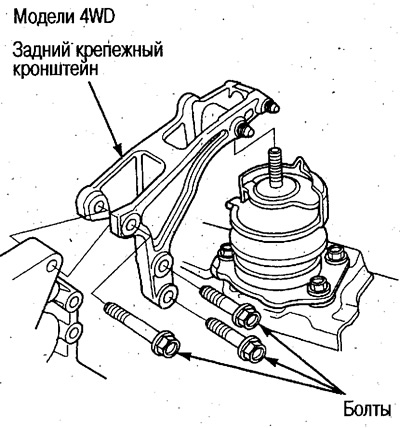
4WD Models
- 1) Remove the cover and control cable post.
- 2) Remove the shift shaft, remove the control lever from the control shaft and remove the cable.
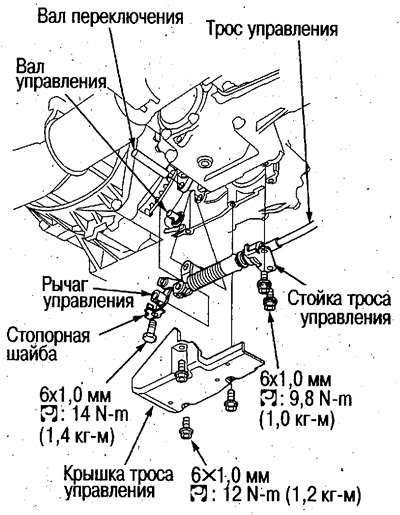
- Do not bend the cable.
- After installation, adjust (see ch. Automatic transmission).
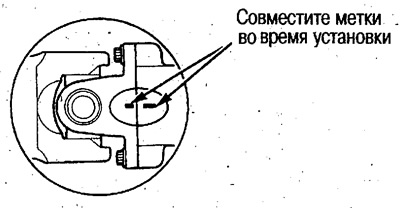
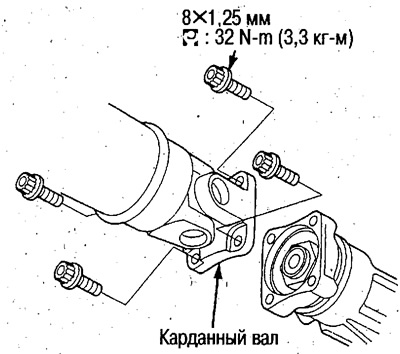
29. Remove the cardan shaft.
- Before removing, put marks on the connection areas in order to install according to these marks.
 |  |
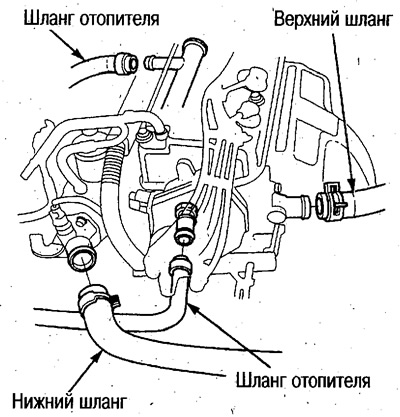
30. Disconnect the upper and lower radiator hoses, as well as the heater hose.
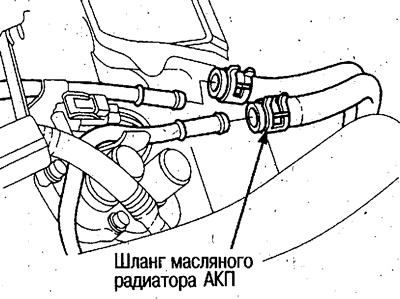
31. Disconnect the automatic transmission radiator hoses.
- Install the caps on the hoses and tubes of the automatic transmission radiator.
- During installation see ch. Automatic transmission.
32. Disconnect the air conditioning compressor.
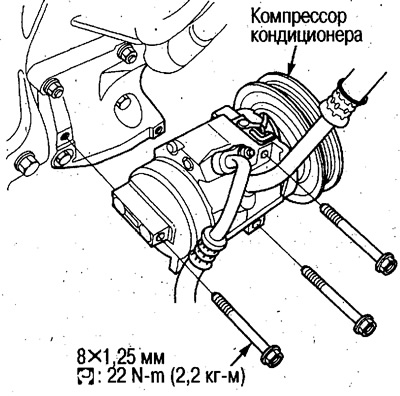
- Do not disconnect hoses.
33. Remove the steering pump hose clamps.
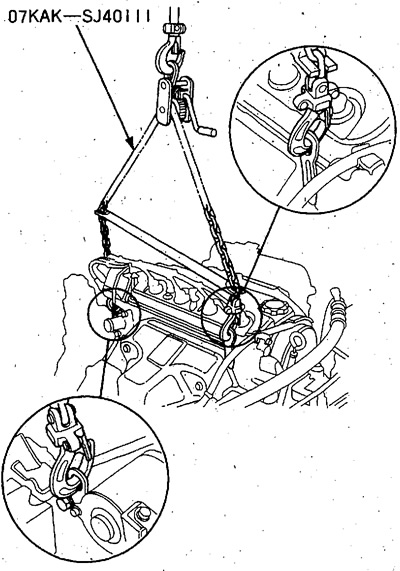
34. Install the special tool and hang the engine.
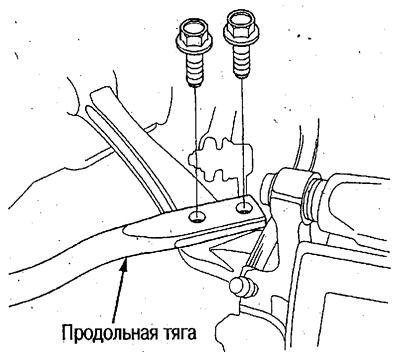
35. Turn off fixing bolts of longitudinal draughts.
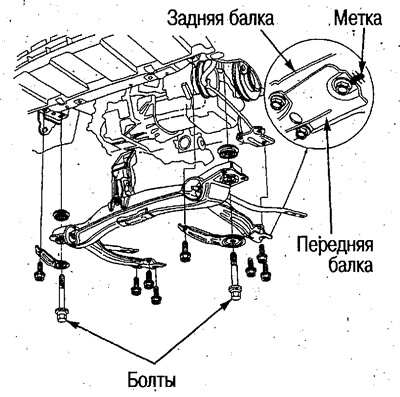
36. Remove the front beam.
- Before removing the front beam, put marks on the connection points with the rear beam in order to install according to these marks.
37. Remove the rear mounting bracket.
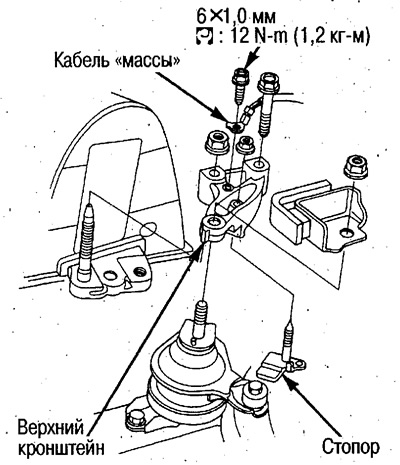
 |  |
38. Remove the stopper, disconnect the cable «masses» and remove the top bracket.
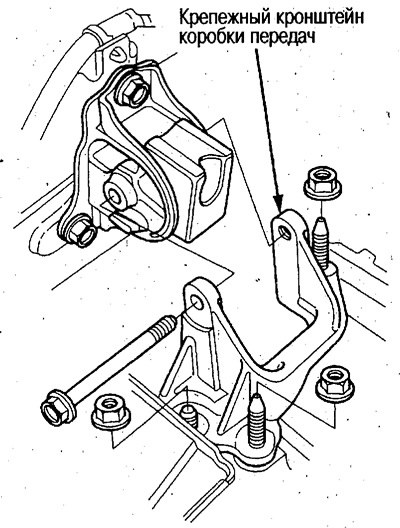
39. Remove the transmission mounting bracket.
40. Make sure that all cables, hoses, e / wiring are disconnected from the engine.
41. Gradually lower the engine assembly so that it does not touch the body, rear beam and radiator.
Attention. Do not stand under the vehicle while lowering the engine.
Brackets and torques for bolts and nuts
