
HondaBook.ru
Auto companies Volkswagen Auto companies Ford Auto companies Lada Auto companies Skoda Auto companies BMW Auto companies Mazda Auto companies Peugeot
English Русский
Български
Беларускі
Український
Српски
Hrvatski
Română
Polski
Slovenský
Magyar
Bookmark Contacts Sitemap   


Accord Civic Fit / Jazz CR-V HR-V Others Articles
Fit 1 (2001-2008)

Checking the electromagnetic clutch circuit (right-hand drive models) (Honda Fit 1)

  • Main
  • Honda Fit
  • 1 (2001-2008)
  • Body and interior
  • Heater and air conditioner
  • Checking the electromagnetic clutch circuit (right-hand drive models)
0
1. Check the electromagnetic clutch relay. If the relay is OK, proceed to step #2, if it is faulty, it should be replaced.

2. Measure the voltage between terminal "2" of the electromagnetic clutch relay connector and ground. If the voltage matches the battery voltage, proceed to step #3; if not, replace the relay unit.
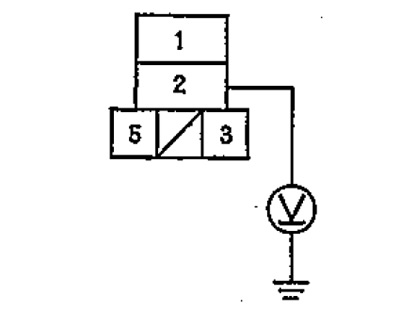
2. Measure the voltage between terminal «2» of…


3. Short-circuit terminals "1" and "2" of the electromagnetic clutch relay connector with a jumper.
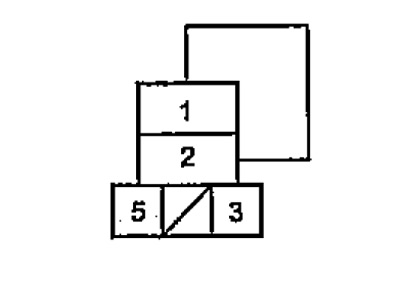
3. Short-circuit terminals «1» and «2» of the…


If the electromagnetic clutch has worked, proceed to point #7; if it has not worked, proceed to point #4.

4. Remove the jumper from terminals "1" and "2" of the electromagnetic clutch relay connector.

5. Disconnect the electromagnetic clutch connector.

6. Check the conductivity between terminal "1" of the electromagnetic clutch relay connector and terminal "1" of the electromagnetic clutch connector.
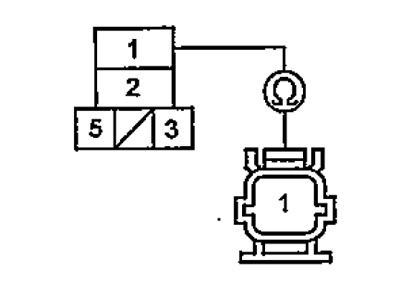


6. Check the conductivity between terminal «1» of…


If there is continuity, remove and check the electromagnetic clutch; if there is none, repair the open circuit in the wires between the electromagnetic clutch and the relay unit.

7. Remove the jumper from terminals "1" and "2" of the electromagnetic clutch relay connector.

8. Turn the ignition key to the "ON" position.

9. Measure the voltage between terminal #5 of the electromagnetic clutch connector and ground. If the voltage matches the battery voltage, proceed to step #10; if it does not, replace the relay unit.
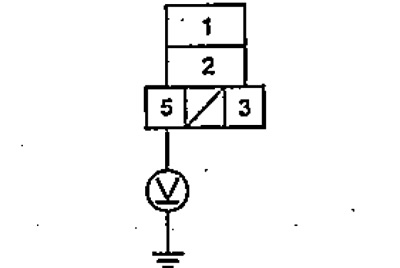
9. Measure the voltage between terminal #5 of the…


10. Turn the ignition key to the "OFF" position.

11. Install the electromagnetic clutch relay into the relay block.

12. Set the air conditioner switch to the "OFF" position and turn the ignition key to the "ON" position.


13. Measure the voltage between terminal "18" of the electronic fuel injection control unit connector and ground.
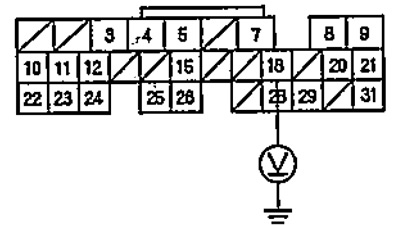
13. Measure the voltage between terminal «18» of…


If the voltage matches the battery voltage; install a working electronic control unit of the injection system and carry out diagnostics first, if it does not match, eliminate the break in the wire circuit between the electronic control unit of the injection system and the electromagnetic clutch relay.

[Information obtained from this source www.hondabook.ru]
This article is available at: russian, bulgarian, belarusian, ukrainian, serbian, croatian, romanian, polish, slovak, hungarian
This information has been verified: Varvara Vereshchagina
Share with friends:
◀ Previous
Fit 1: Heater and air conditioner
Next ▶

Checking the air conditioning system circuits (left-hand drive models)
Checking the air conditioning system circuits (right-hand drive models)
Checking the Heater Fan Speed Switch Circuit (Right Hand Drive Models)
Checking the Radiator Fan Circuit (Right Hand Drive Models)
Checking the common circuit of the radiator and condenser fans
Checking the electromagnetic clutch circuit (left-hand drive models)
Heater Fan Unit — Removal and Installation
Replacing the Heater Fan Unit Components
Air conditioning and heating unit — removal and disassembly
Adjusting the air flow mixing flap drive cable
See also other articles from Honda manuals:
Checking the heater fan drive motor and its electrical circuit… Honda Accord 6 (1997-2002)
Checking the heater fan drive motor and the condition of its… Honda Civic 6 (1995-2000)
Wiring Harness and Connector Locations Part 1 (Left Hand Drive Models) Honda CR-V 2 (2002-2006, petrol)
Checking the starter overrunning clutch Honda HR-V 1 (1998-2006, petrol)
Checking the injection pump (4WD models) Honda Avancier 1 (1999-2003, petrol)
Link in different formats to this article
Comments and feedback from visitors
No comments yet


How much will 25 + 10 ?


Fit 1 (2001-2008) 
  • General information
  • User manual
  • Maintenance
  • Power unit
  • Engine repair
  • Cooling and lubrication system
  • Injection and power system
  • Control system
  • Engine electrical equipment
  • Transmission
  • Clutch
  • Mechanical gearbox
  • Automatic gearbox
  • Variator (CVT)
  • Drive shafts and gearbox
  • Chassis and running gear
  • Car suspension
  • Steering
  • Brake system
  • Body and interior
  • Exterior (external elements)
  • Interior (internal elements)
  • Doors, locks and windows
  • Heater and air conditioner
  • Safety system
  • Electrical equipment
  • Equipment and devices
  • Wiring diagrams (since 06.2001)
  • Wiring diagrams (since 06.2004)
HondaBook.ru © 2018–2026 • Mobile version • Sitemap: EN BG BY UA RS HR RO PL SK HU • Feedback • Driver Information • Search system • Bookmark
Accord 3 (1985-1989) • Accord 6 (1997-2002) • Civic 3 and 4 (1983-1991) • Civic 5 and 6 (1991-2000) • Civic 6 (1995-2000) • Civic 7 (2000-2005) • Civic 8 (2005-2011) • Fit 1 (2001-2008) • CR-V 1 (1995-2001) • CR-V 2 (2002-2006) • HR-V 1 (1998-2006) • Avancier 1 (1999-2003) •
 
This website uses cookies to ensure proper functioning. By clicking "OK," you agree.