
Note:
- Before removing, read the chapter "Safety system (SRS)".
- Installation is made in an order, the return to removal.
- Assembly is carried out in the reverse order of disassembly.
- When installing, do not confuse the heater hoses and fasten them securely,
- When installing, secure the drain hose.
- Adjust the damper cables after installation.
- After installation, charge the system with refrigerant and check for leaks.
- Once installed, enter the security codes for the audio system.
1. Make sure you know the security codes of the audio system and save the settings.
2. Disconnect the negative battery terminal.
3. Disconnect the tubes from the evaporator.
4. Remove the coolant from the system when the engine is cold.
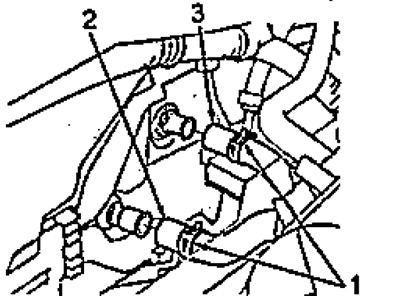
5. Loosen and slide the hose clamps away from the ends (1). Disconnect the inlet (2) and graduation (3) heater hoses. Immediately after disconnecting the hoses, drain the fluid into a clean, dry container. Do not allow working fluid to come into contact with painted surfaces and electrical equipment.
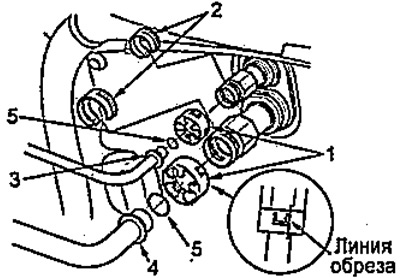
6. Cut off the plastic clips (1) from the evaporator tubes. Remove dirt with compressed air or detergents. Remove metal rims (2), disconnect the inlet (3) and graduation (4) tubes. Remove o-rings from tubes (5). Wipe the inner walls of the tubes with a brush and SP-10 compressor oil (after disconnecting the pipes, do not use compressed air or detergents). Immediately after disconnecting the pipes, they must be tightly closed to prevent dirt from entering the system.
7. Remove the dashboard.
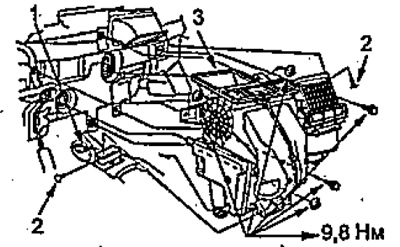
8. Disconnect the drain hose (1) conditioner. Remove two pistons (2), remove the bolts, remove the nuts and remove the air conditioning and heater unit and the heater fan assembly (3).
9. Remove the heater fan assembly.
10. Loosen the screws and remove the cover of the radiator tubes, unscrew the screw and remove the tube holder, carefully remove the radiator so as not to bend the tubes.
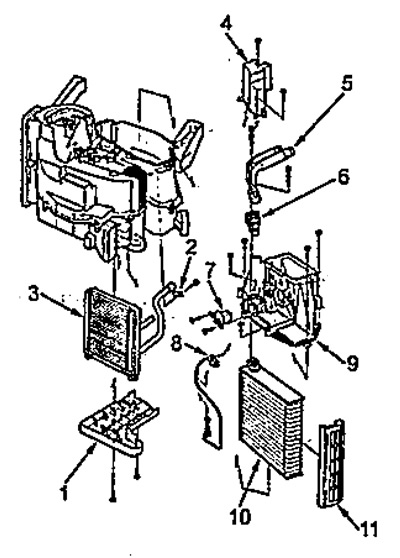
1 - cover, radiator tubes,
2 - tube holder,
3 - radiator,
4 - evaporator tube cover,
5 - evaporator tubes,
6 - expansion valve,
7 - fan resistor,
8 - temperature sensor behind the evaporator,
9 - air duct,
10 - evaporator,
11 - evaporator plate.
11. Turn away screws and remove a cover of tubes of the evaporator, turn away bolts, remove tubes of the evaporator and expansion valve. If necessary, loosen the screws and remove the evaporator fan resistor. Disconnect the temperature sensor connector behind the evaporator. Loosen the screws and remove the air duct. Remove the evaporator with the evaporator plate.