
Contents: Ignition switch ⇊ Starting the engine ⇊ If the engine does not start... ⇊ Starting the engine (if the spark…⇊
Ignition switch
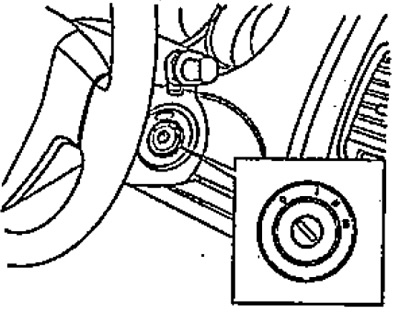
There are four fixed positions of the key in the ignition switch:
- 0: In this position, the key can be inserted or removed from the ignition switch. When the key is removed, the steering wheel is locked.
- I: In this position you can use the following electrical devices: radio, cigarette lighter and control the side mirrors.
- II: The engine operates in this position. When the engine starts, the indicators of various vehicle systems light up.
- III: In this position the engine is started.
Starting the engine
Caution: Do not allow the engine to run at high speed for a long time or accelerate sharply when not warmed up.
1. Apply the parking brake.
2. Turn off unnecessary lights and auxiliary equipment.
3. Install the automatic transmission (variator) selector.
- a) Set the selector to position "P". When restarting (engine stalls), set the selector to position "N".
- b) Press the brake pedal and hold it until you start moving.
4. Fully depress the clutch pedal and set the manual transmission lever to neutral position.
5. Starting the engine.
Turn the ignition key to position "II". Without pressing the accelerator pedal, turn the engine crankshaft by turning the ignition key to position "III". Release the ignition key when the engine starts.
Caution: Do not crank the engine for more than 15 seconds at a time. This may cause the starter and electrical connections to overheat. If the engine does not start within 15 seconds, wait about one minute before trying again.
6. After the engine warm-up speed has been automatically reduced, the vehicle is ready to drive.
Note: If the weather is frosty, let the engine warm up for a few more minutes before starting to drive. But if necessary, you can start driving immediately after reducing the high engine warm-up speed.
If the engine does not start...
1. Before performing any checks, ensure that the starting procedure (see the relevant section) has been performed correctly and that there is sufficient fuel in the tank.
2. If the engine crankshaft does not turn or turns too slowly:
- a) Make sure the battery terminals are tight and clean.
- b) If the battery terminals are OK, turn on the interior lighting. If there is no lighting, it is dim, or it goes out when the engine is cranked by the starter, then the battery is discharged.
- c) If the lighting is normal, but the engine does not start, then it is faulty.
3. If the engine crankshaft turns normally, but the engine does not start:
- a) Check the tightness of the connectors (e.g. spark plug connections, ignition coils).
- b) If the connectors are OK, the spark plugs may be "flooded" due to repeated cranking of the engine crankshaft.
Starting the engine (if the spark plugs are "flooded")
1. Press the accelerator pedal, crank the engine with the ignition key in position "III" for approximately 15 seconds. Do not pump the pedal, just hold it down.
2. Release the ignition key and the accelerator pedal. Then try to start the engine without pressing the accelerator pedal.
3. If the engine does not start within 15 seconds of cranking the crankshaft, release the ignition key and wait a few minutes.
4. Try to start the engine. If the engine does not start, then:
- a) Remove the spark plugs and dry the wet electrodes.
- b) Turn the ignition key to position "III" for approximately 15 seconds while keeping the accelerator pedal depressed.
- c) Install the spark plugs.
5. Try starting the engine without pressing the accelerator pedal.
If the engine still does not start, it is faulty and requires adjustment or repair.
Caution: Do not crank the engine for more than 15 seconds at a time. This may cause overheating of the starter and electrical circuit connections.
Jump starting with an additional battery
Caution: The booster battery voltage must be 12 V. Do not jump start the engine using a booster battery unless you are sure that the battery voltage is correct.
1. Turn off all unnecessary lights and accessories and ensure that the vehicles do not touch.
2. If necessary, remove all vent plugs from the booster and discharged batteries. Place a cloth over the; open ventilation holes on batteries (this helps reduce the risk of explosion).
3. If the engine of the vehicle with the booster battery does not work, start it and let it run for a few minutes. When starting with the booster battery, the engine should run at approximately 2000 rpm.
4. Connecting cables.
a) Make the cable connections in the sequence shown in the figure.
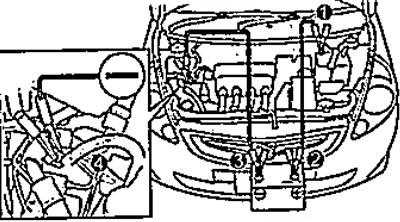
Note: To avoid serious injury when making connections, do not lean over the battery or allow cables or clamps to accidentally touch anything other than the appropriate battery terminals or vehicle ground.
6) Connect the clamp from the other end of the negative cable of the booster battery to a rigid, stationary, unpainted metal part of the engine of the vehicle with the discharged battery.
Caution: Do not connect the cable near any part that may move when the engine cranks.
5. Start the engine in the normal way. Once started, it should run at 2000 rpm for several minutes.
6. Carefully disconnect the cables: first the negative, then the positive.
7. Carefully remove any cloths covering the batteries as they may contain sulfuric acid.
8. If the ventilation plugs were removed, install them in their places.