
HondaBook.ru
Auto companies Volkswagen Auto companies Ford Auto companies Lada Auto companies Skoda Auto companies BMW Auto companies Mazda Auto companies Peugeot
English Русский
Български
Беларускі
Український
Српски
Hrvatski
Română
Polski
Slovenský
Magyar
Bookmark Contacts Sitemap   


Accord Civic Fit / Jazz CR-V HR-V Others Articles
Accord 3 (1985-1989) Accord 6 (1997-2002)

Removal and installation the cylinder head cover (Honda Accord 6)

  • Main
  • Honda Accord
  • 6 (1997-2002)
  • Power unit
  • Four-cylinder engines
  • Removal and installation the cylinder head cover
0
Contents: Removal ⇊ Installation ⇊

Removal


1. Disconnect the negative cable from the battery.

Warning! If the car stereo system is equipped with a security code, make sure you have the correct combination to activate the audio system before disconnecting the battery!


2. After marking, disconnect the high-voltage wires from the spark plugs (see Chapter Settings and ongoing maintenance).

3. Mark and disconnect all hoses and wires that interfere with head removal.
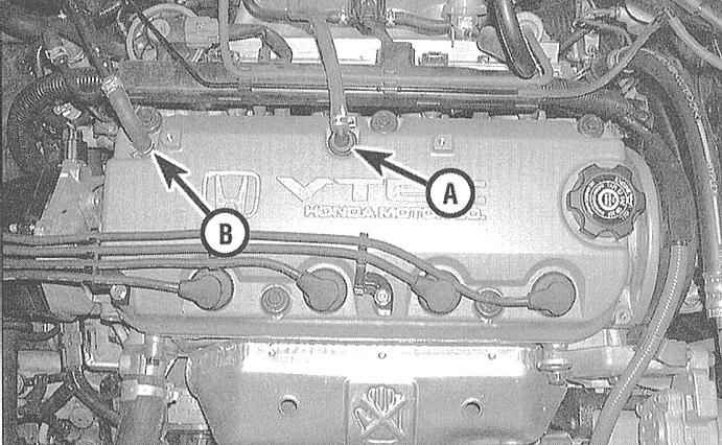
3. Mark and disconnect all hoses and wires that…


4. Remove the PCV valve and disconnect the breather hose from the cylinder head cover.

5. Wipe the cover thoroughly to prevent debris from entering the cylinder head/valve assembly.

6. Loosen the bolt securing the ground bus to the cylinder head cover (from the timing belt side).
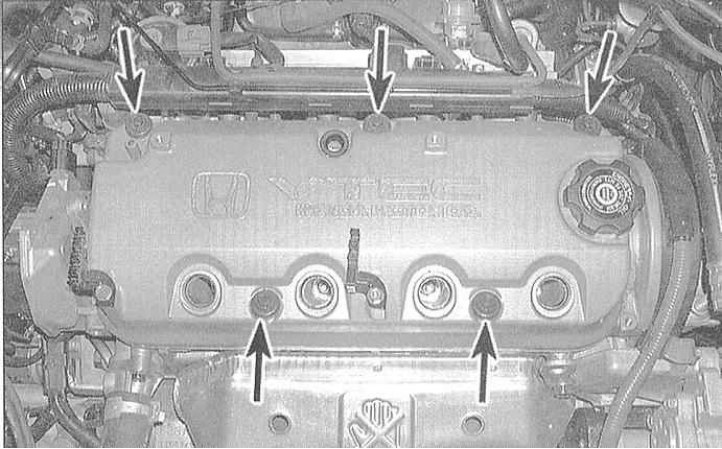
6. Loosen the bolt securing the ground bus to the…


7. Unscrew the cylinder head cover mounting bolts and remove them together with the sealing washers.


8. Carefully remove the cover together with the sealing gasket. If the gasket has stuck to the mating surface of the head, tap the cover with a soft-faced hammer to break the sealant layer. Under no circumstances should you attempt to separate the cover by prying it off with a lever inserted between the mating surfaces.

Installation


1. Remove the old gasket from the cylinder head cover groove, then carefully clean the mating surfaces of the cylinder head and cover. After scraping off traces of old sealant and gasket fragments, wipe the surfaces with a rag soaked in acetone.

Note: An undamaged, one-piece sealing gasket can, in principle, be reused.


2. Place the new rubber gasket into its groove on the head cover flange. Install the molded gasket by pushing it into the groove that runs around the perimeter of the cover. Apply a bead of RTV sealant to the corners where the head cover mating surface meets the front and rear camshaft bearing caps. Wait about five minutes for the sealant to begin to cure.

Note: Make sure that the top layer of sealant has slightly hardened (wait about 10 minutes, but no more), only then proceed to install the lid (in conditions of high humidity, polymerization of the sealant may begin with a slight delay).


3. Install the cover, place the sealing washers, screw in the mounting bolts and tighten them to the required torque.

4. On VTEC models, before installing the cylinder head cover, check the condition of the spark plug sealing washers.

5. Further installation is carried out in the reverse order of dismantling.
This article is available at: russian, bulgarian, belarusian, ukrainian, serbian, croatian, romanian, polish, slovak, hungarian
This information has been verified: Timofey Goryachev
Share with friends:
◀ Previous
Accord 6: Four-cylinder engines
Next ▶

Bringing the piston of the first cylinder to the top dead center (TDC) position
Preparatory actions and repair procedures without removing the engine from the…
General information about four-cylinder engines
Engine specifications
VTEC System — General Information and Component Health Check
Removal, condition check and installation of rocker arm assembly
Replacing oil deflector caps and valve springs with plates
Removal and installation the intake manifold
Removal and installation the exhaust manifold
See also other articles from Honda manuals:
Cylinder Head Cover — Removal and Installation Honda Civic 3 and 4 (1983-1991)
Removal the cylinder head Honda Fit 1 (2001-2008)
Cylinder Head Cover — Removal and Installation Honda CR-V 1 (1995-2001, petrol)
Cylinder head — design description Honda HR-V 1 (1998-2006, petrol)
Cylinder head component arrangement Honda Avancier 1 (1999-2003, petrol)
Link in different formats to this article
Comments and feedback from visitors
No comments yet


How much will 11 + 32 ?


Accord 6 (1997-2002) 
  • General information
  • Introduction to the guide
  • User manual
  • Maintenance
  • Power unit
  • Four-cylinder engines
  • Six-cylinder engines
  • Engine overhaul
  • Cooling system
  • Heater and air conditioner
  • Power and exhaust systems
  • Engine electrical equipment
  • Engine management
  • Transmission
  • Mechanical gearbox
  • Automatic gearbox
  • Clutch and drive shafts
  • Chassis and running gear
  • Brake system
  • Car suspension
  • Steering
  • Body and interior
  • Exterior (external elements)
  • Interior (internal elements)
  • Electrical equipment
  • Equipment and devices
  • Electrical circuits
Accord 3 (1985-1989) 
  • General information
  • Maintenance
  • Power unit
  • Engine adjustment
  • Engine repair
  • Engine electrics
  • Emission management
  • Engine management (carburetor)
  • Electronic injection
  • Programmable injection
  • Schematic of emission system
  • Fuel system
  • Feedback management
  • Transmission
  • Manual gearbox
  • Automatic gearbox
  • Clutch
  • Chassis and running gear
  • Front suspension
  • Rear suspension
  • Steering
  • Brake system
  • Electrical equipment
  • Ventilation and heating
  • Air conditioner
  • Cruise control system
  • Equipment and devices
HondaBook.ru © 2018–2026 • Mobile version • Sitemap: EN BG BY UA RS HR RO PL SK HU • Feedback • Driver Information • Search system • Bookmark
Accord 3 (1985-1989) • Accord 6 (1997-2002) • Civic 3 and 4 (1983-1991) • Civic 5 and 6 (1991-2000) • Civic 6 (1995-2000) • Civic 7 (2000-2005) • Civic 8 (2005-2011) • Fit 1 (2001-2008) • CR-V 1 (1995-2001) • CR-V 2 (2002-2006) • HR-V 1 (1998-2006) • Avancier 1 (1999-2003) •
 
This website uses cookies to ensure proper functioning. By clicking "OK," you agree.