
HondaBook.ru
Auto companies Volkswagen Auto companies Ford Auto companies Lada Auto companies Skoda Auto companies BMW Auto companies Mazda Auto companies Peugeot
English Русский
Български
Беларускі
Український
Српски
Hrvatski
Română
Polski
Slovenský
Magyar
Bookmark Contacts Sitemap   


Accord Civic Fit / Jazz CR-V HR-V Others Articles
Accord 3 (1985-1989) Accord 6 (1997-2002)

Evaporator Core, Expansion Valve and Thermostat — Prelude (Honda Accord 3)

  • Main
  • Honda Accord
  • 3 (1985-1989)
  • Electrical equipment
  • Air conditioner
  • Evaporator Core, Expansion Valve and Thermostat — Prelude
0
Evaporator Core, Expansion Valve and Thermostat —…


1. Disconnect the cable from the negative battery terminal.

2. Carefully drain the refrigerant.

3. Disconnect the line and hose from the evaporator joints on the firewall in the engine compartment. Hold the joints with a second wrench. Immediately cover the joints to prevent dirt from entering.

4. On a 1984-87 Prelude, remove the sealing rings from the firewall. Remove both lower instrument panel sections.

5. On a 1988-91 Prelude, remove the glove box.

6. Disconnect the wiring from the fan (1984-87) or thermostat. Release the wires from the clamps.

7. On a 1984-87 Prelude, remove the sealing strip located between the fan and the evaporator; remove the fan assembly.

8. On a 1988-91 Prelude, remove the fan seal strip if necessary.

9. Remove the evaporator mounting nuts and bolts. Remove the evaporator.

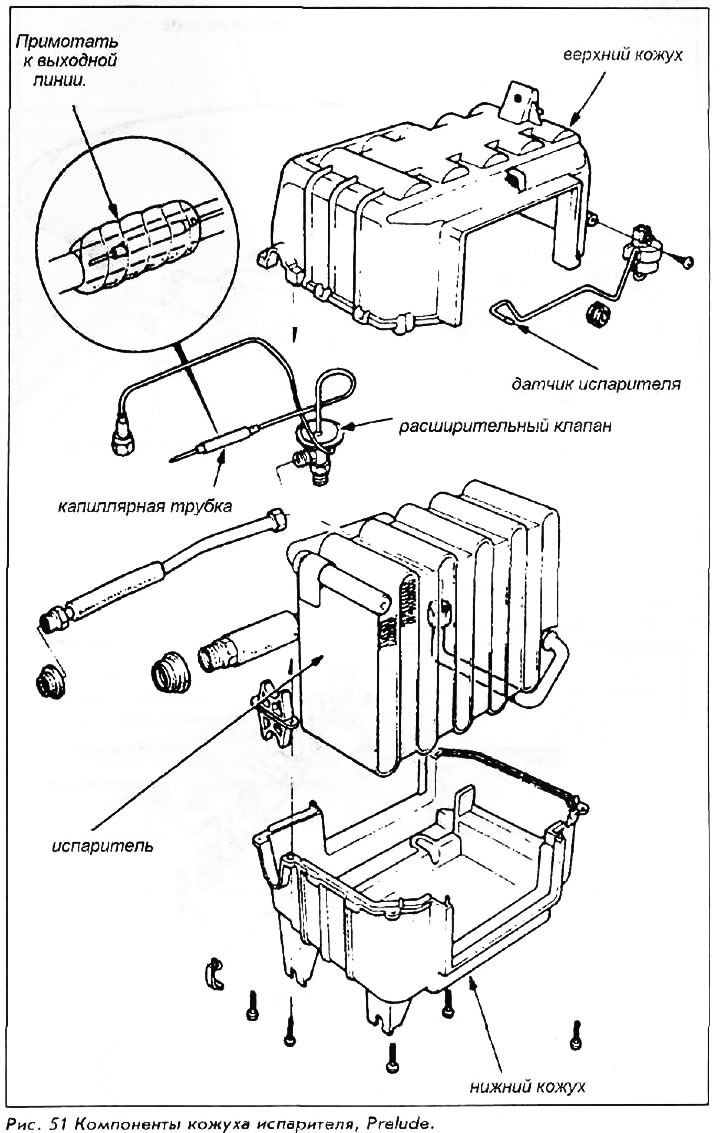
10. On Prelude 1984-87:
  • a. Remove the screw and clamps from the casing.
  • b. Carefully separate the housing halves to gain access to the capillary tube. Remove the thermostat tube from the evaporator fins.
  • c. Separate the casing halves. Remove the cover.
  • g. Remove the expansion valve if necessary.

11. On Prelude 1988-91:


  • a. Remove the evaporator sensor from the evaporator fins.
  • b. Remove the bolts and clamps holding the housing halves together.
  • c. Carefully separate the housing halves and remove the covers.
  • g. Remove the expansion valve if necessary.

To install:


12. Assemble the housing components as needed. Install the capillary tube in its original location. Assemble the upper and lower halves of the housing, making sure there are no gaps in the housing.

13. Install the evaporator assembly and tighten the lock nuts. Don't forget to attach the evaporator drain hose and route it outside the vehicle.

14. Connect the thermostat wire or fan wiring.

15. Install the glove box if it was removed. On early models, install the fan motor.

16. Install the sealing strips.

17. On 1984-87 Prelude, install the lower instrument panel pieces.

18. On 1984-87 Prelude, install the O-rings on the firewall.

19. Connect the receiver-dryer line and the suction hose. Tighten the receiver line to 17 Nm, the suction line to 32 Nm.

20. Fill the coolant and bleed the system. Start the system and check for leaks.
This article is available at: russian, bulgarian, belarusian, ukrainian, serbian, croatian, romanian, polish, slovak, hungarian
This information has been verified: Yaroslav Shiryaev
Share with friends:
◀ Previous
Accord 3: Air conditioner
Next ▶

Evaporator Core, Expansion Valve & Thermostat — 1990-91 Accord
Evaporator Core, Expansion Valve & Thermostat — 1986-89 Accord
Evaporator Core, Expansion Valve and Thermostat — 1984-85 Accord
Air Conditioner Condenser — Prelude
Air Conditioner Condenser — Accord 1990-91
Fan switch and instrument panel
Mains and hoses
See also other articles from Honda manuals:
Removal and installation the air conditioner evaporator with… Honda Civic 6 (1995-2000)
Checking and adjusting the clearance in the valve drive (L1ZA) Honda Fit 1 (2001-2008)
Testing the air supply bypass thermostat valve Honda CR-V 2 (2002-2006, petrol)
Adjusting valve clearances Honda HR-V 1 (1998-2006, petrol)
Adjusting valve clearances Honda Avancier 1 (1999-2003, petrol)
Link in different formats to this article
Comments and feedback from visitors
No comments yet


How much will 25 + 49 ?


Accord 6 (1997-2002) 
  • General information
  • Introduction to the guide
  • User manual
  • Maintenance
  • Power unit
  • Four-cylinder engines
  • Six-cylinder engines
  • Engine overhaul
  • Cooling system
  • Heater and air conditioner
  • Power and exhaust systems
  • Engine electrical equipment
  • Engine management
  • Transmission
  • Mechanical gearbox
  • Automatic gearbox
  • Clutch and drive shafts
  • Chassis and running gear
  • Brake system
  • Car suspension
  • Steering
  • Body and interior
  • Exterior (external elements)
  • Interior (internal elements)
  • Electrical equipment
  • Equipment and devices
  • Electrical circuits
Accord 3 (1985-1989) 
  • General information
  • Maintenance
  • Power unit
  • Engine adjustment
  • Engine repair
  • Engine electrics
  • Emission management
  • Engine management (carburetor)
  • Electronic injection
  • Programmable injection
  • Schematic of emission system
  • Fuel system
  • Feedback management
  • Transmission
  • Manual gearbox
  • Automatic gearbox
  • Clutch
  • Chassis and running gear
  • Front suspension
  • Rear suspension
  • Steering
  • Brake system
  • Electrical equipment
  • Ventilation and heating
  • Air conditioner
  • Cruise control system
  • Equipment and devices
HondaBook.ru © 2018–2026 • Mobile version • Sitemap: EN BG BY UA RS HR RO PL SK HU • Feedback • Driver Information • Search system • Bookmark
Accord 3 (1985-1989) • Accord 6 (1997-2002) • Civic 3 and 4 (1983-1991) • Civic 5 and 6 (1991-2000) • Civic 6 (1995-2000) • Civic 7 (2000-2005) • Civic 8 (2005-2011) • Fit 1 (2001-2008) • CR-V 1 (1995-2001) • CR-V 2 (2002-2006) • HR-V 1 (1998-2006) • Avancier 1 (1999-2003) •
 
This website uses cookies to ensure proper functioning. By clicking "OK," you agree.