Contents: Self-diagnosis ⇊ Troubleshooting ⇊ Reading DTC codes ⇊ Reading DTCs with the DLC ⇊ Clearing DTC codes ⇊ Clearing DTCs with the DLC ⇊ Trouble Code (DTC) Table ⇊ Troubleshooting procedure ⇊
1. If a malfunction occurs in the system, the control unit (CPU) determines the location and nature of the malfunction and records the DTC code in non-volatile memory.
2. DTCs are cleared only when certain procedures are performed in a certain sequence and are not cleared in the following cases.
- If the ignition key is in the OFF position or after the battery is disconnected
- After the system is returned to working order
3. The number of DTC codes recorded in the memory is not limited, however, the same DTC code is recorded on top of each other, i.e. if the same malfunction is detected multiple times, one code is recorded.
4. DTCs are displayed in sequence, regardless of the order in which the faults occurred.
5. Reading of DTC codes is performed in the established sequence.
Self-diagnosis
1. Self-diagnosis is divided into two categories.
- Primary diagnostics: performed immediately after starting the engine before the ABS warning lamp goes out.
- Normal diagnostics: performed from the moment the primary diagnostics is completed until the ignition key is turned to the OFF position.
2. When a malfunction is detected, the system performs the following actions.
- Turns on the ABS warning light.
- Enters the DTC code into memory.
- Stops the operation of the ABS system (depending on the nature of the malfunction, also stops the operation of the EBD system).
Kickback
1. When the ABS system is operating, the electric motor operates. Since the brake fluid under pressure flows from the reservoir to the master cylinder during the operation of the electric motor, kickback occurs. Therefore, when kickback occurs, you must continue to press the brake pedal in the same way as on models without the ABS system.
Electric pump motor
1. The pump electric motor operates while the ABS system is operating.
2. The ABS control unit checks the operation of the electric motor during its acceleration immediately after turning the ignition key to the ON position. At this time, a faint sound may be heard, which is not a malfunction.
Replacing brake fluid and bleeding air
Replacing the brake fluid and bleeding air is performed in the same way as on models without an ABS system.
Troubleshooting
1. Diagnosis is performed after the ABS warning lamp lights up due to malfunctions. If you perform diagnosis when the warning lamp is not on, you may get an incorrect result.
2. Create conditions that are as close as possible to the conditions under which the warning lamp came on. The time that the ABS warning lamp stays on due to self-diagnosis varies widely, depending on whether it is the initial diagnosis or it is carried out during or at the end of the ABS system operation, at the start of movement or while driving at 30 km/h, the malfunction lasts for several seconds or several minutes. Therefore, if the appropriate conditions are not created, it becomes impossible to determine the nature of the malfunction.
3. If no malfunction occurs during test driving and the ABS warning lamp does not light, it may be that the connectors are not connected securely, so before performing diagnostics, make sure that the connectors are connected securely, and also disconnect the connectors and visually check the condition of the contacts.
4. After correcting the problem, clear the DTCs, test drive the vehicle, and verify that the ABS warning light does not come on.
5. In the figures, the female connectors are outlined with single lines, and the male connectors are outlined with double lines.
Reading DTC codes
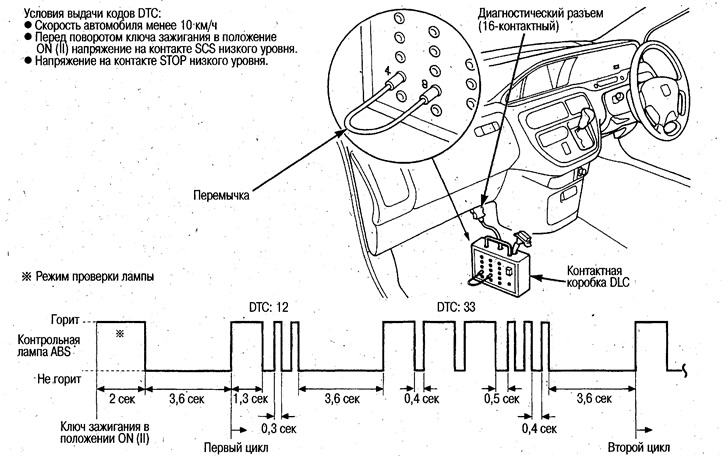
Reading DTCs (number of times the ABS warning light flashes) can be done using the Honda PGM Tester connected to the 16-pin diagnostic connector and turning and shorting the SCS line (while shorting the SCS line, the ignition switch is turned from the OFF position to the ON position (II)). You can also read DTCs using the data link connector (DLC) terminal box as described below.
Reading DTCs with the DLC
1. With the ignition key in the OFF position, connect the DLC connector to the 16-pin diagnostic connector.
2. Short-circuit contacts No.4 and 9 of the DLC contact box with a jumper and press the switch.
3. Without pressing the brake pedal, turn the ignition key to the ON (II) position.
4. The ABS warning light will come on for 2 seconds, go out and the DTC code will be output (see below). After reading, the code is entered into the memory.
- If the DTC is not stored in memory, the indicator lamp comes on after 3.6 seconds.
- If the ABS warning light comes on, perform the troubleshooting for "ABS Warning Light Does Not Go Out" (see below).
- If no DTC is returned, there is an open in the SCS line (from the ABS control unit to the diagnostic connector and to ground). Also, if the DTC is returned without the DLC connected, there may be a short to ground in the SCS line.
5. Turn the ignition switch to the OFF position and remove the DLC connector box.
Clearing DTC codes
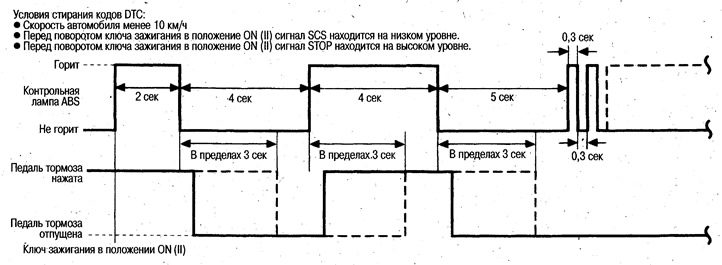
DTCs can be cleared using the Honda PGM Tester connected to the 16-pin diagnostic connector and shorting the SCS line (the ignition switch is turned from the OFF position to the ON (II) position while shorting the SCS line). DTCs can also be cleared using the data link connector (DLC) terminal box (commercially available) as described below.
Clearing DTCs with the DLC
1. With the ignition key in the OFF position, connect the DLC connector to the 16-pin diagnostic connector.
2. Short-circuit contacts No.4 and 9 of the DLC contact box with a jumper and press the switch.
3. While pressing the brake pedal, turn the ignition key to the ON (II) position.
4. After the ABS warning light goes out, release the brake pedal.
5. If the ABS warning light comes on, press the brake pedal again.
6. If the ABS warning light goes out, release the brake pedal again.
7. If the ABS indicator light flashes twice after the above procedures, the DTCs have been cleared. If the ABS indicator light does not flash twice, repeat the clearing procedure from the beginning. If the indicator light comes on and stays on after flashing twice, a malfunction was detected during the initial diagnosis before the DTCs were cleared. Check the DTC.
8. Turn the ignition switch to the OFF position and remove the DLC connector box.
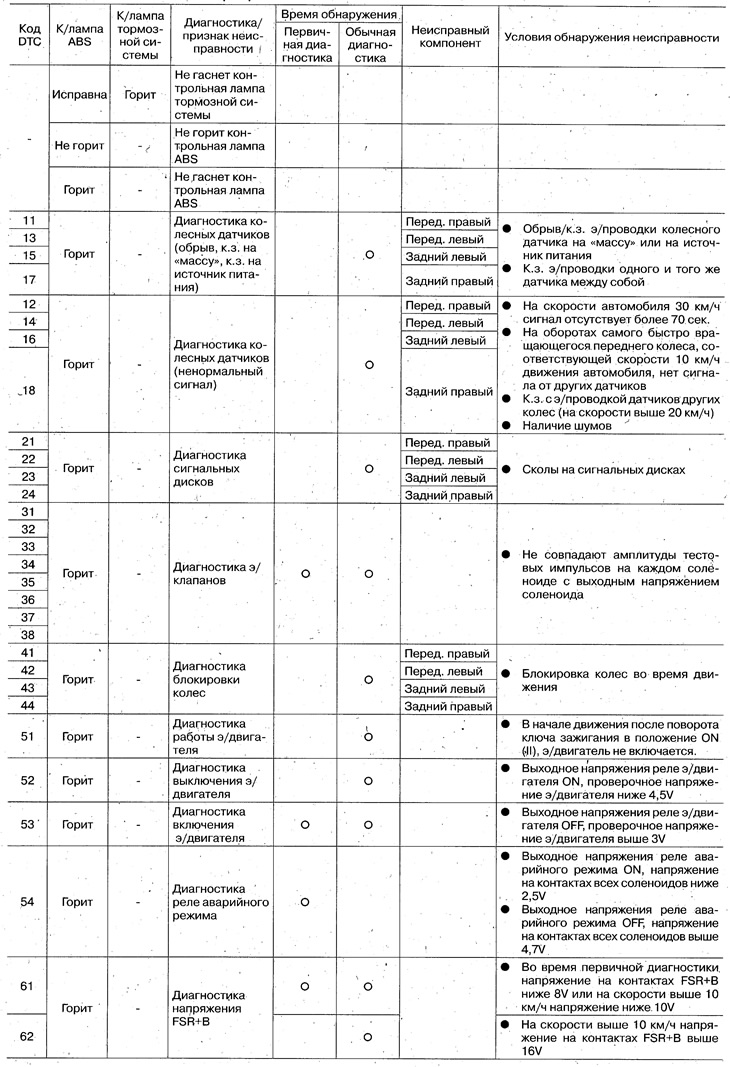
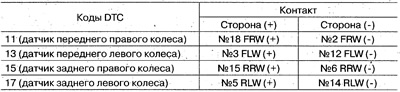
Trouble Code (DTC) Table

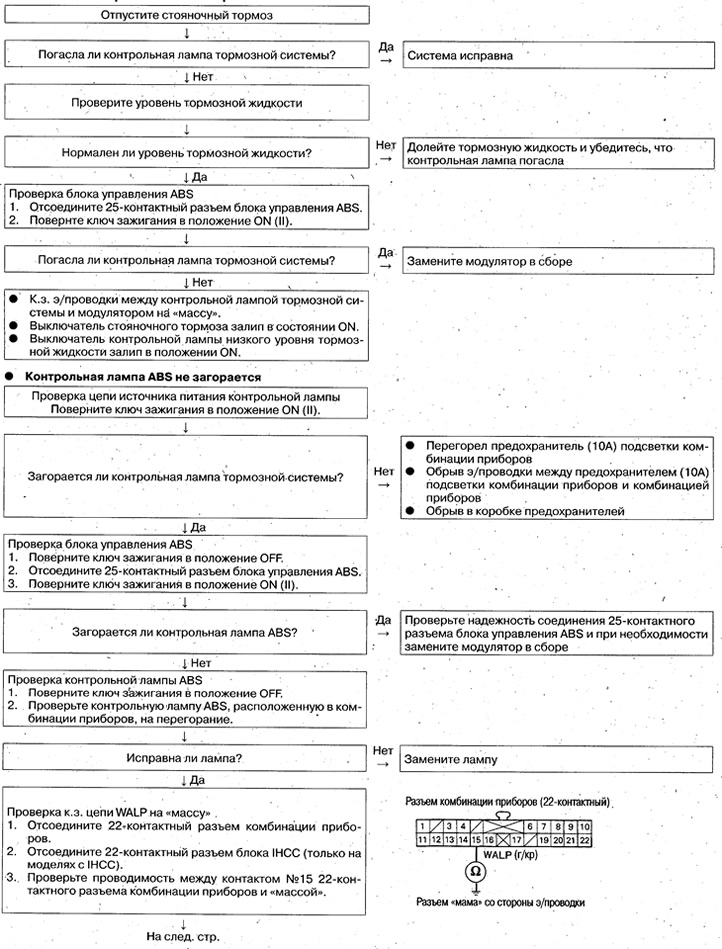
Troubleshooting procedure
The brake system warning light does not go out
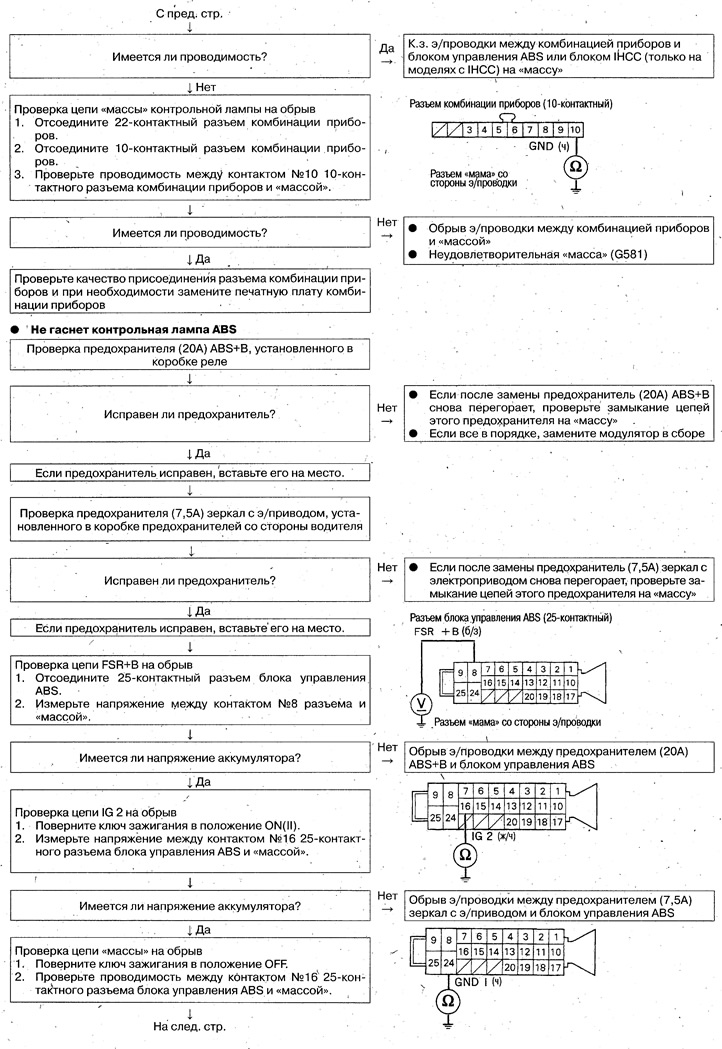
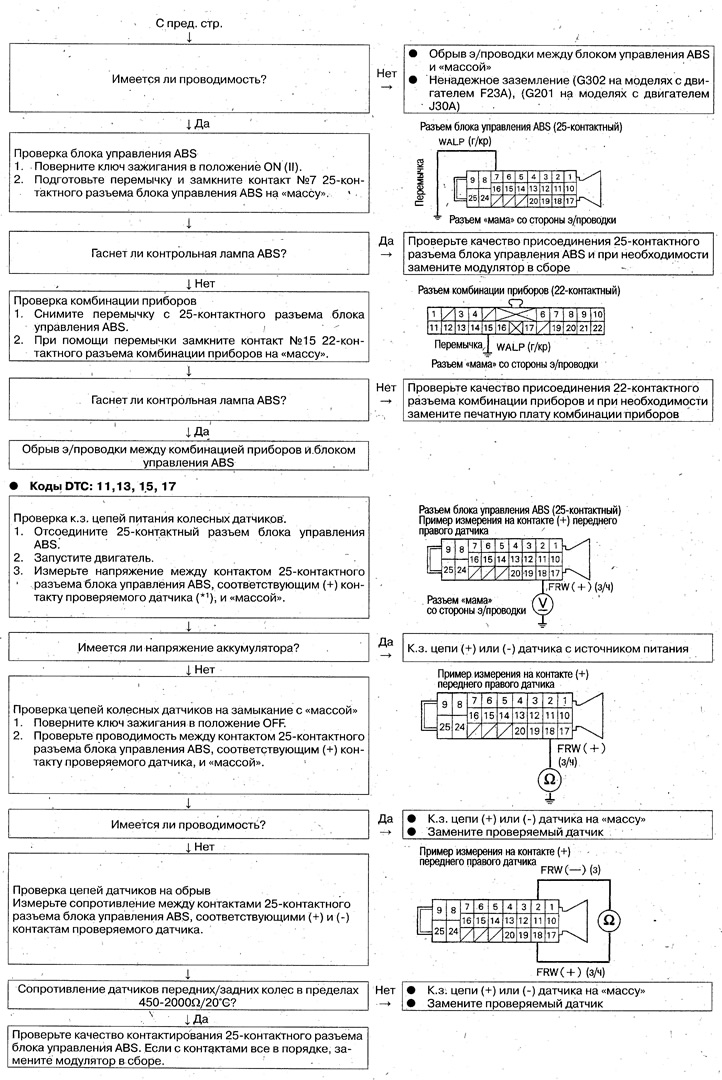
*1
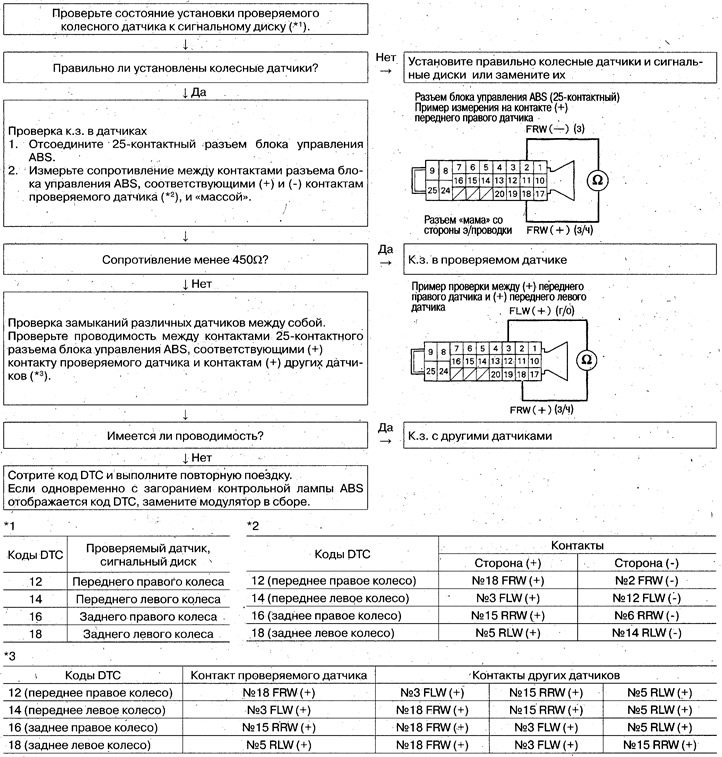
DTC codes: 12, 14, 16, 18
Turn the ignition key to the OFF position -> ON (II), turn off the ABS indicator lamp at a speed of approximately 30 km/h. If the lamp does not turn off even while driving, the following can be assumed.
- The drive wheel rotates only on one side or only 2 drive wheels rotate
- The car turns
- Signal interference