HondaBook.ru
Auto companies Volkswagen Auto companies Ford Auto companies Lada Auto companies Skoda Auto companies BMW Auto companies Mazda Auto companies Peugeot
English Русский
Български
Беларускі
Український
Српски
Hrvatski
Română
Polski
Slovenský
Magyar
Bookmark Contacts Sitemap   


Accord Civic Fit / Jazz CR-V HR-V Others Articles
Avancier 1 (1999-2003, petrol)

Front Seat Trim Replacement (Honda Avancier 1)

  • Main
  • Honda
  • Avancier 1 (1999-2003, petrol)
  • Body and interior
  • Interior (internal elements)
  • Front Seat Trim Replacement
0
Contents: Seat with side airbag ⇊ Seat without side airbag ⇊ Seat cushion ⇊
Avoid staining the finish while working.

Carry out work wearing gloves.

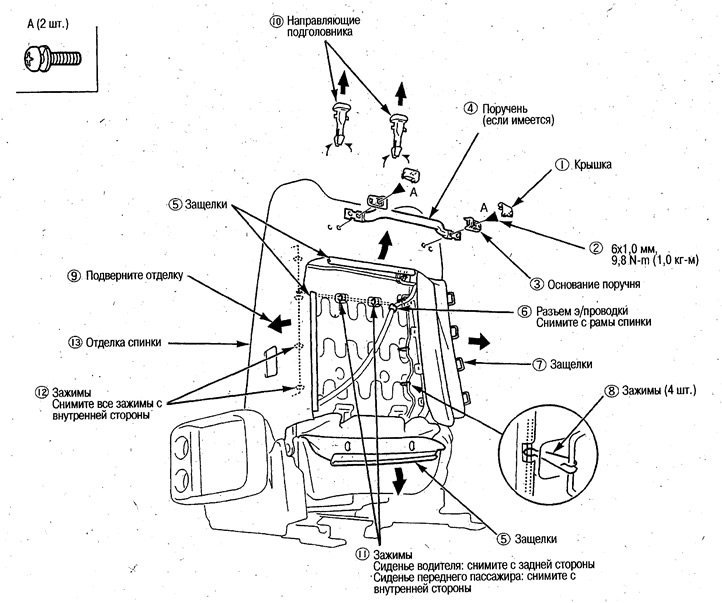
Seat with side airbag


Since there are components of the airbag system (side airbag, passenger presence sensor), during the work, see chapter Supplemental Restraint System (SRS).

Since seats with side airbags have special trim, replace with the same trim. Never install trim for seats without side airbags.

Do not touch the occupant sensor located in the front passenger seat cushion. Be careful not to let oil get on the sensor, as it may rust and cause the system to fail.

Remove the headrest, seatback cover (see above), driver's side armrest pin (see above) and fold the seatback forward. Remove the components in numerical order.

Install in the reverse order of removal.

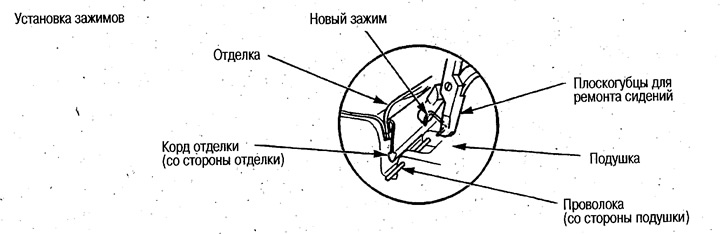
Install the clips and latches correctly, making sure that the trim does not come apart at the seams, wrinkle, or move. Replace the latches with new ones. Using seat repair pliers (available commercially) will make the job easier.

Install the clips and latches correctly, making…


Seat without side airbag


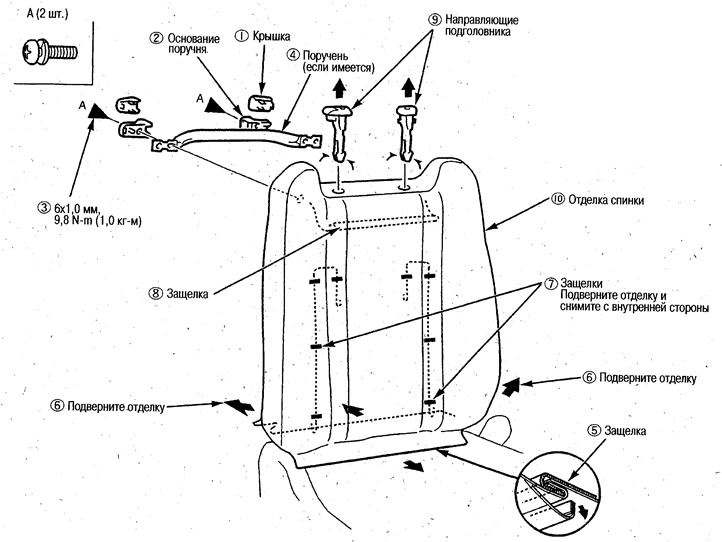
Remove the headrest, armrest pin on the driver's side of the seat (see above) and fold the seatback forward. Remove the components in numerical order.


Install in the reverse order of removal.
  • Install clips and latches correctly, making sure that seams do not come apart, wrinkles do not form, and the trim does not shift.
  • Replace the latches with new ones. Using seat repair pliers will make the job easier.

Replace the latches with new ones. Using seat…


Seat cushion


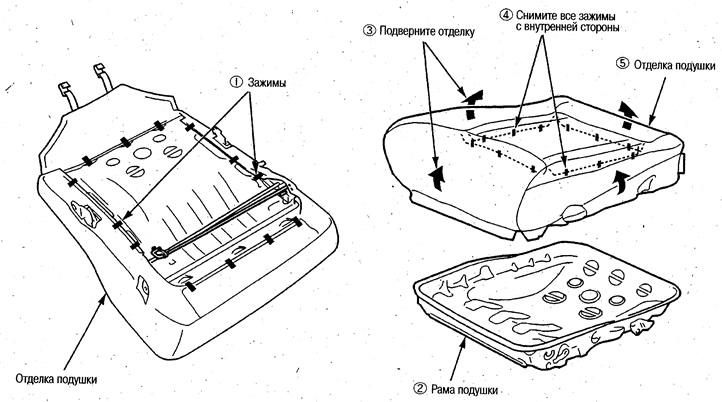
Remove the seat and remove the cushion (see above).

Remove the components in the numbered order shown in the illustration.

The picture shows a seat with manual height adjustment.

Install in the reverse order of removal.
  • Install clips and latches correctly and ensure that seams do not come apart, wrinkle, or trim shift.
  • Replace the latches with new ones. Using seat repair pliers will make the job easier.

Replace the latches with new ones. Using seat…


Replace the latches with new ones. Using seat…


[The original can be found on the resource «hondabook.ru»]
This article is available at: russian, bulgarian, belarusian, ukrainian, serbian, croatian, romanian, polish, slovak, hungarian
This information has been verified: Emil Safonov
Share with friends:
◀ Previous
Avancier 1: Interior (internal elements)
Next ▶

Disassembly and assembly of the front seat mechanisms
Removal and installation front seat armrests
Removal and installation the front seat torsion bar
Disassembly and assembly of front seats
Removal and installation front seats
Removal and installation the rear seat
Removal and installation the rear seat cushion frame assembly and steering axis…
Disassembling and assembling the rear seat cushion frame assembly
Removal and installation the rear seat armrest
Removal and installation the rear seat back lock
See also other articles from Honda manuals:
General information about the front suspension Honda Accord 3 (1985-1989)
Front Fender Trim Replacement Honda Civic 8 (2005-2011)
Removal and installation front seat belts Honda Fit 1 (2001-2008)
Replacing the front side roof trim Honda CR-V 2 (2002-2006, petrol)
Disassembling and assembling the front seat Honda HR-V 1 (1998-2006, petrol)
Link in different formats to this article
Comments and feedback from visitors
No comments yet


How much will 38 + 41 ?


Avancier 1 (1999-2003, petrol) 
  • General information
  • Controls and instruments
  • User manual
  • Power unit
  • Engine maintenance
  • Engine repair
  • Cooling system
  • Engine management
  • Power and exhaust system
  • Transmission
  • Automatic gearbox
  • Drive shafts and differential
  • Chassis and running gear
  • Steering
  • Car suspension
  • Brake system
  • Body and interior
  • Doors, locks and windows
  • Interior (internal elements)
  • Exterior (external elements)
  • Air conditioner
  • Electrical equipment
  • Power devices
  • Equipment and devices
  • Headlights and lighting
  • Electrical circuits
HondaBook.ru © 2018–2026 • Mobile version • Sitemap: EN BG BY UA RS HR RO PL SK HU • Feedback • Driver Information • Search system • Bookmark
Accord 3 (1985-1989) • Accord 6 (1997-2002) • Civic 3 and 4 (1983-1991) • Civic 5 and 6 (1991-2000) • Civic 6 (1995-2000) • Civic 7 (2000-2005) • Civic 8 (2005-2011) • Fit 1 (2001-2008) • CR-V 1 (1995-2001) • CR-V 2 (2002-2006) • HR-V 1 (1998-2006) • Avancier 1 (1999-2003) •
 
This website uses cookies to ensure proper functioning. By clicking "OK," you agree.