HondaBook.ru
Auto companies Volkswagen Auto companies Ford Auto companies Lada Auto companies Skoda Auto companies BMW Auto companies Mazda Auto companies Peugeot
English Русский
Български
Беларускі
Український
Српски
Hrvatski
Română
Polski
Slovenský
Magyar
Bookmark Contacts Sitemap   


Accord Civic Fit / Jazz CR-V HR-V Others Articles
HR-V 1 (1998-2006, petrol)

Oil pump — removal, inspection and installation (Honda HR-V 1)

  • Main
  • Honda HR-V
  • 1 (1998-2006, petrol)
  • Power unit
  • Lubrication system
  • Oil pump — removal, inspection and installation
0
1. Drain the engine oil.

2. Turn the crankshaft and align the white notch on the crankshaft pulley with the arrow on the lower cover.

3. Remove the cylinder head cover and top cover.

4. Remove the power steering pump, air conditioning compressor and alternator drive belts.

5. Remove the crankshaft pulley and lower cover.

6. Remove the timing belt.

7. Remove the drive pulley.

8. Remove the oil pan and coarse oil filter.

9. Remove the oil pump.
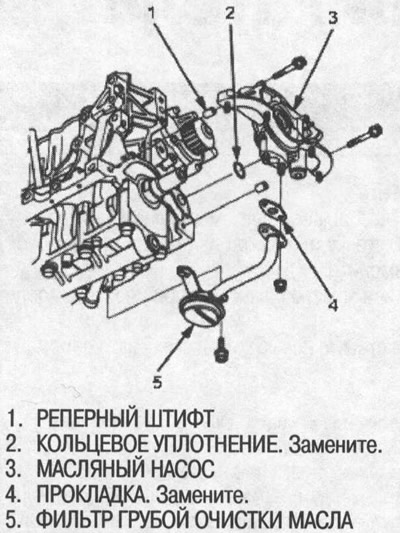
9. Remove the oil pump.


10. Remove the screws from the pump body, then separate the body and cover.

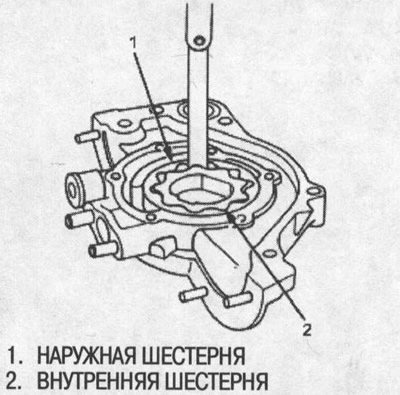
11. Check the radial clearance between the internal and external gears of the oil pump. If the clearance exceeds the wear limit, replace the internal and external gears.

Radial clearance between internal and external gears:
  • Standard (new): 0.02-0.14 mm
  • Limit: 0.20 mm

Limit: 0.20 mm


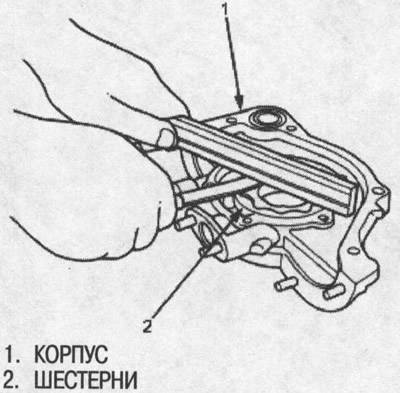
12. Check the axial clearance between the housing and the oil pump gear. If the clearance exceeds the wear limit, replace the gear assemblies and/or the pump housing.


Axial clearance between housing and gear:
  • Standard (new): 0.03-0.08 mm
  • Limit: 0.15 mm

Limit: 0.15 mm


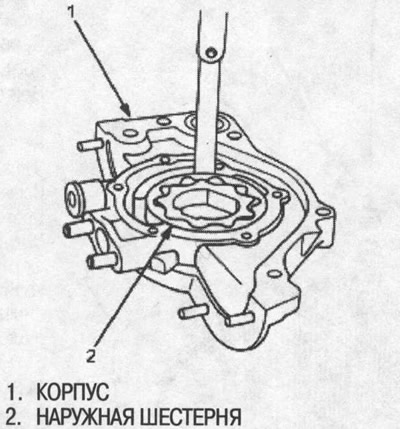
13. Check the radial clearance between the housing and the outer gear of the oil pump. If the clearance exceeds the wear limit, replace the gear assemblies and/or the pump housing.

Radial clearance between housing and outer gear:
  • Standard (new): 0.10-0.18 mm
  • Limit: 0.20 mm

Limit: 0.20 mm


14. Inspect both gears and the pump housing for scoring or other damage. Replace components as necessary.

15. Remove the old oil seal from the oil pump.

16. Using the special tool, carefully press in the new seal until the mandrel contacts the pump.

Note: The seal itself can be replaced without removing the oil pump.
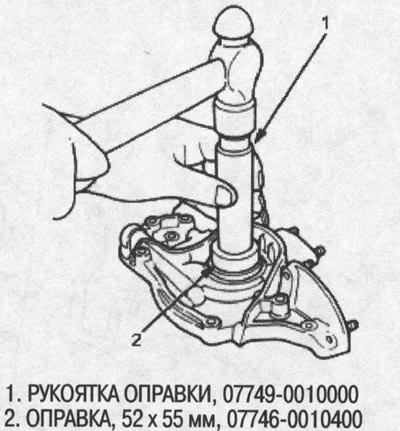

Note: The seal itself can be replaced without…


17. Assemble the oil pump by applying locking compound to the threads of the pump housing screws.


18. Make sure the oil pump rotates freely.

19. Apply a thin layer of oil to the lip of the oil seal.

20. Install both reference pins and a new O-ring onto the oil pump.

21. Apply sealant to the contact surface of the cylinder block on the oil pump side.

Note:
  • Use sealant P/N 08С70-К0234М, 08С70-К0334М or 08С70-X0331S.
  • Before applying sealant, ensure that the contact surfaces are clean and dry.
  • Apply the sealant evenly, distributing it over the entire contact surface.
  • To prevent oil leakage, apply sealant to the threads of the bolt holes.
  • Do not install components if more than five minutes have passed since applying the sealant. Instead, reapply the sealant, removing any traces of the old one.
  • After assembly, wait at least 30 minutes before adding oil to the engine.
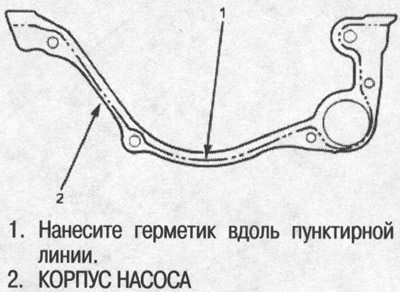

After assembly, wait at least 30 minutes before…


22. Install the oil pump on the cylinder block. Apply grease to the lip of the pump oil seal. Then install the oil pump on the crankshaft. After installing the pump, remove excess grease from the crankshaft, then make sure the oil seal is not deformed.

23. Install the coarse oil filter.
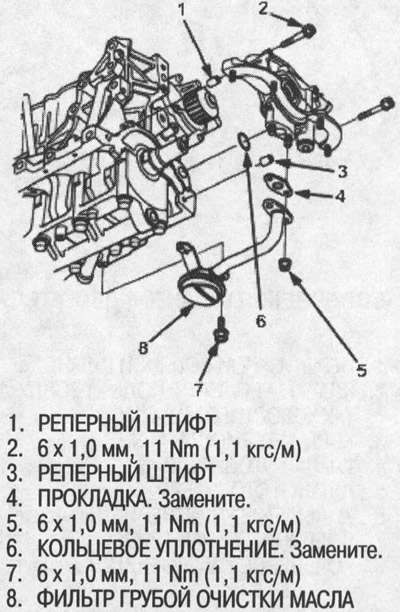
23. Install the coarse oil filter.


24. Install the oil pan.
This article is available at: russian, bulgarian, belarusian, ukrainian, serbian, croatian, romanian, polish, slovak, hungarian
This information has been verified: Emil Safonov
Share with friends:
◀ Previous
HR-V 1: Lubrication system
Next ▶

Oil pump — design description
Oil pressure — testing
Oil Pressure Sensor — Testing
Oil filter — replacement
Engine oil — replacement
Engine Lubrication System Specifications
See also other articles from Honda manuals:
Power steering pump Honda Accord 3 (1985-1989)
Oil pump — removal, inspection and installation Honda Civic 3 and 4 (1983-1991)
Coolant pump Honda Fit 1 (2001-2008)
Power steering pump Honda CR-V 1 (1995-2001, petrol)
Checking and adjusting the tension of the power steering pump belt Honda Avancier 1 (1999-2003, petrol)
Link in different formats to this article
Comments and feedback from visitors
No comments yet


How much will 21 + 23 ?


HR-V 1 (1998-2006, petrol) 
  • General information
  • User manual
  • Maintenance
  • Power unit
  • Engine repair
  • Lubrication system
  • Cooling system
  • Fuel injection and control
  • Power and exhaust system
  • Engine electrical equipment
  • Transmission
  • Clutch
  • Mechanical gearbox
  • Automatic gearbox
  • Rear differential
  • Drive shafts and cardan
  • Chassis and running gear
  • Steering
  • Car suspension
  • Brake system
  • Body and interior
  • Exterior (external elements)
  • Interior (internal elements)
  • Doors, locks and windows
  • Electrical equipment
  • Equipment and devices
  • Lighting system
  • Electrical circuits
HondaBook.ru © 2018–2026 • Mobile version • Sitemap: EN BG BY UA RS HR RO PL SK HU • Feedback • Driver Information • Search system • Bookmark
Accord 3 (1985-1989) • Accord 6 (1997-2002) • Civic 3 and 4 (1983-1991) • Civic 5 and 6 (1991-2000) • Civic 6 (1995-2000) • Civic 7 (2000-2005) • Civic 8 (2005-2011) • Fit 1 (2001-2008) • CR-V 1 (1995-2001) • CR-V 2 (2002-2006) • HR-V 1 (1998-2006) • Avancier 1 (1999-2003) •
 
This website uses cookies to ensure proper functioning. By clicking "OK," you agree.