HondaBook.ru
Auto companies Volkswagen Auto companies Ford Auto companies Lada Auto companies Skoda Auto companies BMW Auto companies Mazda Auto companies Peugeot
English Русский
Български
Беларускі
Український
Српски
Hrvatski
Română
Polski
Slovenský
Magyar
Bookmark Contacts Sitemap   


Accord Civic Fit / Jazz CR-V HR-V Others Articles
Fit 1 (2001-2008)

Timing chain — removal (Honda Fit 1)

  • Main
  • Honda Fit
  • 1 (2001-2008)
  • Power unit
  • Engine repair
  • Timing chain — removal
0
Note: Keep the timing chain away from magnetic field.


1. Remove the front wheels.

2. Remove the lower mudguard.

3. Remove the accessory drive belt.

4. Unscrew the two bolts "A" securing the generator bracket, and loosen the bolt "B" securing the generator.
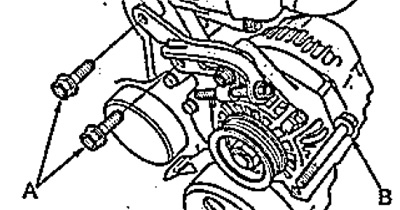
4. Unscrew the two bolts «A» securing the…


5. Remove the intermediate roller.

5. Remove the intermediate roller.


6. Remove the cylinder head cover.

7. Set the piston of the first cylinder to TDC. In this case, the "UP" mark on the crankshaft sprocket should be directed upwards, and the notches on the sprocket should lie in the plane of the cylinder head.
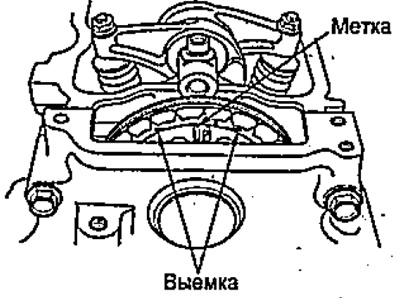
7. Set the piston of the first cylinder to TDC.…


8. Make sure that the pulley notch is aligned with the reference mark.
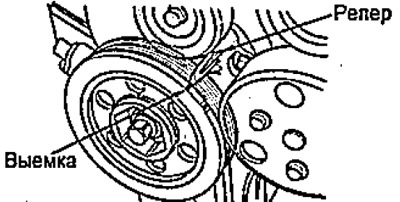


8. Make sure that the pulley notch is aligned…


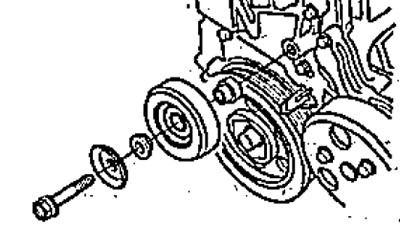
9. Remove the coolant pump pulley.

10. Remove the crankshaft pulley.

11. Remove the oil pan.

12. Disconnect the crankshaft position sensor connector and two clips.
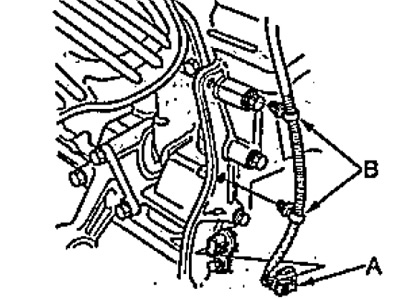
A - connector,

A - connector,
B - clips.


13. Place the jack under the engine. Place a wooden block between the jack foot and the engine.

Note: Be careful not to damage the oil pan when placing the jack on the edge of the cylinder block.


14. Remove the ground wire and front engine mount bracket.
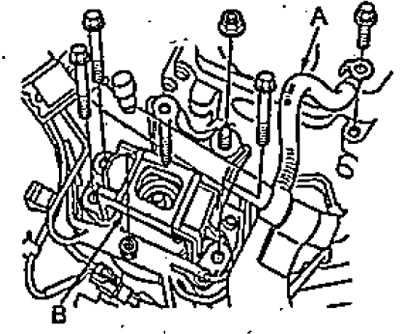
Engine L15A.

Engine L15A.
A - ground wire,
B - right engine support bracket.
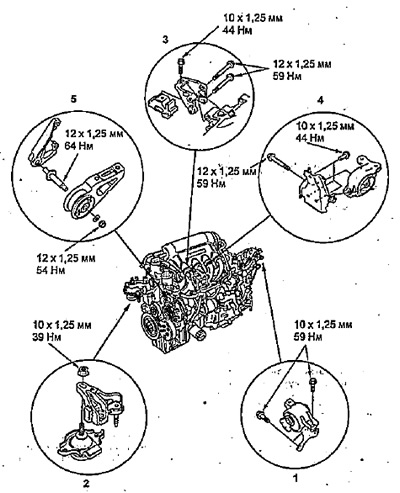

Powertrain mounts (L15A).

Powertrain mounts (L15A).
1 - transmission support bracket,
2 - front engine support bracket,
3 - rear engine mount bracket (4WD),
4 - rear engine mount bracket (2WD),
5 - front limiter.
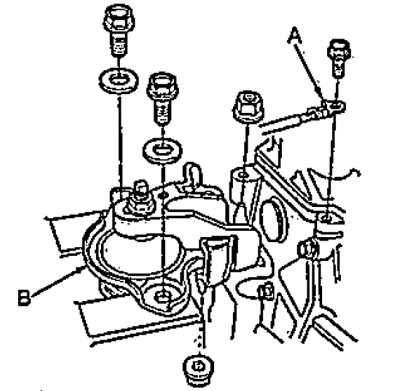

Engine L13A.

Engine L13A.
A - ground wire,
B - right engine support bracket.


15. Remove the generator, crankshaft speed sensor rotor and timing chain cover.
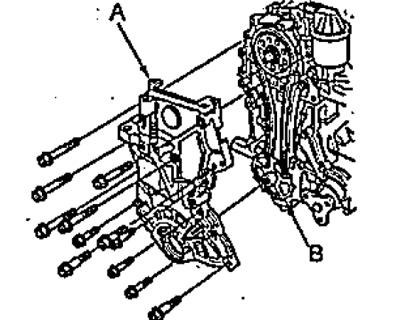


A - timing chain cover,

A - timing chain cover,
B - crankshaft speed sensor rotor.
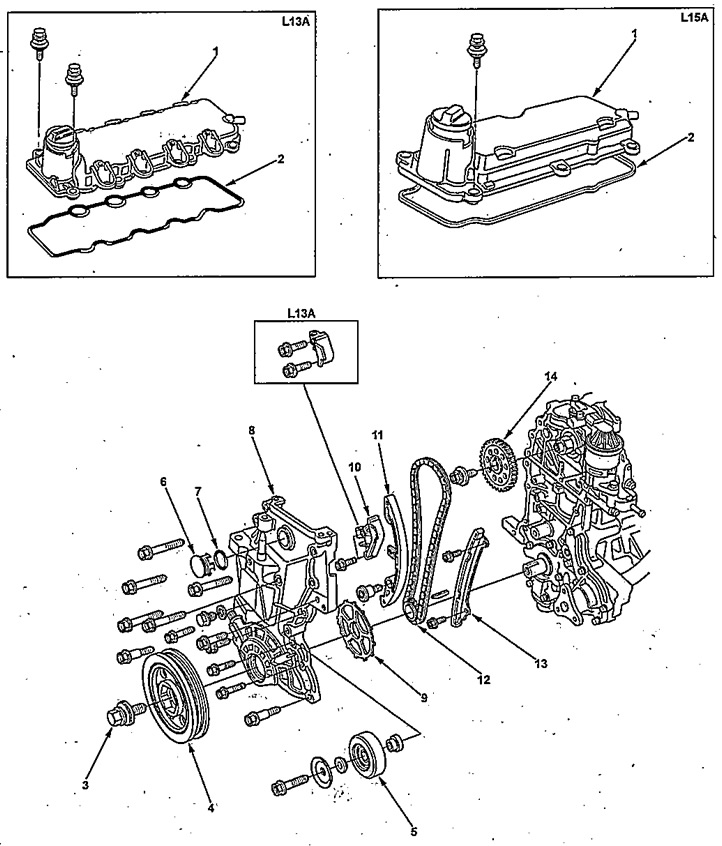

Removal and installation the timing chain.

Removal and installation the timing chain.
1 - cylinder head cover,
2 - cylinder head cover gasket,
3 - bolt,
4 - crankshaft pulley,
5 - intermediate roller,
6 - plug,
7 - O-ring seal,
8 - timing chain cover,
9 - crankshaft position sensor rotor,
10 - tensioner,
11 - tensioner shoe,
12 - chain,
13 - chain guide,
14 - camshaft sprocket.


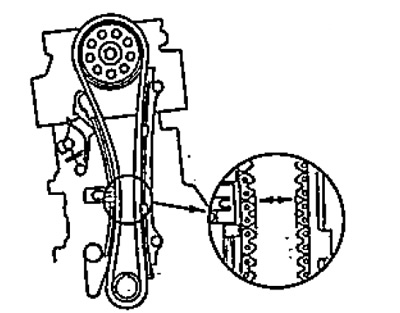
16. Measure the distance between the chain links as shown in the figure. If the distance is less than the minimum, replace the chain with the tensioner.
  • Nominal distance - 19 mm
  • Minimum distance - 15 mm

Minimum distance - 15 mm


17. Apply fresh engine oil to the tensioner contact surface.


18. Secure tensioner "A" with a screwdriver, unscrew bolt "B" and loosen bolt "C".
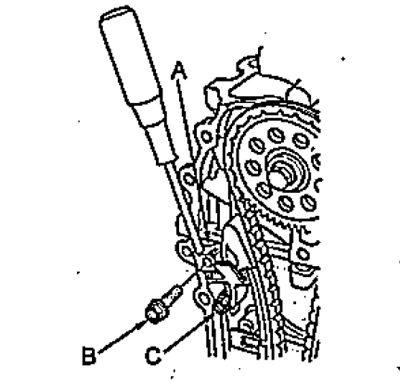
18. Secure tensioner «A» with a screwdriver,…


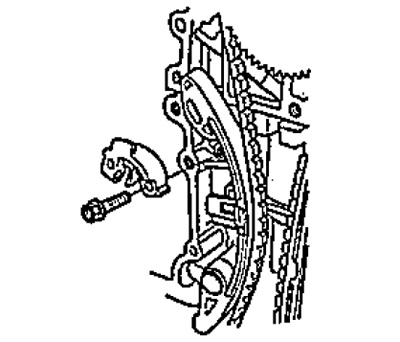
19. Remove the tensioner.

19. Remove the tensioner.


20. Remove the tensioner shoe and timing chain guide.
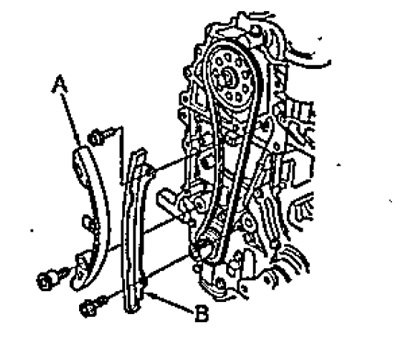
A - tensioner shoe,

A - tensioner shoe,
B - chain guide.


21. Remove the timing chain.
This article is available at: russian, bulgarian, belarusian, ukrainian, serbian, croatian, romanian, polish, slovak, hungarian
This information has been verified: Varvara Vereshchagina
Share with friends:
◀ Previous
Fit 1: Engine repair
Next ▶

Engine assembly — installation
Engine assembly — removal
Checking and adjusting the valve clearance (L15A)
Checking and adjusting the clearance in the valve drive (L1ZA)
Timing chain — installation
Removal the cylinder head
Checking the cylinder head for flatness
Removal the rocker arm shaft assembly
Checking the VTEC (LISA) rocker shaft
See also other articles from Honda manuals:
Ignition timing — checking and adjustment Honda Accord 3 (1985-1989)
Installing the timing chain housing oil seal Honda Civic 8 (2005-2011)
Removal the timing chain Honda CR-V 2 (2002-2006, petrol)
Checking and adjusting the ignition timing angle Honda HR-V 1 (1998-2006, petrol)
Diagnostics of malfunctions of the VTEC system (electronic control of… Honda Avancier 1 (1999-2003, petrol)
Link in different formats to this article
Comments and feedback from visitors
No comments yet


How much will 31 + 16 ?


Fit 1 (2001-2008) 
  • General information
  • User manual
  • Maintenance
  • Power unit
  • Engine repair
  • Cooling and lubrication system
  • Injection and power system
  • Control system
  • Engine electrical equipment
  • Transmission
  • Clutch
  • Mechanical gearbox
  • Automatic gearbox
  • Variator (CVT)
  • Drive shafts and gearbox
  • Chassis and running gear
  • Car suspension
  • Steering
  • Brake system
  • Body and interior
  • Exterior (external elements)
  • Interior (internal elements)
  • Doors, locks and windows
  • Heater and air conditioner
  • Safety system
  • Electrical equipment
  • Equipment and devices
  • Wiring diagrams (since 06.2001)
  • Wiring diagrams (since 06.2004)
HondaBook.ru © 2018–2026 • Mobile version • Sitemap: EN BG BY UA RS HR RO PL SK HU • Feedback • Driver Information • Search system • Bookmark
Accord 3 (1985-1989) • Accord 6 (1997-2002) • Civic 3 and 4 (1983-1991) • Civic 5 and 6 (1991-2000) • Civic 6 (1995-2000) • Civic 7 (2000-2005) • Civic 8 (2005-2011) • Fit 1 (2001-2008) • CR-V 1 (1995-2001) • CR-V 2 (2002-2006) • HR-V 1 (1998-2006) • Avancier 1 (1999-2003) •
 
This website uses cookies to ensure proper functioning. By clicking "OK," you agree.