HondaBook.ru
Auto companies Volkswagen Auto companies Ford Auto companies Lada Auto companies Skoda Auto companies BMW Auto companies Mazda Auto companies Peugeot
English Русский
Български
Беларускі
Український
Српски
Hrvatski
Română
Polski
Slovenský
Magyar
Bookmark Contacts Sitemap   


Accord Civic Fit / Jazz CR-V HR-V Others Articles
Fit 1 (2001-2008)

Engine assembly — installation (Honda Fit 1)

  • Main
  • Honda Fit
  • 1 (2001-2008)
  • Power unit
  • Engine repair
  • Engine assembly — installation
0
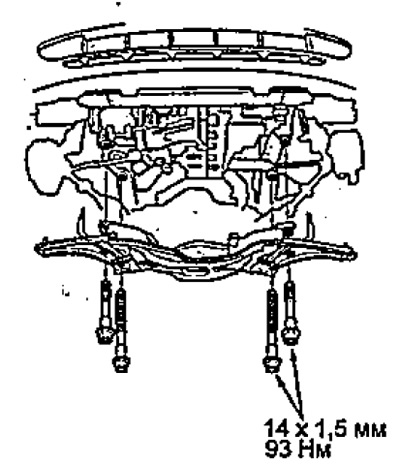
1. Install the subframe.

1. Install the subframe.


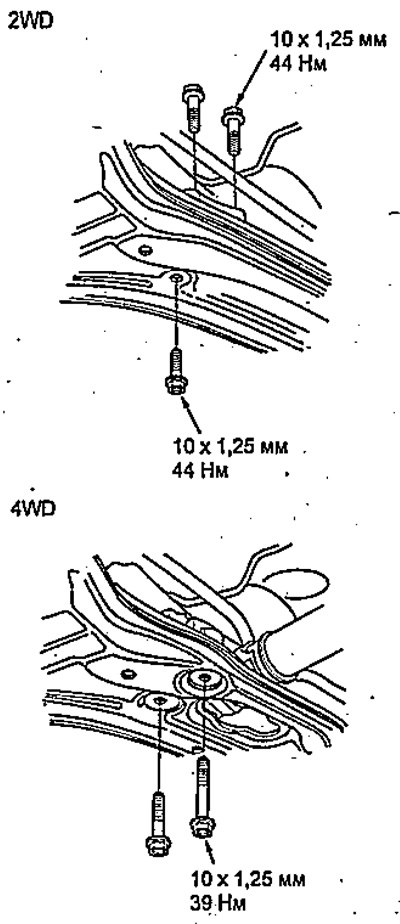
2. Tighten the rear engine mount mounting bolts.
2. Tighten the rear engine mount mounting bolts.


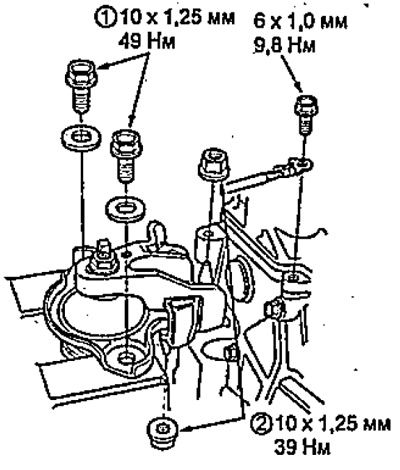
3. Install the front engine mount, tighten the bolts and nuts in the sequence shown in the figure.
3. Install the front engine mount, tighten the…


4. Install the ground wire.

5. Install the transmission support bracket, tighten the bolts and nuts in the sequence shown in the figure.


6. Install the ground wire.
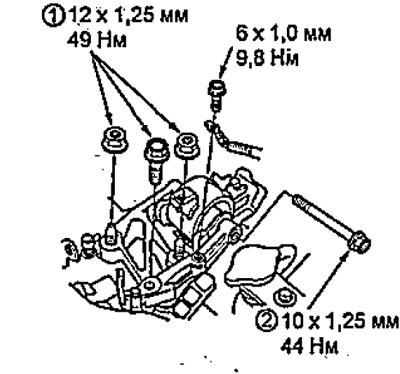
6. Install the ground wire.


7. Install the steering gear onto the subframe.

8. Clean the drive shaft flanges from dirt.

9. Install the drive shafts. Be careful not to damage the seals.

10. Connect the ball joint to the lower control arm.

11. Install the anti-roll bar struts,

12. Install the propeller shaft onto the transfer case.

13. Install the catalytic converter with a new gasket and tighten the nuts. Connect the oxygen sensor connector.
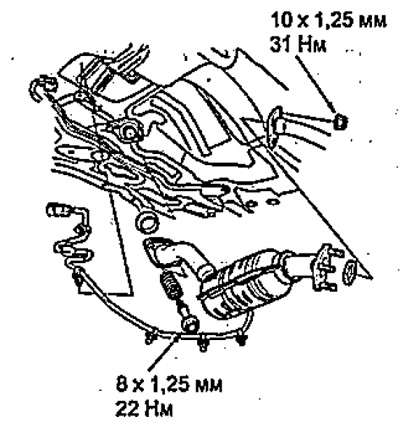
13. Install the catalytic converter with a new…


14. Connect the transmission fluid cooler hoses.

15. Install the air conditioner fan casing.

16. Connect the electromagnetic clutch of the compressor, air conditioner and air conditioner.
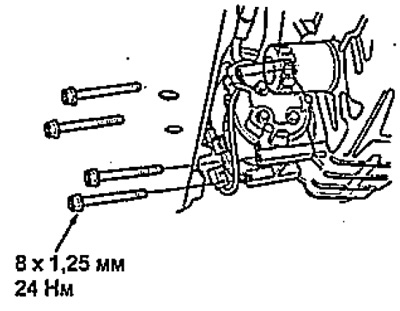
16. Connect the electromagnetic clutch of the…


17. Install the mudguard.


18. Connect the upper and lower hoses.

19. Connect the heater hoses.

20. Install the transmission control cable, plastic washer, washer and cotter pin.
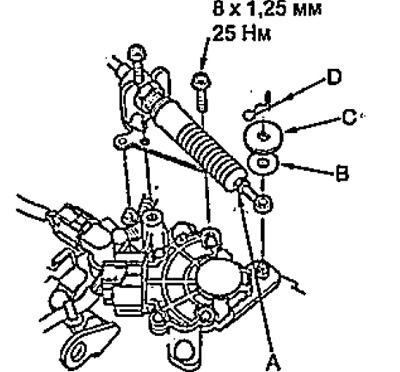
A - transmission control cable,

A - transmission control cable,
B - plastic washer,
C - washer,
D - cotter pin.


21. Connect the fuel vapor recovery system hose and vacuum hose.
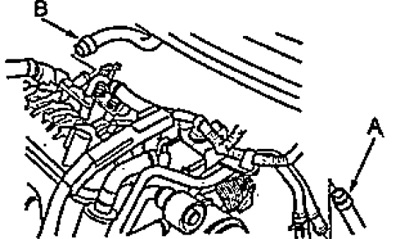
A - fuel vapor recovery system hose,

A - fuel vapor recovery system hose,
B - vacuum hose


22. Install the fuse box on the bracket and connect the power wires.

23. Connect the wire clamps.

24. Install the wiring harness by connecting the two clips and installing the seal.

25. Connect the electronic control unit connectors.
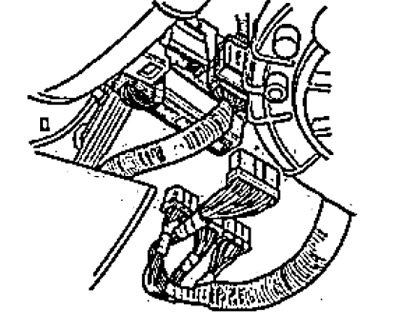
25. Connect the electronic control unit…


26. Install the battery tray and connect the wiring harness retainer.
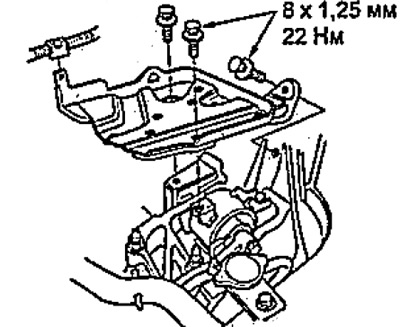


26. Install the battery tray and connect the…


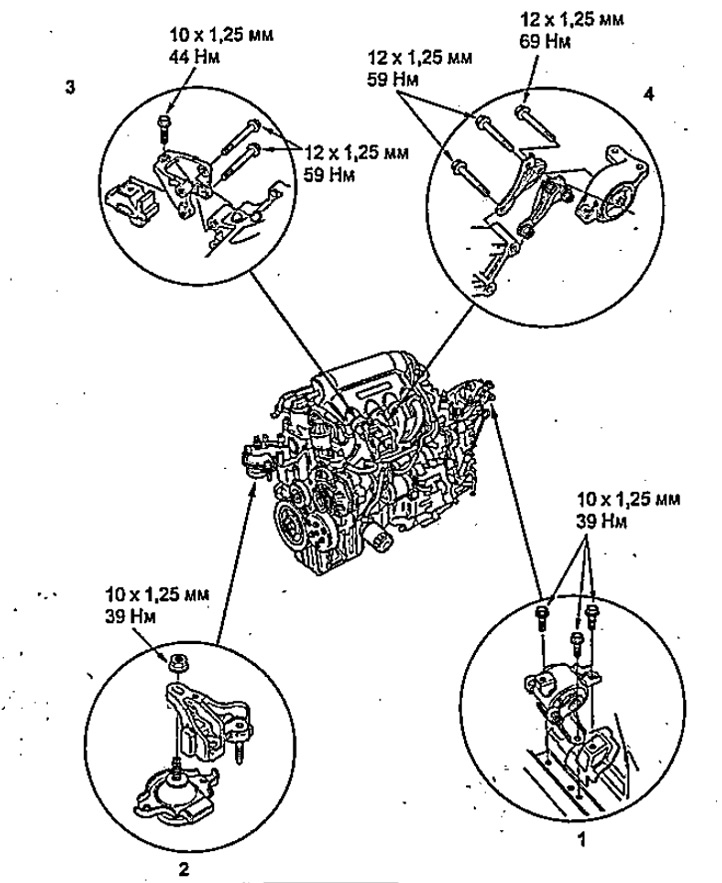
Powertrain mounts (L13A).

Powertrain mounts (L13A).
1 - transmission support bracket,
2 - front engine support bracket,
3 - rear engine mount bracket (4WD),
4 - rear engine mount bracket (2WD).


27. Connect the fuel hose.

28. Install the attachment drive belt and adjust its tension.

29. Install the throttle cable.

30. Install the air filter housing.

31. Sand the battery terminals, install the wires and treat them with conductive grease.

32. Fill with coolant, make sure there are no vapor locks.

33. Fill with engine oil.

34. Fill with transmission fluid.

35. Make sure that the automatic transmission gear indicator readings are correct.

36. Turn the ignition key to the ON(II) position (the starter does not engage), let the fuel pump run for approximately 2 seconds to create pressure in the fuel line. Repeat the procedure 2-3 times and check for fuel leaks.


37. Check the idle speed.

38. Check the ignition timing angle.

39. Check and, if necessary, adjust the wheel alignment angles.
This article is available at: russian, bulgarian, belarusian, ukrainian, serbian, croatian, romanian, polish, slovak, hungarian
This information has been verified: Varvara Vereshchagina
Share with friends:
◀ Previous
Fit 1: Engine repair
Next ▶

Engine assembly — removal
Checking and adjusting the valve clearance (L15A)
Checking and adjusting the clearance in the valve drive (L1ZA)
Timing chain — removal
Timing chain — installation
Removal the cylinder head
Checking the cylinder head for flatness
Removal the rocker arm shaft assembly
See also other articles from Honda manuals:
Engine Oil Recommendations Honda Accord 3 (1985-1989)
Emergency engine start Honda Civic 3 and 4 (1983-1991)
Location of serviced units and assemblies in the engine compartment Honda CR-V 1 (1995-2001, petrol)
Engine Starting Procedure Honda HR-V 1 (1998-2006, petrol)
Starting the engine Honda Avancier 1 (1999-2003, petrol)
Link in different formats to this article
Comments and feedback from visitors
No comments yet


How much will 41 + 32 ?


Fit 1 (2001-2008) 
  • General information
  • User manual
  • Maintenance
  • Power unit
  • Engine repair
  • Cooling and lubrication system
  • Injection and power system
  • Control system
  • Engine electrical equipment
  • Transmission
  • Clutch
  • Mechanical gearbox
  • Automatic gearbox
  • Variator (CVT)
  • Drive shafts and gearbox
  • Chassis and running gear
  • Car suspension
  • Steering
  • Brake system
  • Body and interior
  • Exterior (external elements)
  • Interior (internal elements)
  • Doors, locks and windows
  • Heater and air conditioner
  • Safety system
  • Electrical equipment
  • Equipment and devices
  • Wiring diagrams (since 06.2001)
  • Wiring diagrams (since 06.2004)
HondaBook.ru © 2018–2026 • Mobile version • Sitemap: EN BG BY UA RS HR RO PL SK HU • Feedback • Driver Information • Search system • Bookmark
Accord 3 (1985-1989) • Accord 6 (1997-2002) • Civic 3 and 4 (1983-1991) • Civic 5 and 6 (1991-2000) • Civic 6 (1995-2000) • Civic 7 (2000-2005) • Civic 8 (2005-2011) • Fit 1 (2001-2008) • CR-V 1 (1995-2001) • CR-V 2 (2002-2006) • HR-V 1 (1998-2006) • Avancier 1 (1999-2003) •
 
This website uses cookies to ensure proper functioning. By clicking "OK," you agree.