
HondaBook.ru
Auto companies Volkswagen Auto companies Ford Auto companies Lada Auto companies Skoda Auto companies BMW Auto companies Mazda Auto companies Peugeot
English Русский
Български
Беларускі
Український
Српски
Hrvatski
Română
Polski
Slovenský
Magyar
Bookmark Contacts Sitemap   


Accord Civic Fit / Jazz CR-V HR-V Others Articles
Accord 3 (1985-1989) Accord 6 (1997-2002)

Installing the rear crankshaft oil seal (Honda Accord 6)

  • Main
  • Honda Accord
  • 6 (1997-2002)
  • Power unit
  • Engine overhaul
  • Installing the rear crankshaft oil seal
0
1. Before bolting the holder with the new oil seal installed to the engine, install the crankshaft and main bearing caps/their connecting bridge.

2. Carefully check the surface of the shaft journal that contacts the seal for scratches, burrs and other defects that could cause the new seal to fail. Replace the damaged shaft.
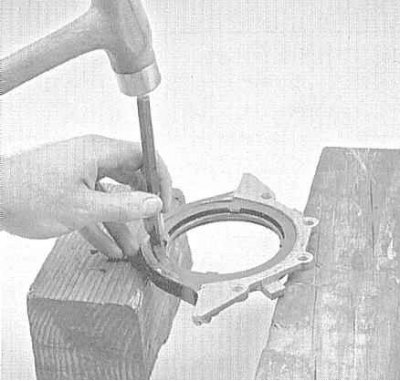
2. Carefully check the surface of the shaft…


3. Measure the standard seating depth of the old seal in the holder socket, then place the holder plate with its edges on a couple of wooden blocks of equal height and, using a suitable punch and hammer, knock the old seal out of its socket. Try not to damage the socket walls.
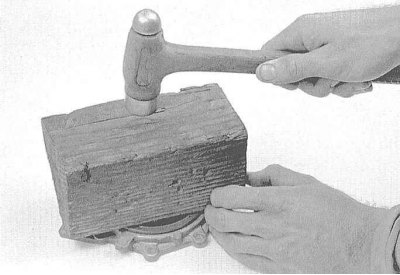
3. Measure the standard seating depth of the old…


4. Wipe the holder thoroughly, then lubricate the outer edge of the new seal with clean engine oil. The seal must be seated in the socket strictly perpendicularly, so it is not recommended to tap it into the holder with a hammer.
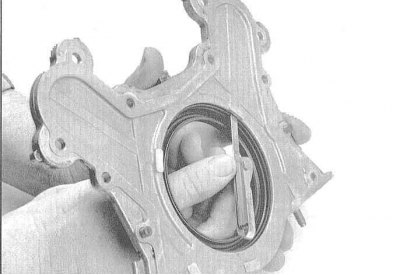


4. Wipe the holder thoroughly, then lubricate the…


5. If there is no access to a press, the gland can be inserted into the socket using a large vice with soft jaws. The holder with the gland should be clamped between two flat wooden blocks, ensuring an even distribution of the load over the entire area of the end surface of the gland. In extreme cases, it is permissible to use a hammer, but the tapping should be done through a flat wooden block. Do not rush, make sure that there is no distortion.

6. Before installing the holder assembly with the seal on the crankshaft journal, lubricate the seal lips with universal grease. The holder is mounted on the engine without a gasket - instead, a uniform cushion of anaerobic sealant 2 mm wide should be applied to its mating surface.

7. Press the holder tightly against the block, tighten the mounting bolts by hand, make sure the holder is installed correctly, then tighten the bolts to the required force.
This article is available at: russian, bulgarian, belarusian, ukrainian, serbian, croatian, romanian, polish, slovak, hungarian
This information has been verified: Timofey Goryachev
Share with friends:
◀ Previous
Accord 6: Engine overhaul
Next ▶

Installing the crankshaft and checking the main bearing clearances
Installing piston rings
Engine assembly procedure
Checking the condition and selecting the liners of the main and connecting rod…
Checking the condition of the crankshaft
Installing connecting rod and piston assemblies and checking working clearances…
Installing balance shafts (four-cylinder engines)
Test run and running-in of the engine after major repairs
See also other articles from Honda manuals:
Replacing the rear crankshaft oil seal Honda Civic 3 and 4 (1983-1991)
Installing the crankshaft Honda Fit 1 (2001-2008)
Rear gearbox oil seal — replacement Honda CR-V 1 (1995-2001, petrol)
Installing the rear door seal Honda HR-V 1 (1998-2006, petrol)
Removal and installation the rear side door seal Honda Avancier 1 (1999-2003, petrol)
Link in different formats to this article
Comments and feedback from visitors
No comments yet


How much will 30 + 30 ?


Accord 6 (1997-2002) 
  • General information
  • Introduction to the guide
  • User manual
  • Maintenance
  • Power unit
  • Four-cylinder engines
  • Six-cylinder engines
  • Engine overhaul
  • Cooling system
  • Heater and air conditioner
  • Power and exhaust systems
  • Engine electrical equipment
  • Engine management
  • Transmission
  • Mechanical gearbox
  • Automatic gearbox
  • Clutch and drive shafts
  • Chassis and running gear
  • Brake system
  • Car suspension
  • Steering
  • Body and interior
  • Exterior (external elements)
  • Interior (internal elements)
  • Electrical equipment
  • Equipment and devices
  • Electrical circuits
Accord 3 (1985-1989) 
  • General information
  • Maintenance
  • Power unit
  • Engine adjustment
  • Engine repair
  • Engine electrics
  • Emission management
  • Engine management (carburetor)
  • Electronic injection
  • Programmable injection
  • Schematic of emission system
  • Fuel system
  • Feedback management
  • Transmission
  • Manual gearbox
  • Automatic gearbox
  • Clutch
  • Chassis and running gear
  • Front suspension
  • Rear suspension
  • Steering
  • Brake system
  • Electrical equipment
  • Ventilation and heating
  • Air conditioner
  • Cruise control system
  • Equipment and devices
HondaBook.ru © 2018–2026 • Mobile version • Sitemap: EN BG BY UA RS HR RO PL SK HU • Feedback • Driver Information • Search system • Bookmark
Accord 3 (1985-1989) • Accord 6 (1997-2002) • Civic 3 and 4 (1983-1991) • Civic 5 and 6 (1991-2000) • Civic 6 (1995-2000) • Civic 7 (2000-2005) • Civic 8 (2005-2011) • Fit 1 (2001-2008) • CR-V 1 (1995-2001) • CR-V 2 (2002-2006) • HR-V 1 (1998-2006) • Avancier 1 (1999-2003) •
 
This website uses cookies to ensure proper functioning. By clicking "OK," you agree.