
HondaBook.ru
Auto companies Volkswagen Auto companies Ford Auto companies Lada Auto companies Skoda Auto companies BMW Auto companies Mazda Auto companies Peugeot
English Русский
Български
Беларускі
Український
Српски
Hrvatski
Română
Polski
Slovenský
Magyar
Bookmark Contacts Sitemap   


Accord Civic Fit / Jazz CR-V HR-V Others Articles
Accord 3 (1985-1989) Accord 6 (1997-2002)

Fog lights and instrument panel lighting switch (Honda Accord 6)

  • Main
  • Honda Accord
  • 6 (1997-2002)
  • General information
  • User manual
  • Fog lights and instrument panel lighting switch
0
Contents: Rear fog light switch ⇊ Fog light switch ⇊ Instrument cluster backlight…⇊ Regulator for adjusting the…⇊ Adjustable steering column locking…⇊

Rear fog light switch
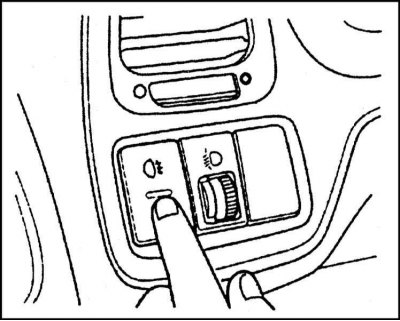


Rear fog light switch


The rear fog lights can only be activated when the headlights and/or front fog lights (if equipped) are on. To turn on the fog lights, press the button on the switch built into the instrument panel. The button has a built-in indicator lamp that reminds the driver that the fog lights remain on. The lights are turned off by pressing the button again.

Note: The fog lights turn off automatically together with the headlights.


Fog light switch
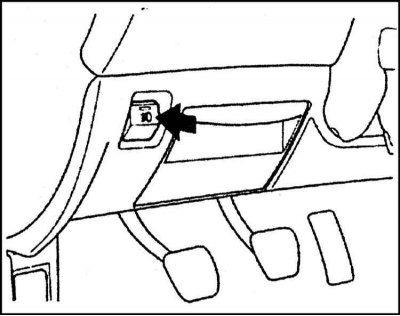


Fog light switch


The fog lights can only be switched on when the parking lights are switched on and are automatically switched off when the latter are switched off. To switch on the fog lights, press the button on the switch built into the instrument panel. The switch button has a built-in indicator lamp that reminds the driver that the fog lights remain on. The lights are switched off by pressing the button again.


Instrument cluster backlight brightness control
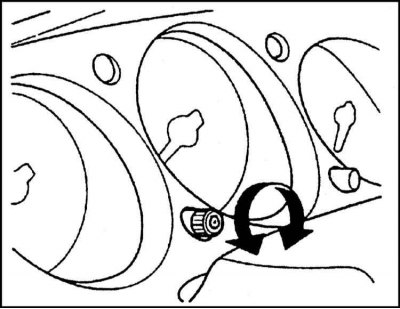


Instrument cluster backlight brightness control


The backlight brightness regulator is mounted in the car's instrument panel near the speedometer assembly (see accompanying illustration). The required panel backlight intensity is achieved by rotating the regulator knob.

Regulator for adjusting the direction of the optical axes of the headlights of the car
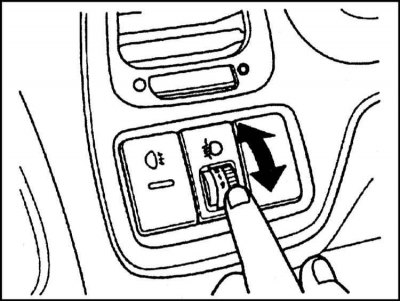


Regulator for adjusting the direction of the…


The regulator provides the ability to adjust the direction of the optical axes of the headlights in the low beam mode and achieve the best road lighting conditions with different vehicle loads. 2Adjustment is made depending on the number of passengers, the presence and weight of cargo in the luggage compartment. The regulator should be moved to a position corresponding to (or as close as possible to) the actual vehicle load:


  • a) Position "O" - one driver or driver and passenger in the front seat;
  • b) Position "1" - driver and four passengers in the front and rear seats;
  • c) Position "2" - driver, four passengers in the front and rear seats, plus cargo in the luggage compartment (the gross vehicle weight is within the permissible range);
  • d) Position "3" - one driver and cargo in the luggage compartment (the loads on the front and rear axles of the vehicle are within the permissible limits, the gross vehicle weight does not exceed the maximum permissible value).

Note: On R-class modifications, the adjustment of the optical axes of the headlights is carried out automatically in low beam mode.


Adjustable steering column locking lever


Note: See information regarding the correct and safe position of the steering column (Section Elements of vehicle safety systems). The position of the steering column on cars with the corresponding configuration can be adjusted at the driver's discretion. Adjustment is made before starting to move.


Warning! Adjusting the steering column position while driving may result in loss of control of the vehicle and may lead to serious traffic accidents!
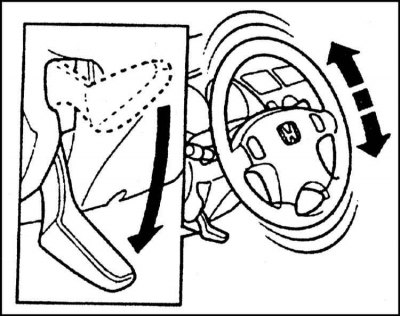

Warning! Adjusting the steering column position…


To adjust the height of the steering column, you must:


  • a) Lower the steering column lock lever located on the left under the steering wheel until it stops;
  • b) The steering wheel height is adjusted by moving it to the required position in the vertical plane. A properly adjusted steering wheel should not obstruct the view of the instrument panel;
  • c) After completing the adjustment, lock the steering column by fully raising the lock lever to its original position;
  • d) Check that the column is securely fixed by trying to move it up and down.
This article is available at: russian, bulgarian, belarusian, ukrainian, serbian, croatian, romanian, polish, slovak, hungarian
This information has been verified: Timofey Goryachev
Share with friends:
◀ Previous
Accord 6: User manual
Next ▶

Rear window defroster switch
Hazard warning light switch
Right steering column switch
Main switch for controlling the operation of external lighting devices
Instrument cluster indicators
Controls located on the steering wheel
Seat adjustment
Upper hatch
Rear view mirrors
Digital display watch
See also other articles from Honda manuals:
Instrument cluster indicator lights Honda Civic 8 (2005-2011)
Instrument panel Honda Fit 1 (2001-2008)
Instrument panel and mounting parts Honda CR-V 1 (1995-2001, petrol)
Removal and installation the central section of the instrument panel Honda HR-V 1 (1998-2006, petrol)
Instrument panel lighting Honda Avancier 1 (1999-2003, petrol)
Link in different formats to this article
Comments and feedback from visitors
No comments yet


How much will 48 + 40 ?


Accord 6 (1997-2002) 
  • General information
  • Introduction to the guide
  • User manual
  • Maintenance
  • Power unit
  • Four-cylinder engines
  • Six-cylinder engines
  • Engine overhaul
  • Cooling system
  • Heater and air conditioner
  • Power and exhaust systems
  • Engine electrical equipment
  • Engine management
  • Transmission
  • Mechanical gearbox
  • Automatic gearbox
  • Clutch and drive shafts
  • Chassis and running gear
  • Brake system
  • Car suspension
  • Steering
  • Body and interior
  • Exterior (external elements)
  • Interior (internal elements)
  • Electrical equipment
  • Equipment and devices
  • Electrical circuits
Accord 3 (1985-1989) 
  • General information
  • Maintenance
  • Power unit
  • Engine adjustment
  • Engine repair
  • Engine electrics
  • Emission management
  • Engine management (carburetor)
  • Electronic injection
  • Programmable injection
  • Schematic of emission system
  • Fuel system
  • Feedback management
  • Transmission
  • Manual gearbox
  • Automatic gearbox
  • Clutch
  • Chassis and running gear
  • Front suspension
  • Rear suspension
  • Steering
  • Brake system
  • Electrical equipment
  • Ventilation and heating
  • Air conditioner
  • Cruise control system
  • Equipment and devices
HondaBook.ru © 2018–2026 • Mobile version • Sitemap: EN BG BY UA RS HR RO PL SK HU • Feedback • Driver Information • Search system • Bookmark
Accord 3 (1985-1989) • Accord 6 (1997-2002) • Civic 3 and 4 (1983-1991) • Civic 5 and 6 (1991-2000) • Civic 6 (1995-2000) • Civic 7 (2000-2005) • Civic 8 (2005-2011) • Fit 1 (2001-2008) • CR-V 1 (1995-2001) • CR-V 2 (2002-2006) • HR-V 1 (1998-2006) • Avancier 1 (1999-2003) •
 
This website uses cookies to ensure proper functioning. By clicking "OK," you agree.