
HondaBook.ru
Auto companies Volkswagen Auto companies Ford Auto companies Lada Auto companies Skoda Auto companies BMW Auto companies Mazda Auto companies Peugeot
English Русский
Български
Беларускі
Український
Српски
Hrvatski
Română
Polski
Slovenský
Magyar
Bookmark Contacts Sitemap   


Accord Civic Fit / Jazz CR-V HR-V Others Articles
Accord 3 (1985-1989) Accord 6 (1997-2002)

Removal and installation wheel cylinders (Honda Accord 6)

  • Main
  • Honda Accord
  • 6 (1997-2002)
  • Chassis and running gear
  • Brake system
  • Removal and installation wheel cylinders
0
Contents: Removal ⇊ Installation ⇊
Note: In case of leaks, wheel cylinders must be replaced without fail. Manufacturers do not recommend attempting to perform restorative repairs on these brake components.


Removal


1. Jack up the rear of the car and place it on supports. Support the front wheels with wheel chocks.

2. Remove the brake drum and shoes (see Section Replacing the shoes of the rear wheel drum brake mechanisms).

3. Clean the wheel cylinder and surrounding surfaces from dirt.
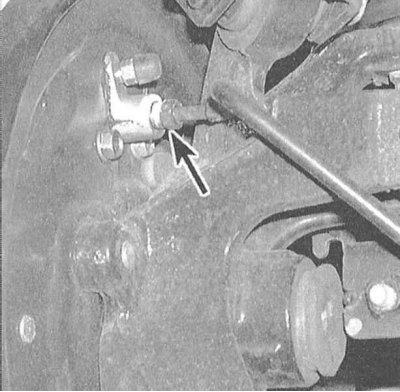
3. Clean the wheel cylinder and surrounding…


4. Disconnect the hydraulic line from the rear of the wheel cylinder. Use a special open-end wrench with a slotted head to avoid rounding the splines of the fitting. When disconnecting, do not pull on the metal tube of the brake line to avoid deformation, which can significantly complicate the connection procedure. Immediately plug the open end of the brake line to minimize fluid loss and prevent dirt from entering the hydraulic system.

5. Disconnect the hydraulic line from the rear of the wheel cylinder (see accompanying illustration). Use a special open-end wrench with a slotted head to avoid rounding the splines of the nipple. When disconnecting, do not pull on the metal tube of the brake line to avoid deformation, which can significantly complicate the connection procedure. Immediately plug the open end of the brake line to minimize fluid loss and to prevent dirt from entering the hydraulic system.


Note: If there are traces of hydraulic fluid on the friction linings of the brake shoes, the shoes should be replaced and the working surface of the drum should be thoroughly cleaned.


Installation


1. Lubricate the mating surfaces of the wheel cylinder and brake shield with RTV sealant. Install the cylinder in its regular place and connect the hydraulic line to it. Do not tighten the union nut yet.

2. Insert the mounting bolts and tighten them securely. Now you can tighten the union nut completely. Reinstall the shoe assembly.

3. Bleed the brake system (see Section Bleeding the brake system).

4. Before operating the vehicle, make sure that the brakes are functioning properly.
This article is available at: russian, bulgarian, belarusian, ukrainian, serbian, croatian, romanian, polish, slovak, hungarian
This information has been verified: Timofey Goryachev
Share with friends:
◀ Previous
Accord 6: Brake system
Next ▶

Replacing the shoes of the rear wheel drum brake mechanisms
Checking the condition, removing and installing the brake disc
Removal and installation of disc brake calipers
Replacement of brake pads of disc brake mechanisms
Anti-lock Brake System (ABS) — General Information and Error Codes
Removal and installation the master brake cylinder
Checking the condition and replacing brake lines and hoses
Bleeding the brake system
Checking the serviceability and tightness, removing and installing the brake…
Adjusting the parking brake
See also other articles from Honda manuals:
Removal and installation wheel cylinders Honda Civic 6 (1995-2000)
Adjusting the position of the steering wheel Honda Fit 1 (2001-2008)
Wheel cylinders of drum brakes — removal and installation Honda CR-V 1 (1995-2001, petrol)
On-board tool, spare wheel, squib Honda HR-V 1 (1998-2006, petrol)
Steering wheel audio controls Honda Avancier 1 (1999-2003, petrol)
Link in different formats to this article
Comments and feedback from visitors
No comments yet


How much will 36 + 11 ?


Accord 6 (1997-2002) 
  • General information
  • Introduction to the guide
  • User manual
  • Maintenance
  • Power unit
  • Four-cylinder engines
  • Six-cylinder engines
  • Engine overhaul
  • Cooling system
  • Heater and air conditioner
  • Power and exhaust systems
  • Engine electrical equipment
  • Engine management
  • Transmission
  • Mechanical gearbox
  • Automatic gearbox
  • Clutch and drive shafts
  • Chassis and running gear
  • Brake system
  • Car suspension
  • Steering
  • Body and interior
  • Exterior (external elements)
  • Interior (internal elements)
  • Electrical equipment
  • Equipment and devices
  • Electrical circuits
Accord 3 (1985-1989) 
  • General information
  • Maintenance
  • Power unit
  • Engine adjustment
  • Engine repair
  • Engine electrics
  • Emission management
  • Engine management (carburetor)
  • Electronic injection
  • Programmable injection
  • Schematic of emission system
  • Fuel system
  • Feedback management
  • Transmission
  • Manual gearbox
  • Automatic gearbox
  • Clutch
  • Chassis and running gear
  • Front suspension
  • Rear suspension
  • Steering
  • Brake system
  • Electrical equipment
  • Ventilation and heating
  • Air conditioner
  • Cruise control system
  • Equipment and devices
HondaBook.ru © 2018–2026 • Mobile version • Sitemap: EN BG BY UA RS HR RO PL SK HU • Feedback • Driver Information • Search system • Bookmark
Accord 3 (1985-1989) • Accord 6 (1997-2002) • Civic 3 and 4 (1983-1991) • Civic 5 and 6 (1991-2000) • Civic 6 (1995-2000) • Civic 7 (2000-2005) • Civic 8 (2005-2011) • Fit 1 (2001-2008) • CR-V 1 (1995-2001) • CR-V 2 (2002-2006) • HR-V 1 (1998-2006) • Avancier 1 (1999-2003) •
 
This website uses cookies to ensure proper functioning. By clicking "OK," you agree.