
Measuring instruments must have the following measurement limits:
- Ammeter: 0-400A
- Voltmeter: 0-20V, error no more than 0.1 V
- Tachometer: 0-1200 rpm.
1. Connect the ammeter and voltmeter as shown in the figure.
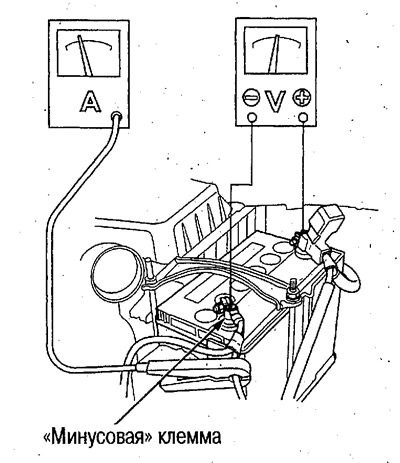
2. To prevent the engine from starting, reduce fuse #46 to 15A from the relay box.
3. Check how the crankshaft turns.
Turn the ignition key to the START (III) position and make sure the crankshaft turns.
If the crankshaft does not turn, check the battery for damage, check the battery charge status, check the condition of the cable connections, and retest the starter operation.
If the crankshaft still does not turn when you recheck, disconnect the black and white wire from the starter solenoid switch and connect (+) battery directly to the S terminal of the solenoid switch.
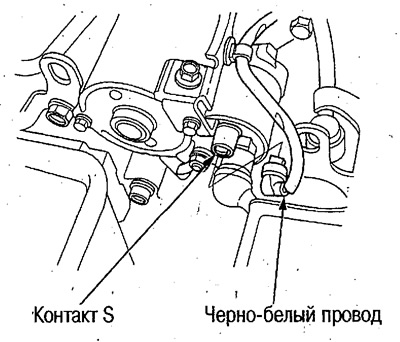
If the crankshaft does not turn even with the battery connected directly, disassemble the starter and check it.
If the crankshaft rotates when the battery is directly connected:
- Check the black and white wire between the starter and the ignition switch for breakage and secure connections.
- Check the position of the automatic transmission selector lever.
- Check the starter cut-off relay.
4. Check the sound of the starter gears.
Turn the ignition key to the START (III) position and make sure that the crankshaft turns smoothly without abnormal noise.
If an abnormal sound is heard, check the pinion (gear/clutch) and starter ring gear for wear or damage.
5. Check whether the starter drive pinion returns to its original position.
Make sure that after returning the ignition key from the START (III) position to the ON (II) position, the starter drive pinion disengages from the ring gear and returns to its original position. 1
If the pinion gear does not return to its position and abnormal sound is heard, check the pinion gear for contamination and damage, and check the magnetic switch.
6. Check the operation of the starter under load.
Turn the ignition key to the START (III) position and measure the voltage and current while cranking the crankshaft.
Do not operate the starter for a long time.
Read the voltmeter and ammeter readings after they have stabilized.
- Standard voltage: more than 8.5V
- Standard current: 350A and below
If the voltage or current values are not within the normal range, do the following:
- Check the battery charge status.
- Check for breaks in the rotor commutator segments.
- Check the rotor resistance.
- Check the rotor windings for short circuit.
- Crankshaft turning force.
7. Check the starter speed.
Turn the ignition key to the START (III) position and measure the starter speed.
Standard frequency: approx. 100/min.
If the frequency is below normal, check the following:
- Battery charge status.
- Battery and starter contact states.
- Condition of starter brushes.
- Breakage of rotor commutator segments.
- Contamination and damage to the starter pinion and ring gear.
- Voltage drop across the electromagnetic switch.