HondaBook.ru
Auto companies Volkswagen Auto companies Ford Auto companies Lada Auto companies Skoda Auto companies BMW Auto companies Mazda Auto companies Peugeot
English Русский
Български
Беларускі
Український
Српски
Hrvatski
Română
Polski
Slovenský
Magyar
Bookmark Contacts Sitemap   


Accord Civic Fit / Jazz CR-V HR-V Others Articles
Fit 1 (2001-2008)

Checking the starter (Honda Fit 1)

  • Main
  • Honda Fit
  • 1 (2001-2008)
  • Power unit
  • Engine electrical equipment
  • Checking the starter
0
Contents: Checking the traction relay ⇊ Stator check ⇊ Checking the overrunning clutch ⇊ Checking the anchor ⇊ Checking the brushes ⇊

Checking the traction relay


1. Remove the starter.

2. Remove the cover from the drive side and disconnect the traction relay.

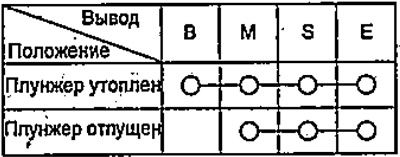
3. Check the resistance between the terminals of the traction relay in two positions.
3. Check the resistance between the terminals of…

Stator check


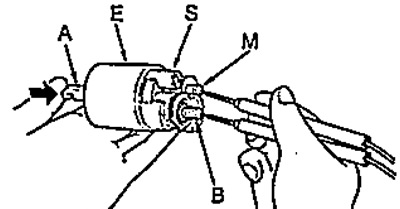
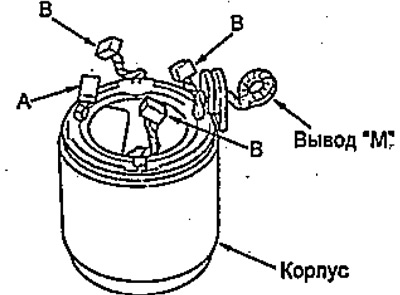
1. Check for continuity between positive brushes "A" and terminal "M".

2. Make sure there is conductivity between the negative brushes "B" and the housing.
2. Make sure there is conductivity between the…


3. Check that there is no conductivity between the positive and negative brush and between the positive brush and the housing.


4. Measure the resistance between the brushes and the stator housing using a megohmmeter with a rated voltage of 500 V.
  • Nominal resistance - above 0.01 MOhm

Checking the overrunning clutch


1. Pull out the overrunning clutch and make sure it moves freely. Replace the overrunning clutch if faulty.

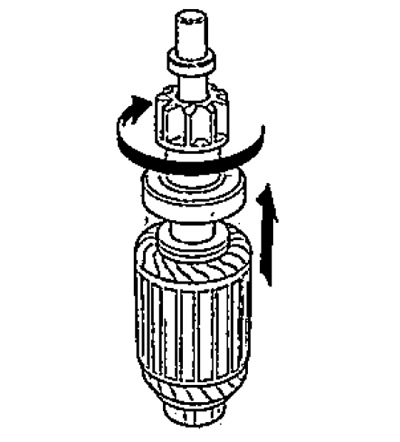
2. Lock the gear and turn the overrunning clutch in the direction shown, make sure it rotates freely. Also make sure the clutch locks in the opposite direction, if the clutch does not lock, replace it.
2. Lock the gear and turn the overrunning clutch…


3. Check the gear for wear and damage. If the gear is worn, replace the clutch assembly.

Check the condition of the torque converter ring gear. Replace it if the clutch gear teeth are damaged.

Checking the anchor


1. Check the anchor for damage and wear.
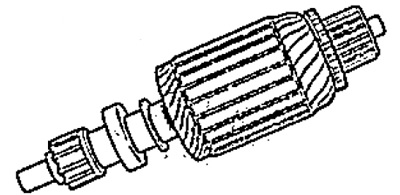
1. Check the anchor for damage and wear.


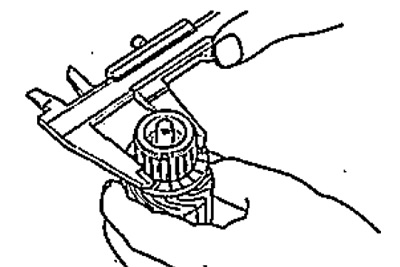
2. Measure the diameter of the collector. If it is less than the minimum, replace the anchor.


Collector diameter:
  • nominal - 27.9 - 28.0 mm
  • minimum - 27.0 mm

minimum - 27.0 mm


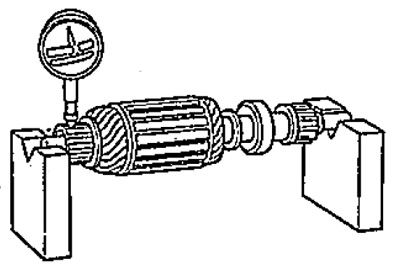
3. Install the anchor on the prisms and check the commutator runout. If the runout is greater than the maximum, replace the anchor.

Beating:
  • nominal - 0.05 mm
  • maximum - 0.40 mm

maximum - 0.40 mm


4. Check the surface of the commutator. If the surface is dirty or has traces of burning, re-sharpen it using sandpaper (#500, #600) or on a lathe.
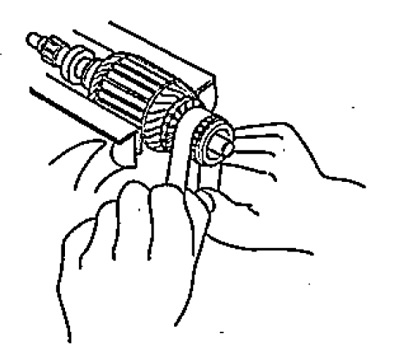
4. Check the surface of the commutator. If the…


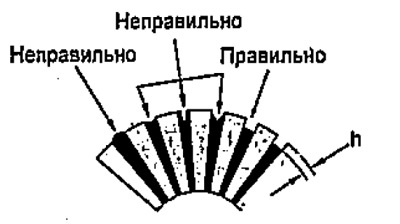
5. Check the amount of protrusion of the collector lamellas. Use a hacksaw to cut grooves if necessary. Make sure the grooves are deep enough, not too narrow or V-shaped.


Lamel protrusion:
  • nominal - 0.45-0.75 mm
  • maximum - 0.20 mm

maximum - 0.20 mm


6. Check for conductivity between the collector lamellas. Replace the anchor if there is no conductivity.
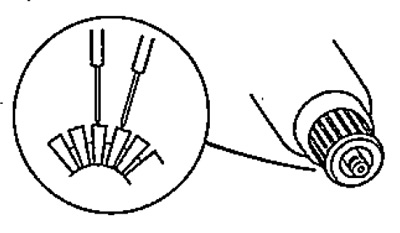
6. Check for conductivity between the collector…


7. Mount the anchor on the tester. Fix the hacksaw blade on the anchor core. If the blade is pulled to the center or vibration occurs when turning the core, the anchor is shorted. Replace it.
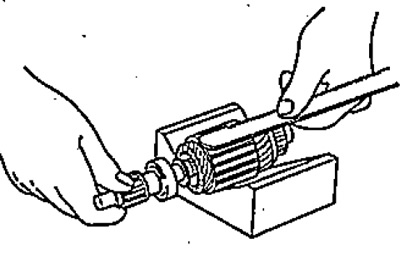
7. Mount the anchor on the tester. Fix the…


8. Make sure there is no conductivity between the commutator lamellas and the armature core, between the commutator lamellas and the armature shaft.
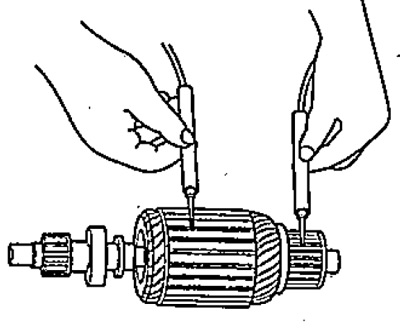


8. Make sure there is no conductivity between the…


Checking the brushes


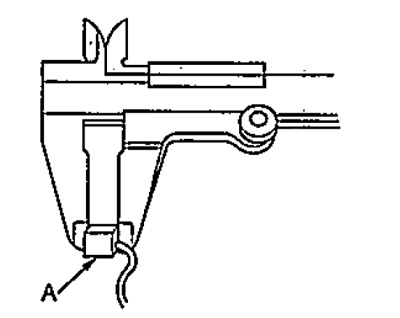
Check the length of brush "A". If the brush length is less than the minimum, replace it.

Brush length:
  • Nominal length - 9.7-10.0mm
  • Minimum length - 6.0 mm

Minimum length - 6.0 mm
This article is available at: russian, bulgarian, belarusian, ukrainian, serbian, croatian, romanian, polish, slovak, hungarian
This information has been verified: Varvara Vereshchagina
Share with friends:
◀ Previous
Fit 1: Engine electrical equipment
Next ▶

Starter — disassembly and assembly
Checking the starter
Charging system — precautions
Charging system — preliminary checks
Checking the charging system
Generator — removal and installation
See also other articles from Honda manuals:
Checking the starter signal Honda Accord 3 (1985-1989)
Checking the starter solenoid Honda Civic 5 and 6 (1991-2000)
Checking the starter Honda CR-V 1 (1995-2001, petrol)
Checking the starter brushes Honda HR-V 1 (1998-2006, petrol)
Checking the starter on a car Honda Avancier 1 (1999-2003, petrol)
Link in different formats to this article
Comments and feedback from visitors
No comments yet


How much will 33 + 20 ?


Fit 1 (2001-2008) 
  • General information
  • User manual
  • Maintenance
  • Power unit
  • Engine repair
  • Cooling and lubrication system
  • Injection and power system
  • Control system
  • Engine electrical equipment
  • Transmission
  • Clutch
  • Mechanical gearbox
  • Automatic gearbox
  • Variator (CVT)
  • Drive shafts and gearbox
  • Chassis and running gear
  • Car suspension
  • Steering
  • Brake system
  • Body and interior
  • Exterior (external elements)
  • Interior (internal elements)
  • Doors, locks and windows
  • Heater and air conditioner
  • Safety system
  • Electrical equipment
  • Equipment and devices
  • Wiring diagrams (since 06.2001)
  • Wiring diagrams (since 06.2004)
HondaBook.ru © 2018–2026 • Mobile version • Sitemap: EN BG BY UA RS HR RO PL SK HU • Feedback • Driver Information • Search system • Bookmark
Accord 3 (1985-1989) • Accord 6 (1997-2002) • Civic 3 and 4 (1983-1991) • Civic 5 and 6 (1991-2000) • Civic 6 (1995-2000) • Civic 7 (2000-2005) • Civic 8 (2005-2011) • Fit 1 (2001-2008) • CR-V 1 (1995-2001) • CR-V 2 (2002-2006) • HR-V 1 (1998-2006) • Avancier 1 (1999-2003) •
 
This website uses cookies to ensure proper functioning. By clicking "OK," you agree.