Contents: Reading fault codes using the DLC…⇊ Definition of fault code ⇊ Indication of fault codes ⇊ Reading fault codes with Honda PGM…⇊ Clearing fault codes from memory ⇊ Diagnostics of temporary faults ⇊
The diagnostic trouble code (DTC) can be identified by the flashing SRS indicator light by connecting the Honda PGM tester or DLC terminal box to the 16-pin diagnostic connector.
Reading fault codes using the DLC connector
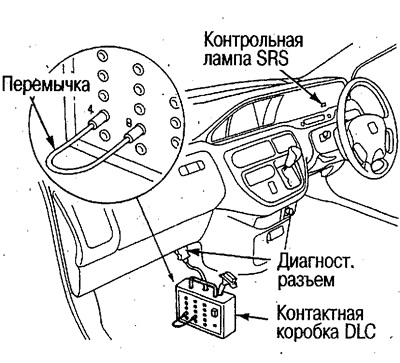
1. Turn the ignition key to the OFF position, wait 10 seconds and connect the box to the diagnostic connector.
2. Close contacts #4 and #9 of the box with a jumper. Press the switch.
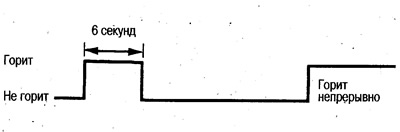
3. Turn the ignition switch to the ON (II) position. The SRS indicator lamp will light and start flashing after 6 seconds, displaying a malfunction code, see Fig. Write down the malfunction code.
4. Turn the ignition key to the OFF position, wait 10 seconds and disconnect the box from the diagnostic connector.
Definition of fault code
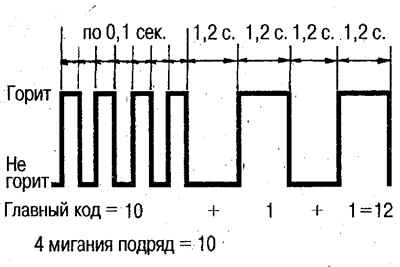
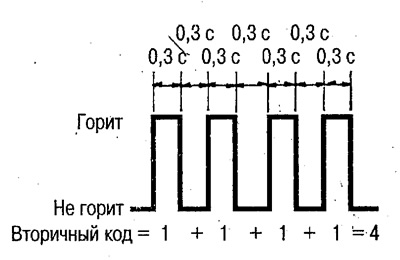
The first flash lasting approximately 6 seconds indicates the start of the code display. The main code is displayed 3 seconds after the first signal goes out. The secondary code is displayed 2 seconds after the main code display ends.
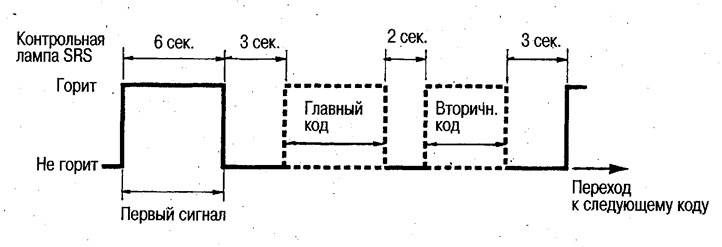
Examples:
1. Master code from 1 to 10
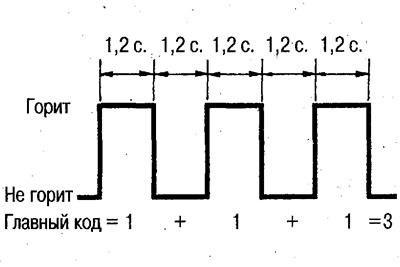
2. Main code from 11 to 15
3. Secondary code
Indication of fault codes
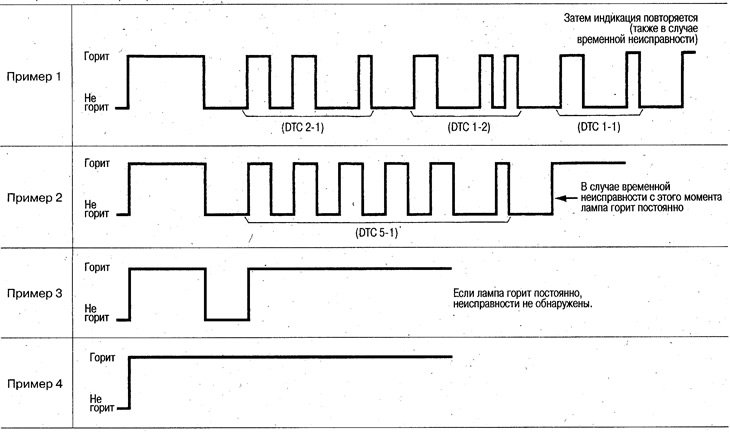
The system can generate three fault codes, see example 1.
If the fault is defined as permanent, the code indication is repeated, see example 1.
If the fault is defined as temporary, after the code is displayed the lamp lights up continuously, see example 2.
If a permanent and temporary fault is detected, the code indication is repeated, see example 1.
If no faults are detected, the lamp goes out and after some time begins to burn continuously, see example 3.
If there are no codes displayed and the lamp remains on continuously without going out at the start of the test, this indicates a fault in the SRS lamp circuit.
If the lamp does not light as described above, this may indicate a short circuit in the SCS circuit. Check the circuit before starting the test.
Reading fault codes with Honda PGM tester
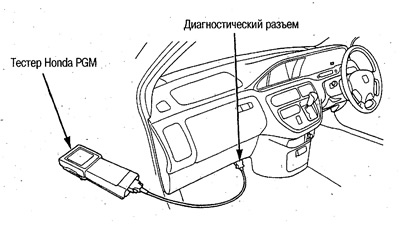
Connect the Honda PGM tester to the 16-pin diagnostic connector. If the tester does not display DTCs or if DTCs 9-1 and 9-2 are present, read the trouble codes using the SRS warning light.
Clearing fault codes from memory
1. Turn the ignition key to the OFF position.
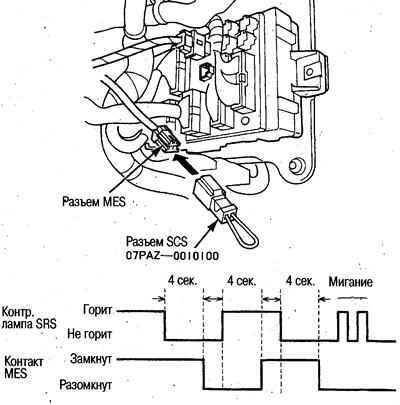
2. Connect the SCS connector (special tool) to the 2-pin MES connector to erase the memory.
3. Turn the ignition key to the ON (II) position.
4. The SRS indicator light will come on and go out after approximately 6 seconds. Within 4 seconds of this, disconnect the SCS connector.
5. The lamp will light a second time. Within 4 seconds, connect the SCS connector.
6. The lamp will go out. Within 4 seconds after this, disconnect the SCS connector.
7. The lamp will go out and then flash 2 times, indicating that the memory erasure is complete. If the lamp lights up after 2 flashes, this indicates that the erasure of fault codes has not been completed.
8. Turn the ignition key to the OFF position and wait 2-3 seconds.
9. Erasing codes from memory is complete.
After the memory erasure is complete, turn the ignition switch to the ON (II) position. The SRS indicator lamp should come on for approximately 6 seconds and then go out. Make sure that it does not come on for 30 seconds after this - this indicates that the fault codes have been erased from the memory and the system is normal.
Diagnostics of temporary faults
Temporary faults are faults that have been detected by the system but are not currently observed. Read the fault codes and perform the following procedure.
1. Read the fault codes, write them down and erase them from memory.
2. Turn the ignition key to the ON (II) position, start the engine and let it run at idle speed. The SRS indicator lamp will light and go out after 6 seconds.
3. Move the wiring and connectors from side to side, check while driving under different conditions (sharp acceleration and braking, turns). If there is a malfunction in the system, the SRS lamp will light and remain on continuously.
4. If the lamp lights up:
- Write down the conditions under which it lights up,
- Read the fault codes and erase them from memory,
- Determine the fault based on the fault codes and the conditions under which the lamp lights up. If this does not work right away, repeat 2-4 times.
5. If the lamp does not light, the system is OK. However, if the same temporary fault is detected repeatedly, it is recommended to replace the "suspect" component.