HondaBook.ru
Auto companies Volkswagen Auto companies Ford Auto companies Lada Auto companies Skoda Auto companies BMW Auto companies Mazda Auto companies Peugeot
English Русский
Български
Беларускі
Український
Српски
Hrvatski
Română
Polski
Slovenský
Magyar
Bookmark Contacts Sitemap   


Accord Civic Fit / Jazz CR-V HR-V Others Articles
Avancier 1 (1999-2003, petrol)

Removal the fuel tank (Honda Avancier 1)

  • Main
  • Honda
  • Avancier 1 (1999-2003, petrol)
  • Power unit
  • Power and exhaust system
  • Removal the fuel tank
0
Attention. Store drained fuel in a safe place. Observe fire safety regulations.


Removal


1. Disconnect the (-) battery cable.

2. Relieve the fuel pressure (see above).

3. Relieve the pressure in the fuel tank by opening the fuel filler cap.

4.

2WD models:

Open the trunk lid, remove the inspection hole cover and disconnect the 5-pin fuel pump connector. (On models with navigation, remove the TV receiver).
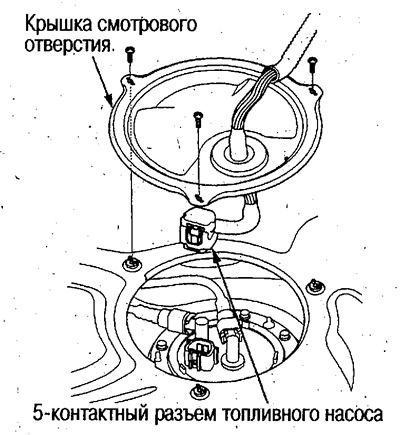
Open the trunk lid, remove the inspection hole…


4WD models:

Open the trunk lid, remove the inspection hole covers and disconnect the 4-pin fuel pump connector and the 2-pin intermediate fuel pump connector.
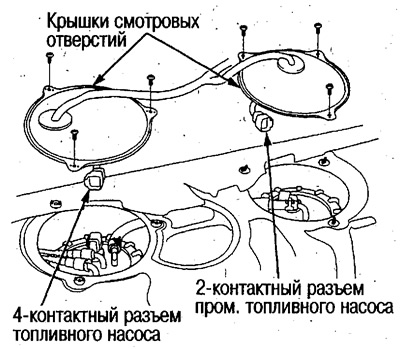
Open the trunk lid, remove the inspection hole…


5. Remove the fuel pump and drain the fuel using a hand pump.

6. Raise the vehicle, remove the rear wheels and release the parking brake.

7. 2WD models:


Remove the resonator installed behind the catalytic converter, (see chapter Mechanical part of the engine).

4WD models:

Remove the resonator installed behind the catalytic converter, (see chapter Mechanical part of the engine), remove the propeller shaft B from the rear differential (see chapter Drive shafts and differential).

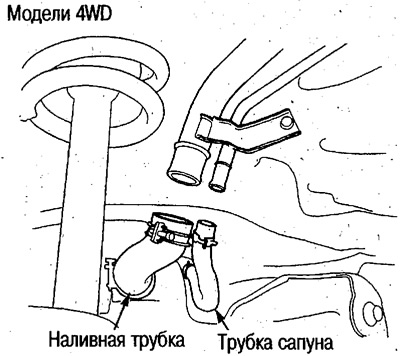
8. Disconnect the filler tube and breather tube.
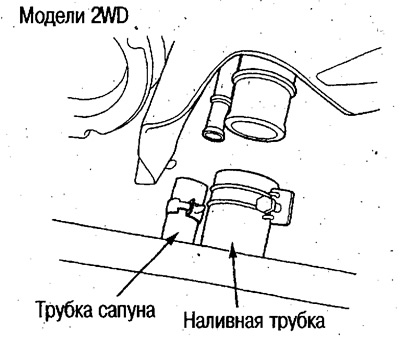
8. Disconnect the filler tube and breather tube.

9. 2WD models:

Disconnect the quick-release hoses (see above) and the fuel vapor bleed hose:
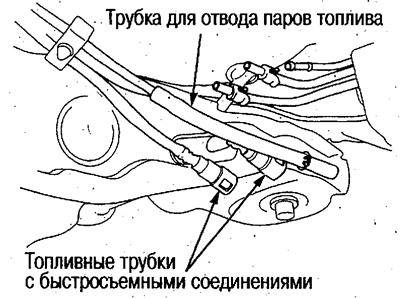
Disconnect the quick-release hoses (see above)…


4WD models:


Disconnect the quick-connect pipe (see above), fuel filter (see above) and fuel vapor bleed pipe.
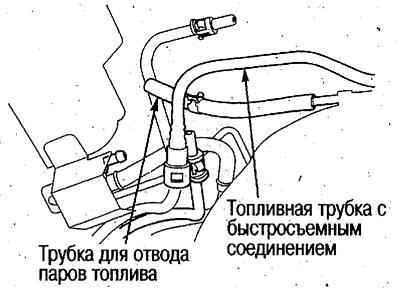
Disconnect the quick-connect pipe (see above),…


10. Disconnect the 2-pin ABS wheel sensor connector.
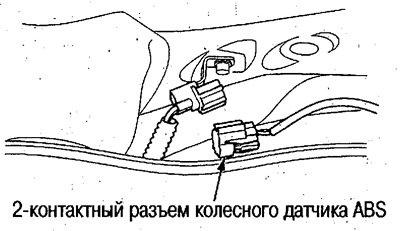
10. Disconnect the 2-pin ABS wheel sensor…


11.

2WD models:

Remove the rear stabilizer bar, insulator and parking brake cable brackets.
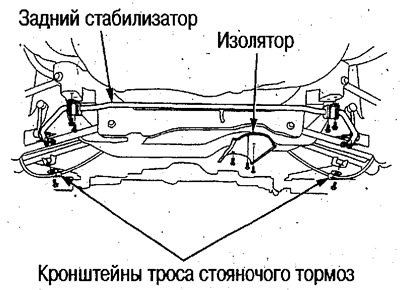
Remove the rear stabilizer bar, insulator and…


4WD models:

Remove the rear stabilizer bar and parking brake cable brackets.
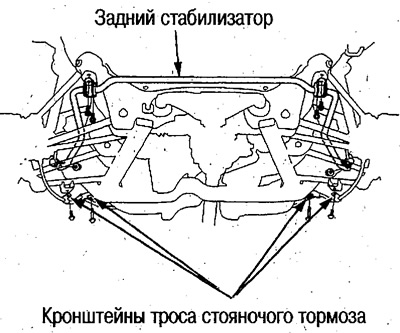


Remove the rear stabilizer bar and parking brake…


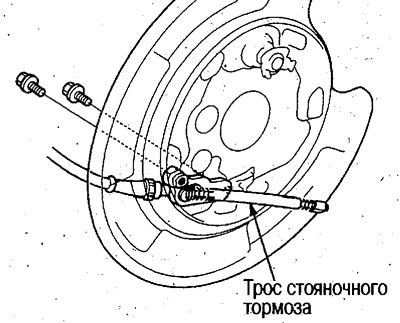
12. Remove the parking brake cable.

12. Remove the parking brake cable.


13. Remove the brake hose bracket mounting bolt. Remove the brake caliper bracket mounting bolts and remove the brake caliper.
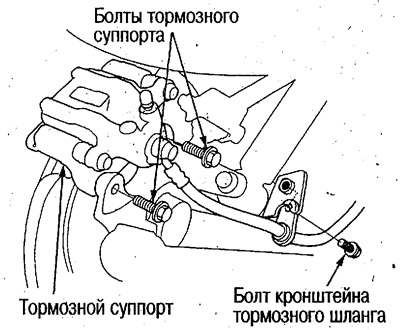
13. Remove the brake hose bracket mounting bolt.…


14. Pass the brake caliper between the rear suspension rods and secure it to the rear suspension spring.
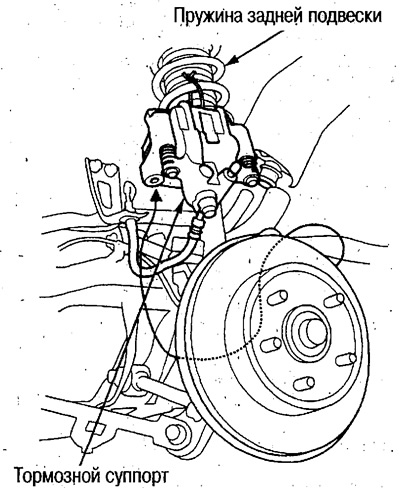
14. Pass the brake caliper between the rear…


15. Unscrew the lower bolt of the rear shock absorber.
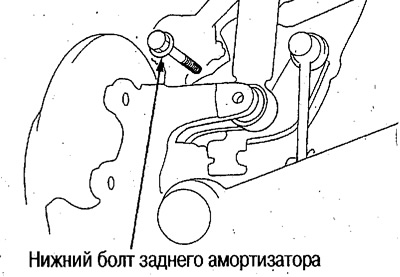


15. Unscrew the lower bolt of the rear shock…


16. Support the rear suspension with a jack, unscrew the mounting bolts, strut bolts and slowly lower the rear suspension.
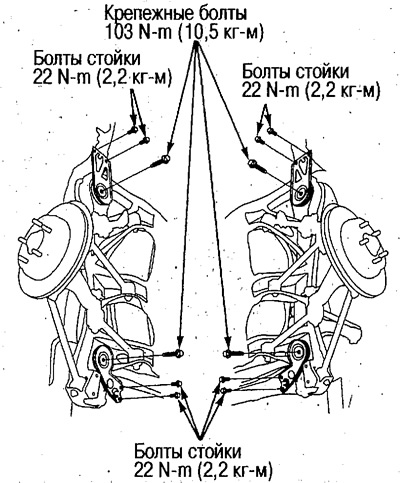
16. Support the rear suspension with a jack,…


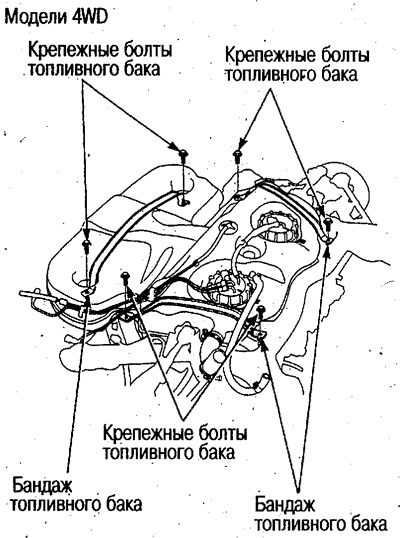
17. Loosen the mounting bolts and remove the fuel tank bandage.
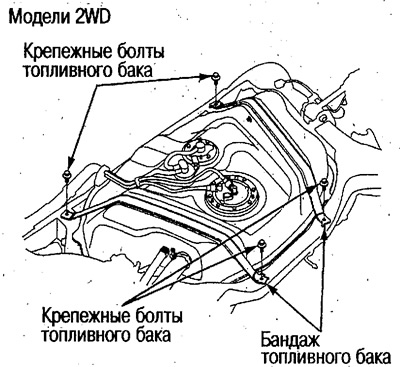
17. Loosen the mounting bolts and remove the fuel…


Information obtained from this source: HondaBook
This article is available at: russian, bulgarian, belarusian, ukrainian, serbian, croatian, romanian, polish, slovak, hungarian
This information has been verified: Emil Safonov
Share with friends:
◀ Previous
Avancier 1: Power and exhaust system
Next ▶

Checking the PGM-Fi Main Relay
Checking the Low Fuel Warning Light
Checking the fuel level sensor/sender unit
Replacing the injection pump
Checking the injection pump (4WD models)
Installing a fuel tank
Intake Air Management System
Checking the throttle cable
Replacing and adjusting the throttle cable
Checking the throttle body
See also other articles from Honda manuals:
Fuel Tank — Accord 1984-89, Prelude 1984-85 Honda Accord 3 (1985-1989)
Fuel Tank Cleaning and Repair — General Information Honda Civic 3 and 4 (1983-1991)
Fuel tank Honda Fit 1 (2001-2008)
Fuel tank — removal and installation Honda CR-V 1 (1995-2001, petrol)
Fuel tank — replacement Honda HR-V 1 (1998-2006, petrol)
Link in different formats to this article
Comments and feedback from visitors
No comments yet


How much will 27 + 39 ?


Avancier 1 (1999-2003, petrol) 
  • General information
  • Controls and instruments
  • User manual
  • Power unit
  • Engine maintenance
  • Engine repair
  • Cooling system
  • Engine management
  • Power and exhaust system
  • Transmission
  • Automatic gearbox
  • Drive shafts and differential
  • Chassis and running gear
  • Steering
  • Car suspension
  • Brake system
  • Body and interior
  • Doors, locks and windows
  • Interior (internal elements)
  • Exterior (external elements)
  • Air conditioner
  • Electrical equipment
  • Power devices
  • Equipment and devices
  • Headlights and lighting
  • Electrical circuits
HondaBook.ru © 2018–2026 • Mobile version • Sitemap: EN BG BY UA RS HR RO PL SK HU • Feedback • Driver Information • Search system • Bookmark
Accord 3 (1985-1989) • Accord 6 (1997-2002) • Civic 3 and 4 (1983-1991) • Civic 5 and 6 (1991-2000) • Civic 6 (1995-2000) • Civic 7 (2000-2005) • Civic 8 (2005-2011) • Fit 1 (2001-2008) • CR-V 1 (1995-2001) • CR-V 2 (2002-2006) • HR-V 1 (1998-2006) • Avancier 1 (1999-2003) •
 
This website uses cookies to ensure proper functioning. By clicking "OK," you agree.