
HondaBook.ru
Auto companies Volkswagen Auto companies Ford Auto companies Lada Auto companies Skoda Auto companies BMW Auto companies Mazda Auto companies Peugeot
English Русский
Български
Беларускі
Український
Српски
Hrvatski
Română
Polski
Slovenský
Magyar
Bookmark Contacts Sitemap   


Accord Civic Fit / Jazz CR-V HR-V Others Articles
HR-V 1 (1998-2006, petrol)

Longitudinal tilt of the pivot axis — check (Honda HR-V 1)

  • Main
  • Honda HR-V
  • 1 (1998-2006, petrol)
  • Chassis and running gear
  • Car suspension
  • Longitudinal tilt of the pivot axis — check
0
1. Remove the wheel cap.

2. Raise the car and place the steering angle measuring stands under the front wheels, and place boards of the same thickness as the stands under the rear wheels, then lower the car.

Note: Make sure the vehicle is positioned parallel to the ground with the wheels on the steering angle measuring stands and boards.


3. Install the wheel alignment tool and the front camber and caster angle measuring device onto the wheel hub and apply the front brakes.

4. Turn the front wheel 20° outward, then turn the adjusting screw until the bubble in the camber and caster gauge is at 0°.

5. Turn the front wheel 20° inward and read the longitudinal tilt angle of the steering axis by bringing the bubble to the center of the device.

Angle of longitudinal tilt of the pivot axis: 2°15'±1°

6. If the angle is different from the specified one, check if the suspension components are bent or damaged.
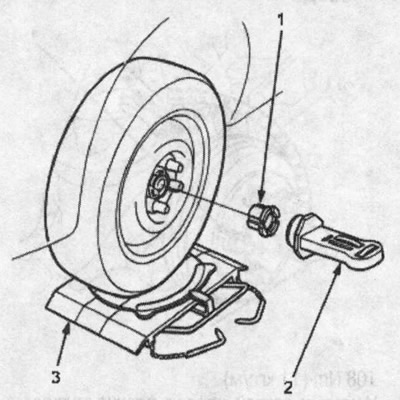
1. Wheel alignment tool, 07MGK-0010100

1. Wheel alignment tool, 07MGK-0010100
2. device for measuring the camber angle of the front wheels and the longitudinal tilt angle of the steering axis
3. stand for measuring the angle of rotation
This article is available at: russian, bulgarian, belarusian, ukrainian, serbian, croatian, romanian, polish, slovak, hungarian
This information has been verified: Emil Safonov
Share with friends:
◀ Previous
HR-V 1: Car suspension
Next ▶

Checking wheel alignment
Wheel alignment angles
Location of suspension components
Checking and adjusting the alignment
Checking the wheel runout
Replacing the front suspension arms
Replacing the steering knuckle and hub
Replacing the ball joint boot
See also other articles from Honda manuals:
Oxygen sensor — check Honda Accord 3 (1985-1989)
Additional resistance of injectors (multipoint injection only) —… Honda Civic 3 and 4 (1983-1991)
Radiator — check Honda Fit 1 (2001-2008)
Checking the longitudinal tilt of the front wheel steering axis Honda CR-V 2 (2002-2006, petrol)
Torque Converter Lockup Solenoid Valve and Shift Solenoid Valve Assy… Honda Avancier 1 (1999-2003, petrol)
Link in different formats to this article
Comments and feedback from visitors
No comments yet


How much will 38 + 20 ?


HR-V 1 (1998-2006, petrol) 
  • General information
  • User manual
  • Maintenance
  • Power unit
  • Engine repair
  • Lubrication system
  • Cooling system
  • Fuel injection and control
  • Power and exhaust system
  • Engine electrical equipment
  • Transmission
  • Clutch
  • Mechanical gearbox
  • Automatic gearbox
  • Rear differential
  • Drive shafts and cardan
  • Chassis and running gear
  • Steering
  • Car suspension
  • Brake system
  • Body and interior
  • Exterior (external elements)
  • Interior (internal elements)
  • Doors, locks and windows
  • Electrical equipment
  • Equipment and devices
  • Lighting system
  • Electrical circuits
HondaBook.ru © 2018–2026 • Mobile version • Sitemap: EN BG BY UA RS HR RO PL SK HU • Feedback • Driver Information • Search system • Bookmark
Accord 3 (1985-1989) • Accord 6 (1997-2002) • Civic 3 and 4 (1983-1991) • Civic 5 and 6 (1991-2000) • Civic 6 (1995-2000) • Civic 7 (2000-2005) • Civic 8 (2005-2011) • Fit 1 (2001-2008) • CR-V 1 (1995-2001) • CR-V 2 (2002-2006) • HR-V 1 (1998-2006) • Avancier 1 (1999-2003) •
 
This website uses cookies to ensure proper functioning. By clicking "OK," you agree.